Celestron 90LCM Computerized Telescope LCM Series Manual (English) - Page 14
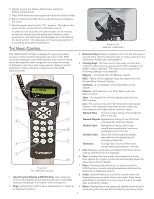
Rate Button
 |
View all Celestron 90LCM Computerized Telescope manuals
Add to My Manuals
Save this manual to your list of manuals |
Page 14 highlights
Direction Buttons The LCM has four direction buttons in the center of the hand control which controls the telescope motion in altitude (up and down) and azimuth (left and right). The telescope can be controlled at nine different speed rates. Tracking Rate - In addition to being able to move the telescope with the hand control buttons, the LCM will continually track a celestial object as it moves across the night sky. The tracking rate can be changed depending on what type of object is being observed: Nine Available Slew Speeds 1 = 2x 4 = 16x 7 = 1º / sec 2 = 4x 5 = 32x 8 = 2º / sec 3 = 8x 6 = 64x 9 = 3º / sec Sidereal: This rate compensates for the rotation of the earth by moving the telescope at the same rate as the rotation of the earth, but in the opposite direction. When tracking in Alt-Az mode, the telescope must make corrections in both altitude and azimuth. Lunar: Used for tracking the Moon when observing the lunar landscape. Rate Button Solar: Used for tracking the Sun when solar observing using a proper solar filter. Pressing the RATE key (11) allows you to instantly change the speed rate of the motors from high speed slew rate to precise guiding rate or anywhere in between. Each rate corresponds to a number on the hand controller key pad. The number 9 is the fastest rate (approximately 3º per second, depending on power source) and is used for slewing between objects and locating alignment stars. The number 1 on the hand control is the slowest rate (2x sidereal) and can be used for accurate centering of objects in the eyepiece. To change the speed rate of the motors: • Press the RATE key on the hand control. The LCD will display the current speed rate. • Press the number on the hand control that corresponds to the desired speed. The hand control has a "double button" feature that allows you to instantly speed up the motors without having to choose a speed rate. To use this feature, simply press the arrow button that corresponds to the direction that you want to move the telescope. While holding that button down, press the opposite directional button. This will increase the speed to the maximum slew rate. Set Up Procedures The LCM contains many user defined setup functions designed to give the user control over the telescope's many advanced features. All of the set up and utility features can be accessed by pressing the MENU key and scrolling through the options: Tracking Mode - Once the LCM is aligned, the tracking motors will automatically turn on and begin tracking the sky. However, the tracking can be turned off for terrestrial use: Alt-Az: This is the default tracking rate and is used when the telescope has been properly aligned. EQ North: Used to track the sky when the telescope is polar aligned using an equatorial wedge in the Northern Hemisphere. EQ South: Used to track the sky when the telescope is polar aligned using an equatorial wedge in the Southern Hemisphere. Off: When using the telescope for terrestrial (land) observation the tracking can be turned off so that the telescope never moves. Note: EQ North and EQ South tracking modes are only needed with telescopes that can be polar aligned. The LCM series are exclusively Alt-Az mounted telescopes and do not require equatorial tracking. View Time-Site - View Time-Site will display the last saved time and longitude/latitude entered in the hand control. User Defined Objects - The LCM can store up to 50 different user defined objects in its memory. The objects can be daytime land objects or an interesting celestial object that you discover that is not included in the regular database. There are several ways to save an object to memory depending on what type of object it is: Save Sky Object: The LCM stores celestial objects to its database by saving its right ascension and declination in the sky. This way the same object can be found each time the telescope is aligned. Once a desired object is centered in the eyepiece, simply scroll to the "Save Sky Obj" command and press ENTER. The display will ask you to enter a number between 1-25 to identify the object. Press ENTER again to save this object to the database. Save Database (Db) Object: This feature allows you to create your own custom tour of database objects by allowing you to record the current position of the telescope and save the name of the object by selecting it from any one of the database catalogs. These objects then can be accessed by selecting GoTo Sky Object. Save Land Object: The LCM can also be used as a spotting scope on terrestrial objects. Fixed land objects can be stored by saving their altitude and azimuth relative to the location of the telescope at the time of observing. Since these objects are relative to the location of the telescope, they are only valid for that exact location. To save land objects, once again center the desired object in the eyepiece. Scroll down to the "Save Land Obj" command and press ENTER. The display will ask you to enter a number between 1-25 to identify the object. Press ENTER again to save this object to the database. Enter R.A. - Dec: You can also store a specific set of coordinates for an object just by entering the R.A. and declination for that object. Scroll to the "Enter RA-DEC" command and press ENTER. The display will then ask you to enter first the R.A. and then the declination of the desired object. GoTo Object: To go to any of the user defined objects stored in the database, scroll down to either GoTo Sky Obj or Goto Land Obj and enter the number of the object you wish to select and press ENTER. The hand control will automatically retrieve and display the coordinates before slewing to the object. 12
-
 1
1 -
2
-
3
-
4
-
5
-
6
-
7
-
8
-
 9
9 -
 10
10 -
 11
11 -
 12
12 -
 13
13 -
 14
14 -
 15
15 -
 16
16 -
 17
17 -
 18
18 -
 19
19 -
20
-
21
-
22
-
23
-
24
-
25
-
26
-
27
-
28
-
29
-
30
-
31
-
32
-
33
-
34
-
35
 |
 |
