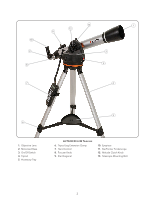
Celestron 90LCM Computerized Telescope LCM Series Manual (English) - Page 8
Focusing, The StarPointer Finderscope, Install the Battery, Aligning the StarPointer, Attaching
 |
View all Celestron 90LCM Computerized Telescope manuals
Add to My Manuals
Save this manual to your list of manuals |
Page 8 highlights
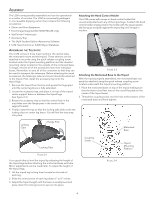
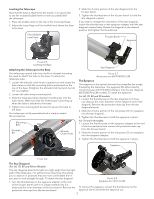
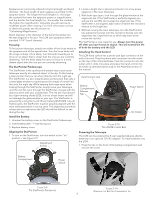
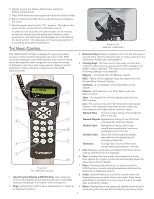
Eyepieces are commonly referred to by focal length and barrel diameter. The focal length of each eyepiece is printed on the eyepiece barrel. The longer the focal length (i.e., the larger the number) the lower the eyepiece power or magnification; and the shorter the focal length (i.e., the smaller the number) the higher the magnification. Generally, you will use low-tomoderate power when viewing. For more information on how to determine power, see the section on "Calculating Magnification." Barrel diameter is the diameter of the barrel that slides into the star diagonal or focuser. The LCM uses eyepieces with a standard 1-1/4" barrel diameter. Focusing To focus your telescope, simply turn either of the focus knobs at the eyepiece end of the optical tube. Turn the focus knob until the image is sharp. Once sharp, turn the knob towards you to focus on an object that is closer than the one you are currently observing. Turn the knob away from you to focus on a more distant object than the one you are currently observing. The StarPointer Finderscope The StarPointer is the quickest and easiest way to point your telescope exactly at a desired object in the sky. It's like having a laser pointer that you can shine directly onto the night sky. The StarPointer is a zero magnification pointing tool that uses a coated glass window to superimpose the image of a small red dot onto the night sky. While keeping both eyes open when looking through the StarPointer, simply move your telescope until the red dot, seen through the StarPointer, merges with the object as seen with your unaided eye. The red dot is produced by a light-emitting diode (LED); it is not a laser beam and will not damage the glass window or your eye. The StarPointer is powered by a long life 3-volt lithium battery (#CR1620). Like all finderscopes, the StarPointer must be properly aligned with the main telescope before it can be used. The alignment procedure is best done at night since the LED dot will be difficult to see during the day. Install the Battery 1. Unscrew the battery cover on the StarPointer finderscope. 2. Insert battery with "+"side facing out. 3. Replace battery cover. Aligning the StarPointer 1. To turn on the StarPointer, turn the switch to the "on" position - see Figure 2-9 Adjustment Screws 2. Locate a bright star or planet and center it in a low power eyepiece in the main telescope. 3. With both eyes open, look through the glass window at the alignment star. If the StarPointer is perfectly aligned, you will see the red LED dot overlap the alignment star. If the StarPointer is not aligned, take notice of where the red dot is relative to the bright star. 4. Without moving the main telescope, turn the StarPointer's two adjustment screws until the red dot is directly over the alignment star. Experiment as to which way each screw moves the red dot. The StarPointer is now ready for use. Always turn the power off after you have found an object. This will extend the life of both the battery and the LED. Attaching the Hand Control The LCM hand control has a phone jack type connector at the end of its cord. Plug the phone jack connector into the outlet on the top of the motorized base. Push the connector into the outlet until it clicks into place and place the hand control into its holder as described previously in the Assembly section of the manual. Hand Control Jack Battery Compartment Release Tab Power Switch 12v Outlet Figure 2-10 The LCM Motorized Base Powering the Telescope The LCM can be powered by 8 user supplied AA size alkaline batteries or an optional 12V AC adapter. To install batteries into the LCM: 1. Press the tab on the front of the battery compartment and remove the cover. Battery Compartment Power Switch Figure 2-9 The StarPointer Finderscope Figure 2-11a Removing the Battery Compartment Lid 6
-
 1
1 -
2
-
 3
3 -
 4
4 -
 5
5 -
 6
6 -
 7
7 -
 8
8 -
 9
9 -
 10
10 -
 11
11 -
 12
12 -
 13
13 -
14
-
15
-
16
-
17
-
18
-
19
-
20
-
21
-
22
-
23
-
24
-
25
-
26
-
27
-
28
-
29
-
30
-
31
-
32
-
33
-
34
-
35
 |
 |
