Celestron CGEM 1100 HD Computerized Telescope EdgeHD Optics Manual - Page 12
Metering, Reducing Vibration
 |
View all Celestron CGEM 1100 HD Computerized Telescope manuals
Add to My Manuals
Save this manual to your list of manuals |
Page 12 highlights
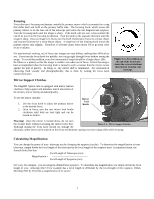
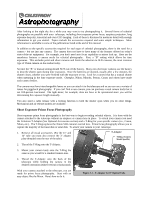
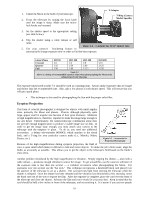
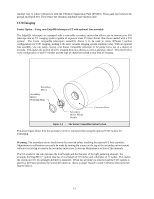
This device allows you to photograph and guide through the telescope simultaneously. Celestron offers a very special and advanced off-axis guider, called the Radial Guider (#94176). In addition, you will need a T-Ring to attach your camera to the Radial Guider. Other equipment needs include a guiding eyepiece. Unlike other forms of astrophotography which allows for fairly loose guiding, prime focus requires meticulous guiding for long periods. To accomplish this you need a guiding ocular with an illuminated reticle to monitor your guide star. For this purpose, Celestron offers the Micro Guide Eyepiece (#94171) Here is a brief summary of the technique. 1. Polar align the telescope. For more information on polar aligning, see the Polar Alignment section earlier in the manual. 2. Remove all visual accessories. 3. Thread the Radial Guider onto your telescope. 4. Thread the T-Ring onto the Radial Guider. 5. Mount your camera body onto the T-Ring the same as you would any other lens. 6. Set the shutter speed to the "B" setting. 7. Focus the telescope on a star. 8. Center your subject in the field of your camera. 9. Find a suitable guide star in the telescope field. This can be the most time consuming process. 10. Open the shutter using a cable release. 11. Monitor your guide star for the duration of the exposure using the buttons on the hand controller to make the needed corrections. 12. Close the camera's shutter. When getting started, use a fast ISO setting to record as much detail in the shortest possible time. Metering The EdgeHD telescopes have a fixed aperture and, as a result, fixed f/ratios. To properly expose your subjects photographically, you need to set your shutter speed accordingly. Most 35mm SLR cameras offer through-thelens metering which lets you know if your picture is under or overexposed. Adjustments for proper exposures are made by changing the shutter speed. Consult your camera manual for specific information on metering and changing shutter speeds. Reducing Vibration Releasing the shutter manually can cause vibrations, producing blurred photos. To reduce vibration when tripping the shutter, use a cable release. A cable release keeps your hands clear of the camera and lens, thus eliminating the possibility of introducing vibration. Mechanical shutter releases can be used, though air-type releases are best. Blurry pictures can also result from shutter speeds that are too slow. To prevent this, use films that produce shutter speeds greater than 1/250 of a second when hand-holding the lens. If the lens is mounted on a tripod, the exposure length is virtually unlimited. 12
-
 1
1 -
2
-
3
-
4
-
5
-
6
-
 7
7 -
 8
8 -
 9
9 -
 10
10 -
 11
11 -
 12
12 -
 13
13 -
 14
14 -
 15
15 -
 16
16 -
 17
17 -
18
-
19
-
20
-
21
 |
 |