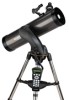
Celestron NexStar 130SLT Computerized Telescope NexStar SLT Series Manual - Page 17
Tips for Using Solar System Align
 |
View all Celestron NexStar 130SLT Computerized Telescope manuals
Add to My Manuals
Save this manual to your list of manuals |
Page 17 highlights
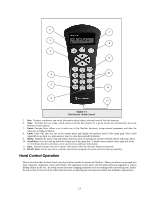
Once the second star alignment is completed properly, the display will read Align Successful, and you should hear the tracking motors turn-on and begin to track. One-Star Align One-Star Align requires you to input all the same information as you would for the Two-Star Align procedure. However, instead of slewing to two alignment stars for centering and alignment, the NexStar uses only one star to model the sky based on the information given. This will allow you to roughly slew to the coordinates of bright objects like the moon and planets and gives the NexStar the information needed to track objects in altazimuth in any part of the sky. One-Star Align is not meant to be used to accurately locate small or faint deep-sky objects or to track objects accurately for photography. To use One-Star Align: 1. Select One-Star Align from the alignment options. 2. Press ENTER to accept the time/site information displayed on the display, or press UNDO to enter new information. 3. The SELECT STAR 1 message will appear in the top row of the display. Use the Up and Down scroll keys (10) to select the star you wish to use for the first alignment star. Press ENTER. 4. NexStar then asks you to center in the eyepiece the alignment star you selected. Use the direction arrow buttons to slew the telescope to the alignment star and carefully center the star in the finderscope. Press ENTER when centered. 5. Then, center the star in the eyepiece and press ALIGN. 6. Once in position, the NexStar will model the sky based on this information and display Align Successful. Note: Once a One-Star Alignment has been done, you can use the Re-alignment feature (later in this section ) to improve your telescope's pointing accuracy. Solar System Align Solar System Align is designed to provide excellent tracking and GoTo performance by using solar system objects (Sun, Moon and planets) to align the telescope with the sky. Solar System Align is a great way to align your telescope for daytime viewing as well as a quick way to align the telescope for night time observing. Never look directly at the sun with the naked eye or with a telescope (unless you have the proper solar filter). Permanent and irreversible eye damage may result. 1. Select Solar System Align from the alignment options. 2. Press ENTER to accept the time/site information displayed on the display, or press UNDO to enter new information. 3. The SELECT OBJECT message will appear in the top row of the display. Use the Up and Down scroll keys (10) to select the daytime object (planet, moon or sun) you wish to align. Press ENTER. 4. NexStar then asks you to center in the eyepiece the alignment object you selected. Use the direction arrow buttons to slew the telescope to the alignment object and carefully center it in the finderscope. Press ENTER when centered. 5. Then, center the object in the eyepiece and press ALIGN. Once in position, the NexStar will model the sky based on this information and display Align Successful. Tips for Using Solar System Align • For safety purposes, the Sun will not be displayed in any of the hand control's customer object lists unless it is enabled from the Utilities Menu. To allow the Sun to be displayed on the hand control, do the following: 1. Press the UNDO button until the display reads "NexStar SLT" 2. Press the MENU button and use the Up and Down keys to select the Utilities menu. Press ENTER. 3. Use the UP and Down keys to select Sun Menu and press ENTER. 4. Press ENTER again to allow the Sun to appear on the hand control display. The Sun can be removed from the display by using the same procedure as above. To improve the telescope pointing accuracy, you can use the Re-Align feature as described below. 17
-
 1
1 -
2
-
3
-
4
-
5
-
6
-
7
-
8
-
9
-
10
-
11
-
 12
12 -
 13
13 -
 14
14 -
 15
15 -
 16
16 -
 17
17 -
 18
18 -
 19
19 -
 20
20 -
 21
21 -
 22
22 -
23
-
24
-
25
-
26
-
27
-
28
-
29
-
30
-
31
-
32
-
33
-
34
-
35
-
36
-
37
-
38
-
39
-
40
-
41
-
42
-
43
-
44
-
45
-
46
-
47
-
48
 |
 |
