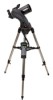
Celestron NexStar 90SLT Computerized Telescope NexStar SLT Series MAKs Manual - Page 31
Tips for Collimating
 |
View all Celestron NexStar 90SLT Computerized Telescope manuals
Add to My Manuals
Save this manual to your list of manuals |
Page 31 highlights
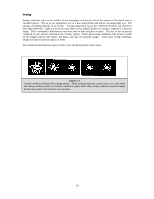
To collimate your telescope, remove the diagonal and eyepiece and look into rear opening of the tube (also remove the dust cover from the front of the tube). This can be done indoors, with the telescope pointed at a white wall in a well-lit room. Try to keep your eye centered with respect to the rear opening of the tube as best as possible. Using a Collimating Eyepiece will aid greatly in keeping your eye centered and is strongly recommend (see Accessories section). Figure 6-2 - Out of collimation (alignment) optics as seen through the rear of the telescope. Figure 6-3 - Collimated (aligned) optics as seen through the rear of the telescope. Once you are ready to collimate, look into rear opening of the tube. If your telescope is out of collimation, it will resemble Figure 6-2. A properly collimated scope will resemble Figure 6-3. The direction of the misalignment in your telescope may differ from Figure 6-2 but the diagram will give you the general idea of how things will look. Note there are six alignment screws on the back of the optical tube, three large and three small. You will need 3mm and 2mm Allen wrenches to turn these screws. These alignment screws push and pull the mirror cell in order to tilt it. When you loosen or tighten one of these screws, the other five screws must be adjusted as well to keep the proper amount of pressure on the back of the mirror cell. Look into the rear opening of the tube and locate the black crescent that shows the telescope is out of alignment (Figure 6-2). Note which way the front of the telescope would need to move in order to "fill" that black crescent and resemble Figure 6-3 Then look at the back end of the telescope and locate the alignment screw that is in the direction that the front of the telescope needs to move. For example, if the view in your telescope resembled Figure 6-2 then you would want to move the front opening of the telescope scope to the right. The alignment screw you would start with would be the screw on the right as shown in Figure 6-4. "Push" Collimation Screws "Pull" Collimation Screws Repeat the above steps until the front opening is centered in the direction you wanted it to go and the view through the rear cell looks like Figure 63. You may need to repeat this process with the other screws in order to align it in other directions. Figure 6-4 Tips for Collimating -If you feel any resistance while turning a screw, stop immediately and loosen the two screws on either side of the one you are turning. -Only make small adjustments to each screw; turning them only ¼ turn at a time. -If your telescope appears collimated after star testing, it should not need adjustment again unless it is roughly handled. 31
-
 1
1 -
2
-
3
-
4
-
5
-
6
-
7
-
8
-
9
-
10
-
11
-
12
-
13
-
14
-
15
-
16
-
17
-
18
-
19
-
20
-
21
-
22
-
23
-
24
-
25
-
 26
26 -
 27
27 -
 28
28 -
 29
29 -
 30
30 -
 31
31 -
 32
32 -
 33
33 -
 34
34 -
 35
35 -
 36
36 -
37
-
38
-
39
-
40
-
41
-
42
-
43
-
44
-
45
-
46
-
47
 |
 |
