Chamberlain C870 C870 Owner s Manual - English - Page 9
STEP 5 Tighten the chain, STEP 6 Install the sprocket cover, Installation
 |
View all Chamberlain C870 manuals
Add to My Manuals
Save this manual to your list of manuals |
Page 9 highlights
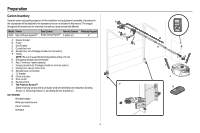
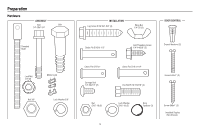
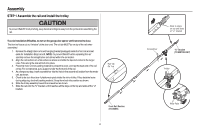
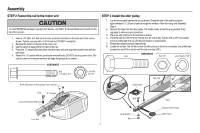
Assembly STEP 5 Tighten the chain 1. Spin the inner nut and lock washer down the trolley threaded shaft, away from the trolley. 2. To tighten the chain, turn the outer nut in the direction shown. 3. When the chain is approximately 1/4" (6 mm) above the base of the rail at it's midpoint, retighten the inner nut to secure the adjustment. Sprocket noise can result if the chain is too loose. When installation is complete, you may notice some chain droop with the door closed. This is normal. If the chain returns to the position shown when the door is open, do not re-adjust the chain. NOTE: During future maintenance, ALWAYS pull the emergency release handle to disconnect the trolley before adjusting the chain. To Tighten Outer Nut Trolley Outer Lock Threaded Nut Washer Shaft STEP 6 Install the sprocket cover To avoid possible SERIOUS INJURY to finger from moving garage door opener: l ALWAYS keep hand clear of sprocket while operating opener. l Securely attach sprocket cover BEFORE operating. 1. Position the sprocket cover over the sprocket as shown and fasten to the mounting plate with 8x3/8" hex screws provided. You have now finished assembling your garage door opener. Please read the following warnings before proceeding to the installation section. HARDWARE Hex Screw #8x3/8" (Packed with the sprocket cover) Inner Nut To Tighten Inner Nut Hex Screw Sprocket Cover Chain Base of Rail 1/4" (6 mm) Mid length of Rail 9
-
 1
1 -
2
-
3
-
 4
4 -
 5
5 -
 6
6 -
 7
7 -
 8
8 -
 9
9 -
 10
10 -
 11
11 -
 12
12 -
 13
13 -
 14
14 -
15
-
16
-
17
-
18
-
19
-
20
-
21
-
22
-
23
-
24
-
25
-
26
-
27
-
28
-
29
-
30
-
31
-
32
-
33
-
34
-
35
-
36
-
37
-
38
-
39
-
40
-
41
-
42
-
43
-
44
 |
 |
