Cisco E900 User Manual - Page 41
How to set up the DHCP server on your router, Auto 20 MHz or 40Mhz
 |
View all Cisco E900 manuals
Add to My Manuals
Save this manual to your list of manuals |
Page 41 highlights
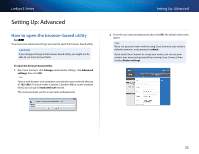
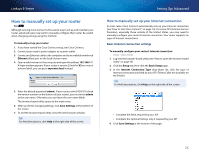
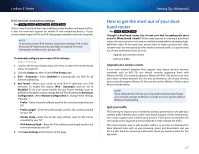
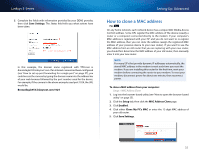
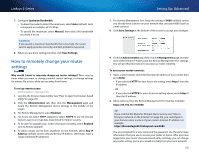
Linksys E-Series On the 2.4 GHz band, you can select: •• Auto (20 MHz or 40Mhz) •• 20 MHz Only d. Channel-Choose the operating channel for each band. Your router will automatically select the channel with the least amount of interference if you leave the default Auto or Auto (DFS) setting. We recommend keeping the default settings for both bands. e. SSID Broadcast-When wireless clients look for wireless networks to connect to, they detect the SSID (wireless network name) broadcast by the router. To broadcast your router's SSID, keep the default setting (Enabled). If you do not want to broadcast the router's SSID, select Disabled. We recommend keeping the default setting (Enabled) for both bands. f. Security Mode (setting is on this page for the E4200, and on the Wireless > Wireless Security page for other routers)-The 5 GHz and 2.4 GHz networks can use different security options. Select the security option for each wireless network. If the security mode you select requires a passphrase, a Passphrase field appears, and you must enter a passphrase. Tip Wireless-N networks should use the WP2-Personal security mode for best performance. 4. To apply your changes, click Save Settings at the bottom of the screen. Setting Up: Advanced How to set up the DHCP server on your router For ALL Your router can be used as a DHCP (Dynamic Host Configuration Protocol) server to automatically assign an IP address to each computer or device on your network. The DHCP server is enabled by default. If you already have a DHCP server on your network, or if you do not want to use your router as a DHCP server, you should disable this setting. To configure your router's DHCP server settings: Setup > Basic Setup > DHCP Server Settings 1. Log into the browser-based utility (see "How to open the browser-based utility" on page 25). 2. Click the Setup tab, then click the Basic Setup page. 3. Review the DHCP Server Setting fields (in the middle of the screen). You can: •• Enable or disable the DHCP server. •• Change the starting address for the DHCP server. •• Change the number of users (253 maximum). 4. If you change any of the settings, click Save Settings at the bottom of the page. Tip For field descriptions, click Help on the right side of the screen. 29
-
 1
1 -
2
-
3
-
4
-
5
-
6
-
7
-
8
-
9
-
10
-
11
-
12
-
13
-
14
-
15
-
16
-
17
-
18
-
19
-
20
-
21
-
22
-
23
-
24
-
25
-
26
-
27
-
28
-
29
-
30
-
31
-
32
-
33
-
34
-
35
-
 36
36 -
 37
37 -
 38
38 -
 39
39 -
 40
40 -
 41
41 -
 42
42 -
 43
43 -
 44
44 -
 45
45 -
 46
46 -
47
-
48
-
49
-
50
-
51
-
52
-
53
-
54
-
55
-
56
-
57
-
58
-
59
-
60
-
61
-
62
-
63
-
64
-
65
-
66
-
67
-
68
-
69
-
70
-
71
-
72
-
73
-
74
-
75
-
76
-
77
-
78
-
79
-
80
-
81
-
82
-
83
-
84
-
85
-
86
-
87
-
88
-
89
-
90
-
91
-
92
 |
 |
