Cisco NME-X-23ES-1G User Guide - Page 120
Configuring Layer 3 Interfaces, fastethernet | gigabitethernet
 |
UPC - 882658036118
View all Cisco NME-X-23ES-1G manuals
Add to My Manuals
Save this manual to your list of manuals |
Page 120 highlights
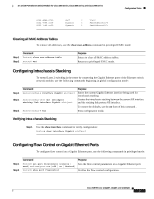
Configuration Tasks 16- and 36-Port Ethernet Switch Module for Cisco 2600 Series, Cisco 3600 Series, and Cisco 3700 Series Configuring Layer 3 Interfaces The Ethernet switch network module supports two types of Layer 3 interfaces for routing and bridging: • SVIs: You should configure SVIs for any VLANs for which you want to route traffic. SVIs are created when you enter a VLAN ID following the interface vlan global configuration command. To delete an SVI, use the no interface vlan global configuration command. • Routed ports: Routed ports are physical ports configured to be in Layer 3 mode by using the no switchport interface configuration command. Note A Layer 3 switch can have an IP address assigned to each routed port and SVI. The number of routed ports and SVIs that you can configure is not limited by software; however, the interrelationship between this number and the number of other features being configured might have an impact on CPU utilization because of hardware limitations. All Layer 3 interfaces require an IP address to route traffic (a routed port cannot obtain an IP address from a DHCP server, but the router can act as a DHCP server and serve IP addresses through a routed port). The following procedure shows how to configure an interface as a Layer 3 interface and how to assign an IP addresses to an interface. Routed ports support only CEF switching (IP fast switching is not supported). Note If the physical port is in Layer 2 mode (the default), you must enter the no switchport interface configuration command to put the interface into Layer 3 mode. Entering a no switchport command disables and then reenables the interface, which might generate messages on the device to which the interface is connected. When you use this command to put the interface into Layer 3 mode, you are also deleting any Layer 2 characteristics configured on the interface. (Also, when you return the interface to Layer 2 mode, you are deleting any Layer 3 characteristics configured on the interface.) Beginning in privileged EXEC mode, follow these steps to configure a Layer 3 interface: Step 1 Step 2 Step 3 Step 4 Step 5 Step 6 Step 7 Step 8 Command Purpose configure terminal Enters global configuration mode. interface {{fastethernet | gigabitethernet} interface-id} Enters interface configuration mode, and enter the | {vlan vlan-id} | {port-channel port-channel-number} interface to be configured as a Layer 3 interface. no switchport For physical ports only, enters Layer 3 mode. ip address ip-address subnet-mask Configures the IP address and IP subnet. no shutdown Activates the interface. (Required only if you shut down the interface.) end Returns to privileged EXEC mode. show interfaces [interface-id] Verifies the configuration. show ip interface [interface-id] show running-config interface [interface-id] copy running-config startup-config (Optional) Saves your entries in the configuration file. To remove an IP address from an interface, use the no ip address interface configuration command. 120 Cisco IOS Release 12.2(2)XT, 12.2(8)T, and 12.2(15)ZJ
-
 1
1 -
2
-
3
-
4
-
5
-
6
-
7
-
8
-
9
-
10
-
11
-
12
-
13
-
14
-
15
-
16
-
17
-
18
-
19
-
20
-
21
-
22
-
23
-
24
-
25
-
26
-
27
-
28
-
29
-
30
-
31
-
32
-
33
-
34
-
35
-
36
-
37
-
38
-
39
-
40
-
41
-
42
-
43
-
44
-
45
-
46
-
47
-
48
-
49
-
50
-
51
-
52
-
53
-
54
-
55
-
56
-
57
-
58
-
59
-
60
-
61
-
62
-
63
-
64
-
65
-
66
-
67
-
68
-
69
-
70
-
71
-
72
-
73
-
74
-
75
-
76
-
77
-
78
-
79
-
80
-
81
-
82
-
83
-
84
-
85
-
86
-
87
-
88
-
89
-
90
-
91
-
92
-
93
-
94
-
95
-
96
-
97
-
98
-
99
-
100
-
101
-
102
-
103
-
104
-
105
-
106
-
107
-
108
-
109
-
110
-
111
-
112
-
113
-
114
-
 115
115 -
 116
116 -
 117
117 -
 118
118 -
 119
119 -
 120
120 -
 121
121 -
 122
122 -
 123
123 -
 124
124 -
 125
125 -
126
-
127
-
128
-
129
-
130
-
131
-
132
-
133
-
134
-
135
-
136
-
137
-
138
-
139
-
140
-
141
-
142
-
143
-
144
-
145
-
146
-
147
-
148
-
149
-
150
-
151
-
152
-
153
-
154
-
155
-
156
-
157
-
158
-
159
-
160
-
161
-
162
-
163
-
164
-
165
-
166
-
167
-
168
-
169
-
170
-
171
-
172
-
173
-
174
-
175
-
176
-
177
-
178
-
179
-
180
-
181
-
182
-
183
-
184
-
185
-
186
-
187
-
188
-
189
-
190
-
191
-
192
-
193
-
194
-
195
-
196
-
197
-
198
-
199
-
200
-
201
-
202
-
203
-
204
-
205
-
206
-
207
-
208
-
209
-
210
-
211
-
212
-
213
-
214
-
215
-
216
-
217
-
218
-
219
-
220
-
221
-
222
-
223
-
224
-
225
-
226
-
227
-
228
-
229
-
230
-
231
-
232
-
233
-
234
-
235
-
236
-
237
-
238
-
239
-
240
-
241
-
242
-
243
-
244
-
245
-
246
 |
 |
