Cisco SPA901-NA Administration Guide - Page 40
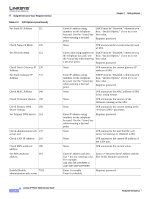
IVR Options, IVR Menu Choice, Parameters, Notes - review
 |
View all Cisco SPA901-NA manuals
Add to My Manuals
Save this manual to your list of manuals |
Page 40 highlights
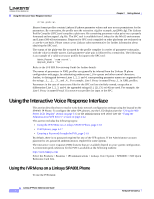
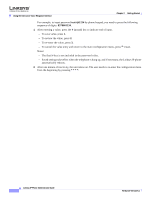
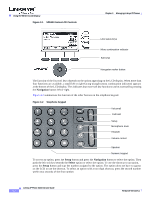
Chapter 2 Getting Started Using the Interactive Voice Response Interface Step 1 Step 2 On a SPA901rt of the Linksys IP phone. Press **** (quickly press the star key four times). Wait until you hear "Linksys configuration menu." Note You cannot access the IVR from a phone that is currently connected to a call. Step 3 Step 4 Step 5 Refer to Table 2-2 to identify the option required. Enter the required option followed by the # (pound) key. To enter a period, use the star key (*). When entering a value, such as an IP address, to exit without entering any changes, press the * (star) key twice within half a second. Otherwise, the * is treated as a decimal point. After entering a value, such as an IP address, press the # (pound) key to indicate you have finished your selection. To save the new setting, press 1. To review the new setting, press 2. To re-enter the new setting, press 3. To cancel your entry and return to the main menu, press * (star). For example, to enter the IP address 191.168.1.105 by keypad, press these keys: 191*168*1*105. Press the # (pound) key to indicate that you have finished entering the IP address. Then press 1 to save the IP address or press the * (star) key to cancel your entry and return to the main menu. If the menu is inactive for more than one minute, the Linksys IP phone times out. You need to re-enter the menu by pressing ****. To exit the menu, hang up the telephone. The settings you have saved take effect after you hang up the telephone. The Linksys IP phone may reboot at this time. IVR Options Table 2-2 summarizes the options provided by the IVR. Table 2-2 IVR Options IVR Action Enter IVR Menu IVR Menu Choice Parameter(s) * * * * None Exit IVR Menu Check DHCP 3948 100 Enable/Disable DHCP 101 Check WAN IP Address 110 None None Enter 1 to enable Enter 0 to disable None Notes Ignore SIT or other tones until you hear, "Linksys configuration menu. Enter option followed by the pound key or hang-up to exit." IVR announces whether DHCP is enabled or disabled. Requires password IVR announces the current IP address of the WAN port. Firmware Version 5.1 Linksys IP Phone Administrator Guide 2-17
-
 1
1 -
2
-
3
-
4
-
5
-
6
-
7
-
8
-
9
-
10
-
11
-
12
-
13
-
14
-
15
-
16
-
17
-
18
-
19
-
20
-
21
-
22
-
23
-
24
-
25
-
26
-
27
-
28
-
29
-
30
-
31
-
32
-
33
-
34
-
 35
35 -
 36
36 -
 37
37 -
 38
38 -
 39
39 -
 40
40 -
 41
41 -
 42
42 -
 43
43 -
 44
44 -
 45
45 -
46
-
47
-
48
-
49
-
50
-
51
-
52
-
53
-
54
-
55
-
56
-
57
-
58
-
59
-
60
-
61
-
62
-
63
-
64
-
65
-
66
-
67
-
68
-
69
-
70
-
71
-
72
-
73
-
74
-
75
-
76
-
77
-
78
-
79
-
80
-
81
-
82
-
83
-
84
-
85
-
86
-
87
-
88
-
89
-
90
-
91
-
92
-
93
-
94
-
95
-
96
-
97
-
98
-
99
-
100
-
101
-
102
-
103
-
104
-
105
-
106
-
107
-
108
-
109
-
110
-
111
-
112
-
113
-
114
-
115
-
116
-
117
-
118
-
119
-
120
-
121
-
122
-
123
-
124
-
125
-
126
-
127
-
128
-
129
-
130
-
131
-
132
-
133
-
134
-
135
-
136
-
137
-
138
-
139
-
140
-
141
-
142
-
143
-
144
-
145
-
146
-
147
-
148
-
149
-
150
-
151
-
152
-
153
-
154
-
155
-
156
-
157
-
158
-
159
-
160
-
161
-
162
-
163
-
164
-
165
 |
 |