Cisco WS-C2960S-24PS-L Hardware Installation Guide - Page 97
Connecting to the Console Port, Starting the Terminal Emulation Software
 |
View all Cisco WS-C2960S-24PS-L manuals
Add to My Manuals
Save this manual to your list of manuals |
Page 97 highlights
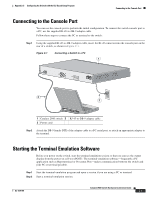
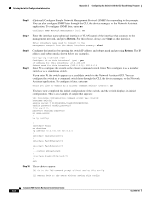
Appendix C Configuring the Switch with the CLI-Based Setup Program Connecting to the Console Port Connecting to the Console Port You can use the console port to perform the initial configuration. To connect the switch console port to a PC, use the supplied RJ-45-to-DB-9 adapter cable. Follow these steps to connect the PC or terminal to the switch: Step 1 Using the supplied RJ-45-to-DB-9 adapter cable, insert the RJ-45 connector into the console port on the rear of a switch, as shown in Figure C-1. Figure C-1 Connecting a Switch to a PC 1 CONSOLE 137088 3 2 1 Catalyst 2960 switch 3 RJ-45-to-DB-9 adapter cable 2 Power cord Step 2 Attach the DB-9 female DTE of the adapter cable to a PC serial port, or attach an appropriate adapter to the terminal. Starting the Terminal Emulation Software Before you power on the switch, start the terminal emulation session so that you can see the output display from the power-on self-test (POST). The terminal-emulation software-frequently a PC application such as Hyperterminal or Procomm Plus-makes communication between the switch and your PC or terminal possible. Step 1 Start the terminal-emulation program and open a session if you are using a PC or terminal. Step 2 Start a terminal-emulation session. OL-7075-09 Catalyst 2960 Switch Hardware Installation Guide C-3
-
 1
1 -
2
-
3
-
4
-
5
-
6
-
7
-
8
-
9
-
10
-
11
-
12
-
13
-
14
-
15
-
16
-
17
-
18
-
19
-
20
-
21
-
22
-
23
-
24
-
25
-
26
-
27
-
28
-
29
-
30
-
31
-
32
-
33
-
34
-
35
-
36
-
37
-
38
-
39
-
40
-
41
-
42
-
43
-
44
-
45
-
46
-
47
-
48
-
49
-
50
-
51
-
52
-
53
-
54
-
55
-
56
-
57
-
58
-
59
-
60
-
61
-
62
-
63
-
64
-
65
-
66
-
67
-
68
-
69
-
70
-
71
-
72
-
73
-
74
-
75
-
76
-
77
-
78
-
79
-
80
-
81
-
82
-
83
-
84
-
85
-
86
-
87
-
88
-
89
-
90
-
91
-
 92
92 -
 93
93 -
 94
94 -
 95
95 -
 96
96 -
 97
97 -
 98
98 -
 99
99 -
 100
100 -
 101
101 -
 102
102 -
103
-
104
-
105
-
106
-
107
-
108
 |
 |
