Clifford UltraCode Owners Guide - Page 3
Standard, Features, Sequence, Installation
 |
View all Clifford UltraCode manuals
Add to My Manuals
Save this manual to your list of manuals |
Page 3 highlights
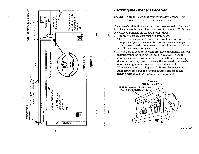
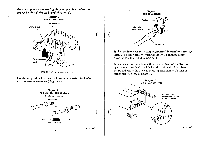
Standard Features Dual-Button/Dual-ChannelRemote Control-Dualbutton/dual-channel design permits individual control of a Clifford vehicle security system and your garage door. The remote control will be on your keychain and with you at all times, not left behind on the sun visor as a bonus to any thief. Four-button/four-channel and four-button/eight-channel remote controls are available to control up to eight garage doors and Clifford-equipped vehicles. P• Programmable Remote Controls-By simply pressing two buttons, you can match up to four Clifford remote controls to your Programmable Receiver-regardless of type, code or number of channels. Just as easily, the code of a lost or stolen remote control can be deleted. e Advanced UltraCoderm Technology-Provides more than four billion (4,000,000,000) different digital codes. Even with the most sophisticated digital scanner, it would take a thief more than 19 years of continuous work to decipher the code! PI Advanced CMOS Microprocessor-Commands the system. W Simple Installation-Installs in minutes with just a screwdriver-no special skill or technical knowledge needed. CM' Tone Acknowledgement-A pleasant electronic tone acknowledges that the remote control is transmitting. 2 , Low Battery Warning-A special double-beep tone lets you know when the remote control battery needs replacing. 1W Universal Application-works with most any electric garage door opener, whether or not already equipped with a remote control. C ongratulations on your purchase of the Clifford UltraCodeTM Remote Control Garage Door System. The Programmable Receiver module and miniature remote control offer the highest level of digital code security attainable. Sequence of Installation Installation of the UltraCode Remote Control Garage Door System is extremely simple: 1. Unplug the electric garage door opener's power cord. 2. If the opener uses an external receiver module, disconnect its terminals, as shown in diagram 1 on page 4. 3. If the opener uses an internal receiver module, perform the Detuning the Opener's Receiver procedure on page 5. 4. Mount the Programmable Receiver above the garage door, as shown in diagram 1. NOTE: Do not mount the receiver module over or near metal. Doing so will reduce remote control range. 5. Route the supplied wire from the Programmable Receiver module to the opener. NOTE: Keep the wire away from the garage door and drive mechanism. 6. Attach the terminals to the same screws used for the interior push button control, as shown. 7. Route the AC adapter cord to an available outlet. NOTE: Keep the cord away from the garage door and drive mechanism. 8. Plug the AC adapter into the outlet. 9. Plug the AC adapter pin connector into the side of the Programmable Receiver. 10.Reconnect the garage door opener's power cord. 11.Test the system for proper operation by pressing Button I on the UltraCode remote control. The garage door should activate. If it does not, recheck steps 4-10.
-
 1
1 -
 2
2 -
 3
3 -
 4
4 -
 5
5 -
 6
6
 |
 |
