Cobra MR F55B-D MRF55D_MANL_ENG - Page 14
External Devices, And Connections
 |
View all Cobra MR F55B-D manuals
Add to My Manuals
Save this manual to your list of manuals |
Page 14 highlights
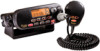
Installation And Start-Up External Devices And Connections External Devices And Connections • Your CobraMarine VHF radio is set up to connect auxiliary devices for navigation, convenience, and added versatility. As is the case with the antenna, choosing these devices is best done with the advice and guidance of a knowledgeable dealer. Standard connectors are provided on the front and back of the transceiver. Microphone Socket Microphone Attachment Connect the Microphone to the cord socket located at the right side of the front of the transceiver. To Connect The Microphone Attachment: 1. Align the connector and push it firmly into the socket. 2. Tighten the captive nut to hold the connector in place. 3. Slide the waterproof sleeve over the nut until it seats in the recess around the socket. External Speaker Jack External Speaker (Not Included) An External Speaker can provide greater volume to hear messages than the speaker incorporated in the CobraMarine transceiver. To Install An External Speaker: Connect the speaker lead to the standard jack on the back of the transceiver. Installation And Start-Up External Devices And Connections Global Positioning System (GPS) Device (Not Included) Cobra strongly recommends that you obtain and connect a GPS device to your CobraMarine VHF radio. By having a GPS connected, your position will be continuously indicated on the LCD and, most importantly, it will be included automatically in any DSC distress message you may need to send. That will take the "search" out of "search and rescue." FCC rules require the radio to prompt the user with visual and audible (beeps) alerts if a GPS is not connected or position information is not entered manually every four (4) hours. GPS Connection To Install A GPS Device: 1. Install the GPS device in a convenient location according to its manufacturer's directions. 2. Bond the NMEA out negative wire to the black wire of the GPS interface cable. 3. Bond the NMEA out positive wire to the red wire of the GPS interface cable. NOTE When bonding the wires, make sure connections are secure and properly insulated. 4. Connect the new combination cable to the GPS device and to the back of the transceiver. NOTE Satellite acquisition time is dependent on the GPS device. 22 English Nothing Comes Close to a Cobra® 23
-
 1
1 -
2
-
3
-
4
-
5
-
6
-
7
-
8
-
 9
9 -
 10
10 -
 11
11 -
 12
12 -
 13
13 -
 14
14 -
 15
15 -
 16
16 -
 17
17 -
 18
18 -
 19
19 -
20
-
21
-
22
-
23
-
24
-
25
-
26
-
27
-
28
-
29
-
30
-
31
-
32
-
33
-
34
-
35
-
36
-
37
-
38
-
39
-
40
 |
 |
