Cobra S120R User Guide - Page 1
Cobra S120R Manual
 |
View all Cobra S120R manuals
Add to My Manuals
Save this manual to your list of manuals |
Page 1 highlights
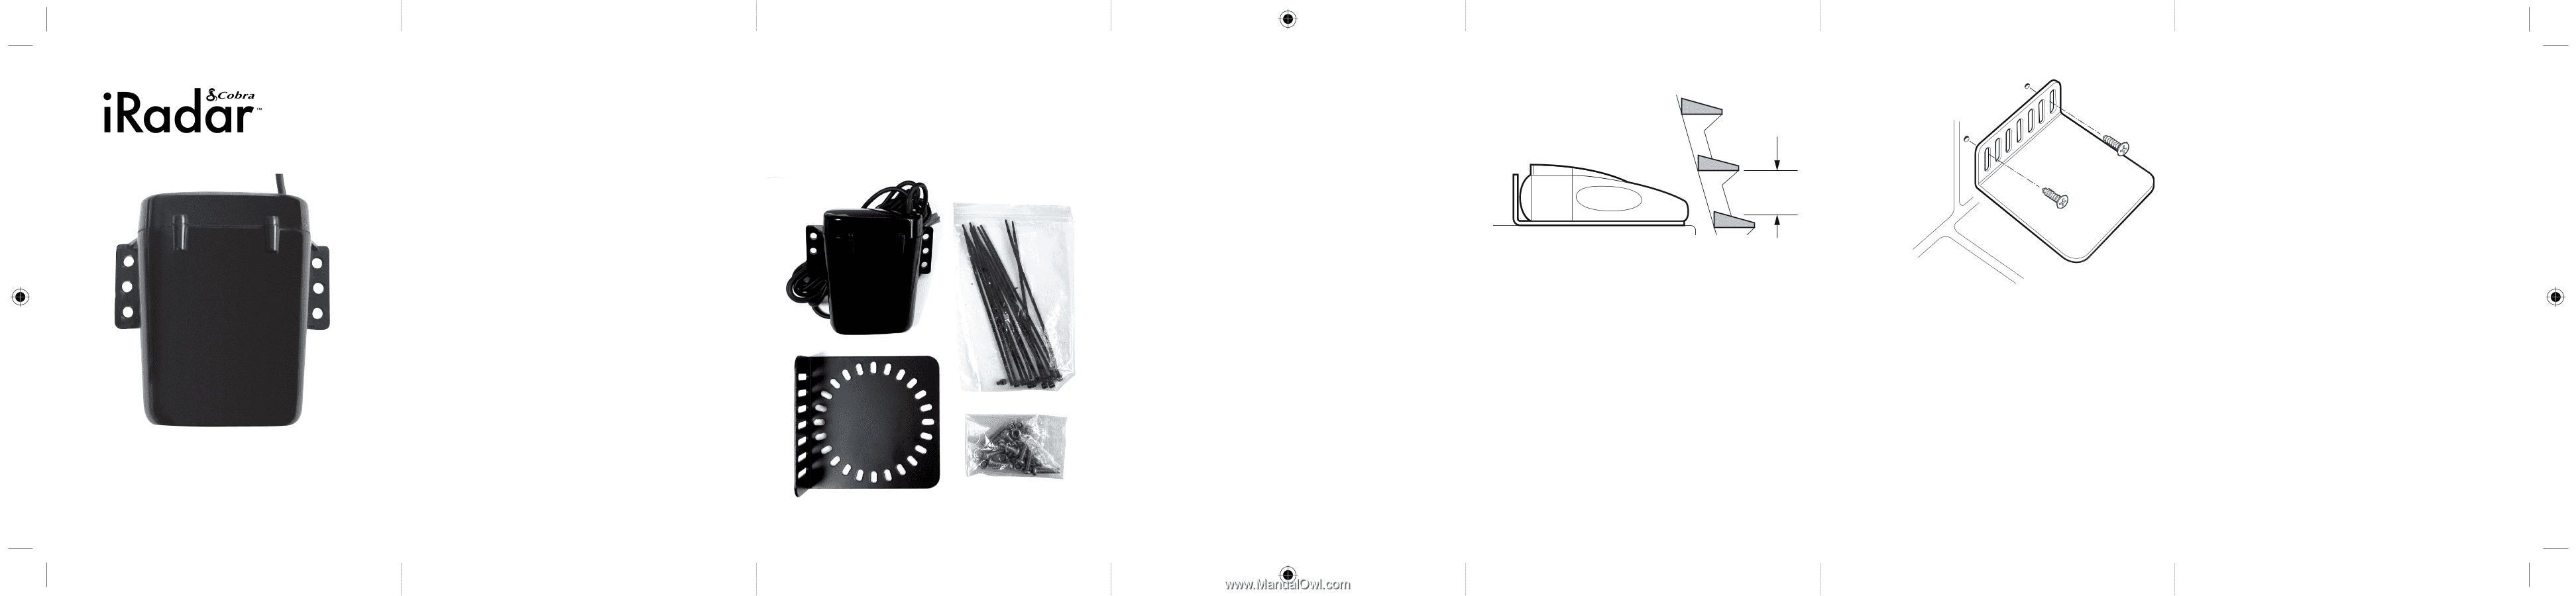
S120R For iPhone Thank you for purchasing the Cobra iRadar S120R for iPhone, the world's first connected radar/laser detector. iRadar S120R uses Bluetooth® wireless technology to connect your iPhone®/iPod Touch® to display radar, laser and speed camera alerts. Follow these simple steps to get your iRadar S120R up and running. Cobra iRadar is made for iPod touch (4th Generation) iPhone 4S iPhone 4 iPhone 3GS NOTE: Location-based alerts and GPS settings available only with iPhone. Only radar/laser alerts and settings will work with iPod touch. What's in the box? Cobra iRadar S120R Mounting bracket Screw, nut & bolt pack Cable-tie fasteners User Guide S120 User Guide iPhone.indd 1 Trademark Acknowledgement Cobra® and the snake design are registered trademarks of Cobra Electronics Corporation, USA. iPhone® and iPod® touch are trademarks of Apple, Inc, registered with the U.S. and other countries. The Bluetooth® word mark is a registered trademark owned by Bluetooth SIG, Inc. and any use of such marks by Cobra Electronics Corporation is under license. Other trademarks and trade names are those of their respective owners. Setting Up iRadar S120R The S120R has been designed to be mounted under the bonnet, behind the vehicle's grille or within an air intake at the front of the vehicle if appropriate using the 'L' shaped bracket and screw pack provided. Find a suitable mounting position for the detector, ensuring that the front of the unit has a clear view of the road ahead and is unobstructed by any metallic objects and that there is a sufficient mounting area to attach the 'L' shaped fixing bracket. The S120R needs to be mounted in as horizontal a position as possible so that it is looking directly down the road ahead. We recommend that you mount the detector either behind the vehicle's grille (if the openings of the grille are at least 10mm in diameter) or within an air intake at the front of the vehicle. The S120R can be mounted anywhere at the front of the vehicle, but for optimum performance we suggest you mount it as close to the number plate of the vehicle as possible. Typical Fitting Typical Fitting 10mm Minimum When you have found a suitable location, using the 'L' shaped mounting bracket as a template, drill between 2 and 4 pilot holes into the selected mounting surface for attaching the bracket using either the self-tapping screws or the nuts and bolts provided. You will need to attach the bracket using at least 2 screws or 2 nuts and bolts to ensure that the bracket is well secured. Remember that there is a lot of vibration within the engine compartment so TityipsicvaelrFyititminpgortant that the S120R mounting bracket is secured correctly. Typical Fitting Typical Fitting Mounting Notes When mounting and connecting the power cables of the S120R always ensure that you mount the unit and cables away from any moving parts such as air-cooling fans or the fan belt. Always position the unit so that device and power cables do not interfere with any moving parts within the engine compartment or interfer with any part of the vehicle that could endanger you or your passengers. Please check that all surfaces are safe to drill through before beginning any work. Connecting the iRadar S120R The S120R is powered by wiring it directly to your vehicles 12v electrical system using the cable supplied Firstly connect the positive side of the cable (Red) to a switched 12v ignition supply. This is a live that is On when the ignition is switched On and Off when the ignition is Off. The negative side of the lead (black) should be connected to a negative ground, so can be attached to any metal portion of the vehicles frame. The LED will blink red if the power connection has been completed successfully. This LED can be located near to the point where the power cable enters the rear of the device. It is not advisable to connect the S120R directly to the vehicle battery as after long periods of vehicle inactivity the vehicle battery may become discharged. 02/12/2011 14:38
-
 1
1 -
 2
2
 |
 |