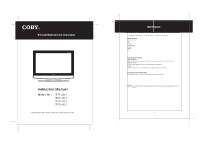
Coby TFTV3217 Instruction Manual - Page 9
AV Function, PC Function - problem
 |
UPC - 716829963210
View all Coby TFTV3217 manuals
Add to My Manuals
Save this manual to your list of manuals |
Page 9 highlights
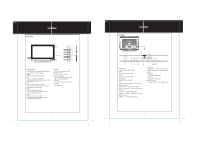
AV Function FuFnunti tni n AV Function The player's AV function consists of the AV IN function and the AV OUT function. You can not only enjoy programs from external input sources through the AV IN function but can also transmit the player's signal to the external monitor using the AV OUT function. 1. Connect the external AV signal source or monitor. Refer to the "Cable Connection" section for details 2. Press the MODE button to select the relevant mode (AV1, AV2, S-Video, Component, HDMI1, HDMI2) NOTE: The AV OUT function is only available for the AV1, AV2, S-Video mode. AV Setup Menu Various features can be preset through the AV menu. Press the MENU button to display the AV menu. AV setup menu consists of PICTURE, AUDIO, TIME, SETUP as well as LOCK. Press the left/right direction button to select the desired sub-menu, press OK to enter. The LOCK setup menu is only available for the AV1, AV2 and S-Video mode. While working with the menu 1. Press the up/down direction buttons to select the desired item. 2. Press the left/right direction button to adjust. 3. Press MENU to exit/return to the previous menu. NOTE: Please see the TV section for the menu descriptions 14 PC Function PC FuFnucntiotin n PC Function You can use the unit's TFT LCD as your computer's monitor. 1. Shut down both the unit and the computer. Connect the VGA jack and PC Audio In jack. See the "Cable Connection" section. 2. Turn on the units and the computer. Press the MODE button to select VGA PC Setup Menu Various features can be preset through the PC menu. Press the MENU button to display the PC menu. PC setup menu consists of PICTURE, AUDIO, TIME as well as SETUP. Press the left/right direction button to select the desired sub-menu, press OK to enter. While working with the menu 1. Press the up/down direction buttons to select the desired item. 2. Press the left/right direction button to adjust. 3. Press MENU to exit/return to the previous menu. NOTE: Please see the TV section for the menu descriptions Adjust the PC Screen Upon switching to the PC mode, the moniter will be automatically regulated for a proper functioning. If the result is not up to your expectation, please perform the following steps to adjust the screen manually . 1. Enter the "Advanced" sub-menu from the SETUP menu. Select "Auto" and press the left/right direction button to adjust the monitor automatically. 2. Or if you still have problem with the monitor after, adjust "H-Pos", "V-Pos", "Clock" as well as "Phase" accordingly under the SETUP menu. 15
-
 1
1 -
2
-
3
-
 4
4 -
 5
5 -
 6
6 -
 7
7 -
 8
8 -
 9
9 -
 10
10 -
 11
11 -
 12
12 -
 13
13
 |
 |
