Compaq 2200 Service Guide - Page 102
Switch Board
 |
UPC - 743172430892
View all Compaq 2200 manuals
Add to My Manuals
Save this manual to your list of manuals |
Page 102 highlights
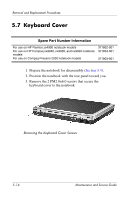
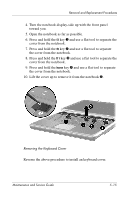
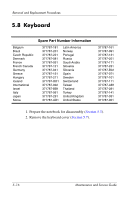
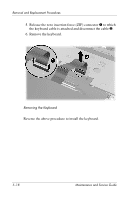
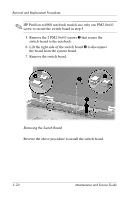
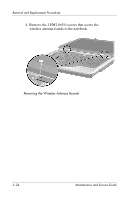
Removal and Replacement Procedures 5.9 Switch Board ✎ The switch board is included with the keyboard cover. Refer to Section 5.7, "Keyboard Cover," for spare part number information. 1. Prepare the notebook for disassembly (Section 5.3). 2. Remove the keyboard cover (Section 5.7). 3. Remove the keyboard (Section 5.8). 4. Disconnect the display lid switch 1 and speaker cables 2 from the switch board. Removing the Switch Board Maintenance and Service Guide 5-19
-
 1
1 -
2
-
3
-
4
-
5
-
6
-
7
-
8
-
9
-
10
-
11
-
12
-
13
-
14
-
15
-
16
-
17
-
18
-
19
-
20
-
21
-
22
-
23
-
24
-
25
-
26
-
27
-
28
-
29
-
30
-
31
-
32
-
33
-
34
-
35
-
36
-
37
-
38
-
39
-
40
-
41
-
42
-
43
-
44
-
45
-
46
-
47
-
48
-
49
-
50
-
51
-
52
-
53
-
54
-
55
-
56
-
57
-
58
-
59
-
60
-
61
-
62
-
63
-
64
-
65
-
66
-
67
-
68
-
69
-
70
-
71
-
72
-
73
-
74
-
75
-
76
-
77
-
78
-
79
-
80
-
81
-
82
-
83
-
84
-
85
-
86
-
87
-
88
-
89
-
90
-
91
-
92
-
93
-
94
-
95
-
96
-
 97
97 -
 98
98 -
 99
99 -
 100
100 -
 101
101 -
 102
102 -
 103
103 -
 104
104 -
 105
105 -
 106
106 -
 107
107 -
108
-
109
-
110
-
111
-
112
-
113
-
114
-
115
-
116
-
117
-
118
-
119
-
120
-
121
-
122
-
123
-
124
-
125
-
126
-
127
-
128
-
129
-
130
-
131
-
132
-
133
-
134
-
135
-
136
-
137
-
138
-
139
-
140
-
141
-
142
-
143
-
144
-
145
-
146
-
147
-
148
-
149
-
150
-
151
-
152
-
153
-
154
-
155
-
156
-
157
-
158
-
159
-
160
-
161
-
162
-
163
-
164
-
165
-
166
-
167
-
168
-
169
-
170
-
171
-
172
-
173
-
174
-
175
-
176
-
177
-
178
-
179
-
180
-
181
-
182
 |
 |

Removal and Replacement Procedures
Maintenance and Service Guide
5–19
5.9
Switch Board
✎
The switch board is included with the keyboard cover. Refer
to
Section 5.7, “Keyboard Cover,”
for spare part number
information.
1. Prepare the notebook for disassembly (
Section 5.3
).
2. Remove the keyboard cover (
Section 5.7
).
3. Remove the keyboard (
Section 5.8
).
4. Disconnect the display lid switch
1
and speaker cables
2
from the switch board.
Removing the Switch Board