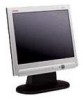
Compaq 5017 Compaq 5017 Flat Panel Monitor User Guide - Page 15
On-Screen Display, Power, Select
 |
UPC - 613326269381
View all Compaq 5017 manuals
Add to My Manuals
Save this manual to your list of manuals |
Page 15 highlights
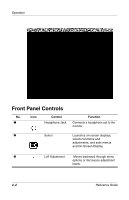
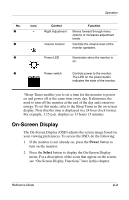
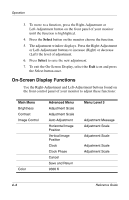
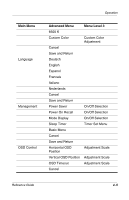
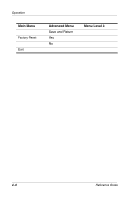
Operation No. 4 5 6 Icon + Control Right Adjustment Volume Control Function Moves forward through menu options or increases adjustment levels. Controls the volume level of the monitor speakers. Power LED Illuminates when the monitor is on. 7 Power switch Controls power to the monitor. The LED on the power button indicates the state of the monitor. *Sleep Timer enables you to set a time for the monitor to power on and power off at the same time every day. It eliminates the need to turn off the monitor at the end of the day and conserves energy. To set this mode, refer to the Sleep Timer in the on-screen display. Note that the time is displayed in a 24 hour clock format. For example, 1:15 p.m. displays as 13 hours 15 minutes. On-Screen Display The On-Screen Display (OSD) adjusts the screen image based on your viewing preferences. To access the OSD, do the following: 1. If the monitor is not already on, press the Power button to turn on the monitor. 2. Press the Select button to display the On-Screen Display menu. For a description of the icons that appear on the screen, see "On-Screen Display Functions" later in this chapter. Reference Guide 4-3
-
 1
1 -
2
-
3
-
4
-
5
-
6
-
7
-
8
-
9
-
 10
10 -
 11
11 -
 12
12 -
 13
13 -
 14
14 -
 15
15 -
 16
16 -
 17
17 -
 18
18 -
 19
19 -
 20
20 -
21
-
22
-
23
-
24
-
25
-
26
-
27
-
28
-
29
-
30
-
31
-
32
-
33
-
34
-
35
-
36
-
37
-
38
-
39
-
40
-
41
-
42
-
43
-
44
 |
 |
