Compaq Evo Notebook PC n115 Compaq Evo N115 Series Maintenance and Service Gui - Page 72
Preparing the Computer for Disassembly
 |
View all Compaq Evo Notebook PC n115 manuals
Add to My Manuals
Save this manual to your list of manuals |
Page 72 highlights
Removal and Replacement Procedures Table 5-1 Disassembly Sequence Chart (Continued) Section 5.12 5.13 5.14 5.15 5.16 5.17 Description Processor Disk cell RTC battery Top cover Diskette drive Charger board Left side panel 5.18 Right side panel 5.19 Speaker assembly 5.20 Audio board 5.21 Fan 5.22 System board # of Screws Removed 0 0 12 1 1 3 screws 1 standoff 3 0 2 2 5 screws 3 standoffs 4 screwlocks 5.3 Preparing the Computer for Disassembly Perform the following steps before disassembling the computer: 1. Turn off the computer. 2. Disconnect the AC adapter and all external devices. 5-4 Maintenance and Service Guide
-
 1
1 -
2
-
3
-
4
-
5
-
6
-
7
-
8
-
9
-
10
-
11
-
12
-
13
-
14
-
15
-
16
-
17
-
18
-
19
-
20
-
21
-
22
-
23
-
24
-
25
-
26
-
27
-
28
-
29
-
30
-
31
-
32
-
33
-
34
-
35
-
36
-
37
-
38
-
39
-
40
-
41
-
42
-
43
-
44
-
45
-
46
-
47
-
48
-
49
-
50
-
51
-
52
-
53
-
54
-
55
-
56
-
57
-
58
-
59
-
60
-
61
-
62
-
63
-
64
-
65
-
66
-
 67
67 -
 68
68 -
 69
69 -
 70
70 -
 71
71 -
 72
72 -
 73
73 -
 74
74 -
 75
75 -
 76
76 -
 77
77 -
78
-
79
-
80
-
81
-
82
-
83
-
84
-
85
-
86
-
87
-
88
-
89
-
90
-
91
-
92
-
93
-
94
-
95
-
96
-
97
-
98
-
99
-
100
-
101
-
102
-
103
-
104
-
105
-
106
-
107
-
108
-
109
-
110
-
111
-
112
-
113
-
114
-
115
-
116
-
117
-
118
-
119
-
120
-
121
-
122
-
123
-
124
-
125
-
126
-
127
-
128
-
129
-
130
-
131
-
132
-
133
-
134
-
135
-
136
-
137
-
138
-
139
-
140
-
141
-
142
-
143
-
144
-
145
-
146
-
147
-
148
-
149
-
150
-
151
-
152
-
153
-
154
-
155
-
156
-
157
-
158
-
159
-
160
-
161
-
162
-
163
-
164
-
165
-
166
-
167
-
168
-
169
-
170
-
171
-
172
-
173
-
174
-
175
-
176
-
177
-
178
-
179
-
180
-
181
-
182
-
183
 |
 |

5–4
Maintenance and Service Guide
Removal and Replacement Procedures
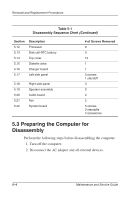
5.3 Preparing the Computer for
Disassembly
Perform the following steps before disassembling the computer:
1. Turn off the computer.
2. Disconnect the AC adapter and all external devices.
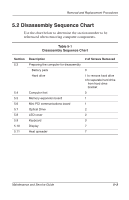
Section
Description
# of Screws Removed
5.12
Processor
0
5.13
Disk cell RTC battery
0
5.14
Top cover
12
5.15
Diskette drive
1
5.16
Charger board
1
5.17
Left side panel
3 screws
1 standoff
5.18
Right side panel
3
5.19
Speaker assembly
0
5.20
Audio board
2
5.21
Fan
2
5.22
System board
5 screws
3 standoffs
4 screwlocks
Table 5-1
Disassembly Sequence Chart
(Continued)