Compaq L2311c L2311c LCD Monitor User Guide - Page 19
Front Panel Controls - hp webcam
 |
View all Compaq L2311c manuals
Add to My Manuals
Save this manual to your list of manuals |
Page 19 highlights
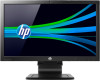
Front Panel Controls Figure 2-11 Monitor Front Panel Controls Table 2-1 Monitor Front Panel Controls Control 1 Webcam with Dual Microphone Array 2 Menu 3 Minus 4 Plus/source 5 OK/auto 6 Power 7 Power LED Function Active = Blue LED Opens, selects or exits the OSD menu. If the OSD menu is on, press to navigate backward through the OSD menu and decrease adjustment levels. If the OSD menu is on, press to navigate forward through the OSD menu and increase adjustment levels. If the OSD menu is inactive, press to activate the source button that chooses the video signal input (USB or VGA) If the OSD menu is on, press to select the highlighted menu item. If the OSD menu is inactive, press to activate the auto adjustment feature to optimize the screen image. The auto adjustment feature only functions if the active video signal is VGA. Turns the monitor on or off. Blue = Fully powered. Amber = Sleep mode. Flashing Amber = Sleep Timer mode. NOTE: To view an OSD menu simulator, visit the HP Customer Self Repair Services Media Library at http://www.hp.com/go/sml. Front Panel Controls 13
-
 1
1 -
2
-
3
-
4
-
5
-
6
-
7
-
8
-
9
-
10
-
11
-
12
-
13
-
 14
14 -
 15
15 -
 16
16 -
 17
17 -
 18
18 -
 19
19 -
 20
20 -
 21
21 -
 22
22 -
 23
23 -
 24
24 -
25
-
26
-
27
-
28
-
29
-
30
-
31
-
32
 |
 |
