Compaq Presario V2000 Getting Started - Page 18
Create User Accounts, Press the Finish Button
 |
View all Compaq Presario V2000 manuals
Add to My Manuals
Save this manual to your list of manuals |
Page 18 highlights
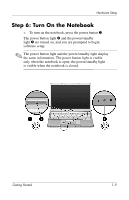
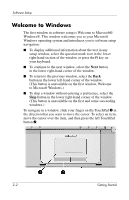
Software Setup If you connected your modem during the "Step 3: Connect the Modem" section in Chapter 1, "Hardware Setup," or have connected the notebook to the Internet by another method, the Connecting to online registration window is displayed. This window describes the progress of your registration. If you are unable to send your registration, you can do so at any time after software setup is complete. For more information about connecting to the Internet, see the "Connect to the Internet" section in Chapter 3, "Next Steps." Create User Accounts In the Who will use this computer? window, you can create a user account for each person who might use the notebook. User accounts enable each notebook user to create a personal notebook environment. A user's environment might include such customizations as display and security settings, personal files, screen savers, and the appearance of the Windows desktop. When you turn on the notebook, a prompt to select a user account is displayed. When a user account is selected, Windows opens according to the preferences set by that user. The names you enter in the Who will use this computer? window text fields are displayed on the list of user accounts displayed at Windows startup. Press the Finish Button! When the Thank you! window is displayed, read the text, and then select Finish. Your notebook saves your preferences, and then restarts in Windows. Select your user account, and you are ready to begin using your notebook. To protect your notebook and gain Internet access to software updates and online assistance, it is recommended that you begin your notebook use by following the suggestions in the next chapter. Getting Started 2-5
-
 1
1 -
2
-
3
-
4
-
5
-
6
-
7
-
8
-
9
-
10
-
11
-
12
-
 13
13 -
 14
14 -
 15
15 -
 16
16 -
 17
17 -
 18
18 -
 19
19 -
 20
20 -
 21
21 -
 22
22 -
 23
23 -
24
-
25
-
26
-
27
-
28
-
29
-
30
-
31
-
32
-
33
-
34
-
35
-
36
-
37
-
38
-
39
-
40
-
41
-
42
-
43
-
44
-
45
-
46
-
47
-
48
-
49
-
50
-
51
-
52
-
53
-
54
-
55
 |
 |
