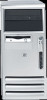
Compaq dx6100 HP Business Desktop dx6100 Series Personal Computers Service Ref - Page 121
Unlocking the Smart Cover Lock, Smart Cover Lock.
 |
View all Compaq dx6100 manuals
Add to My Manuals
Save this manual to your list of manuals |
Page 121 highlights
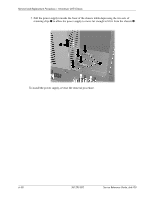
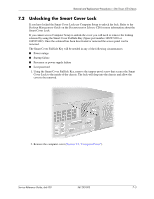
Removal and Replacement Procedures- Slim Tower (ST) Chassis 7.2 Unlocking the Smart Cover Lock If you have locked the Smart Cover Lock use Computer Setup to unlock the lock. Refer to the Desktop Management Guide on the Documentation Library CD for more information about the Smart Cover Lock. If you cannot access Computer Setup to unlock the cover you will need to remove the locking solenoid by using the Smart Cover FailSafe Key (Spare part number 166527-001 or 166527-002). Once the solenoid has been deactivated or removed the access panel can be removed. The Smart Cover FailSafe Key will be needed in any of the following circumstances: ■ Power outage ■ Startup failure ■ Processor or power supply failure ■ Lost password 1. Using the Smart Cover FailSafe Key, remove the tamper-proof screw that secures the Smart Cover Lock to the inside of the chassis. The lock will drop into the chassis and allow the cover to be removed. 2. Remove the computer cover (Section 7.5, "Computer Cover"). Service Reference Guide, dx6100 361293-003 7-3
-
 1
1 -
2
-
3
-
4
-
5
-
6
-
7
-
8
-
9
-
10
-
11
-
12
-
13
-
14
-
15
-
16
-
17
-
18
-
19
-
20
-
21
-
22
-
23
-
24
-
25
-
26
-
27
-
28
-
29
-
30
-
31
-
32
-
33
-
34
-
35
-
36
-
37
-
38
-
39
-
40
-
41
-
42
-
43
-
44
-
45
-
46
-
47
-
48
-
49
-
50
-
51
-
52
-
53
-
54
-
55
-
56
-
57
-
58
-
59
-
60
-
61
-
62
-
63
-
64
-
65
-
66
-
67
-
68
-
69
-
70
-
71
-
72
-
73
-
74
-
75
-
76
-
77
-
78
-
79
-
80
-
81
-
82
-
83
-
84
-
85
-
86
-
87
-
88
-
89
-
90
-
91
-
92
-
93
-
94
-
95
-
96
-
97
-
98
-
99
-
100
-
101
-
102
-
103
-
104
-
105
-
106
-
107
-
108
-
109
-
110
-
111
-
112
-
113
-
114
-
115
-
 116
116 -
 117
117 -
 118
118 -
 119
119 -
 120
120 -
 121
121 -
 122
122 -
 123
123 -
 124
124 -
 125
125 -
 126
126 -
127
-
128
-
129
-
130
-
131
-
132
-
133
-
134
-
135
-
136
-
137
-
138
-
139
-
140
-
141
-
142
-
143
-
144
-
145
-
146
-
147
-
148
-
149
-
150
-
151
-
152
-
153
-
154
-
155
-
156
-
157
-
158
-
159
-
160
-
161
-
162
-
163
-
164
-
165
-
166
-
167
-
168
-
169
-
170
-
171
-
172
-
173
-
174
-
175
-
176
-
177
-
178
-
179
-
180
-
181
-
182
-
183
-
184
-
185
-
186
-
187
-
188
-
189
-
190
-
191
-
192
-
193
-
194
-
195
-
196
-
197
-
198
-
199
-
200
-
201
-
202
-
203
-
204
-
205
-
206
-
207
-
208
-
209
-
210
-
211
-
212
-
213
-
214
-
215
-
216
-
217
-
218
-
219
-
220
-
221
-
222
-
223
-
224
-
225
-
226
-
227
-
228
-
229
-
230
-
231
-
232
-
233
-
234
-
235
-
236
-
237
-
238
-
239
-
240
-
241
-
242
-
243
-
244
-
245
-
246
-
247
-
248
-
249
-
250
 |
 |
