Compaq nx5000 HP Compaq Business Notebook nx5000 Series, Presario V1000 Notebo - Page 138
Keyboard Plate
 |
View all Compaq nx5000 manuals
Add to My Manuals
Save this manual to your list of manuals |
Page 138 highlights
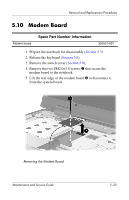
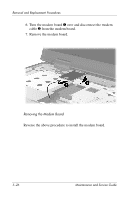
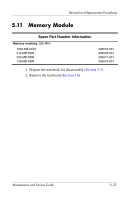
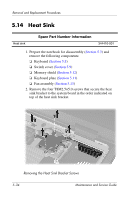
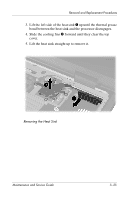
Removal and Replacement Procedures 5.12 Keyboard Plate ✎ The keyboard plate is included in the Miscellaneous Plastics Kit, spare part number 353393-001. 1. Prepare the notebook for disassembly (Section 5.3). 2. Remove the keyboard (Section 5.8). 3. Remove the switch cover (Section 5.9). 4. Remove the memory shield (Section 5.11). 5. Slide the keyboard plate toward the back of the notebook 1 to disengage the plate tabs from the slots 2 in the top cover, and then lift the plate straight up 3 to remove it. Removing the Keyboard Plate Reverse the above procedure to install the keyboard plate. 5-30 Maintenance and Service Guide
-
 1
1 -
2
-
3
-
4
-
5
-
6
-
7
-
8
-
9
-
10
-
11
-
12
-
13
-
14
-
15
-
16
-
17
-
18
-
19
-
20
-
21
-
22
-
23
-
24
-
25
-
26
-
27
-
28
-
29
-
30
-
31
-
32
-
33
-
34
-
35
-
36
-
37
-
38
-
39
-
40
-
41
-
42
-
43
-
44
-
45
-
46
-
47
-
48
-
49
-
50
-
51
-
52
-
53
-
54
-
55
-
56
-
57
-
58
-
59
-
60
-
61
-
62
-
63
-
64
-
65
-
66
-
67
-
68
-
69
-
70
-
71
-
72
-
73
-
74
-
75
-
76
-
77
-
78
-
79
-
80
-
81
-
82
-
83
-
84
-
85
-
86
-
87
-
88
-
89
-
90
-
91
-
92
-
93
-
94
-
95
-
96
-
97
-
98
-
99
-
100
-
101
-
102
-
103
-
104
-
105
-
106
-
107
-
108
-
109
-
110
-
111
-
112
-
113
-
114
-
115
-
116
-
117
-
118
-
119
-
120
-
121
-
122
-
123
-
124
-
125
-
126
-
127
-
128
-
129
-
130
-
131
-
132
-
 133
133 -
 134
134 -
 135
135 -
 136
136 -
 137
137 -
 138
138 -
 139
139 -
 140
140 -
 141
141 -
 142
142 -
 143
143 -
144
-
145
-
146
-
147
-
148
-
149
-
150
-
151
-
152
-
153
-
154
-
155
-
156
-
157
-
158
-
159
-
160
-
161
-
162
-
163
-
164
-
165
-
166
-
167
-
168
-
169
-
170
-
171
-
172
-
173
-
174
-
175
-
176
-
177
-
178
-
179
-
180
-
181
-
182
-
183
-
184
-
185
-
186
-
187
-
188
-
189
-
190
-
191
-
192
-
193
-
194
-
195
-
196
-
197
-
198
-
199
-
200
-
201
-
202
-
203
-
204
-
205
-
206
-
207
-
208
-
209
-
210
-
211
-
212
-
213
-
214
-
215
-
216
-
217
-
218
-
219
-
220
-
221
-
222
-
223
 |
 |

5–30
Maintenance and Service Guide
Removal and Replacement Procedures
5.12
Keyboard Plate
✎
The keyboard plate is included in the Miscellaneous Plastics
Kit, spare part number 353393-001.
1. Prepare the notebook for disassembly (
Section 5.3
).
2. Remove the keyboard (
Section 5.8
).
3. Remove the switch cover (
Section 5.9
).
4. Remove the memory shield (
Section 5.11
).
5. Slide the keyboard plate toward the back of the notebook
1
to disengage the plate tabs from the slots
2
in the top cover,
and then lift the plate straight up
3
to remove it.
Removing the Keyboard Plate
Reverse the above procedure to install the keyboard plate.