Compaq nx9000 Service Manual - Page 121
Removing the Motherboard
 |
View all Compaq nx9000 manuals
Add to My Manuals
Save this manual to your list of manuals |
Page 121 highlights
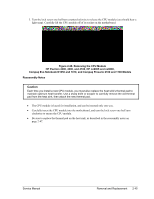
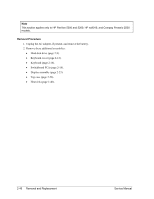
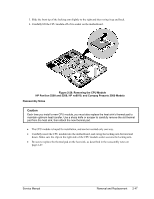
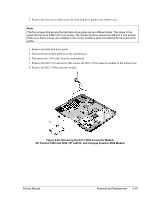
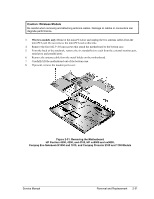
Removing the Motherboard (Authorized Service Providers Only) Note This section applies only to HP Pavilion 4300, 4200, and 4100, HP nx9005 and nx9000, Compaq Evo Notebook N1050 and N1010, and Compaq Presario 2100 and 1100 models. Required Equipment • #1 Phillips screwdriver. Removal Procedure Note: Before Replacing the Motherboard If possible, record the computer's electronic serial number before you replace the motherboard. You will then store the electronic serial number in the EEPROM on the new motherboard using the Service Utility floppy disk. 1. Download the notebook service package from the Partnership Web site (see page vii), and create a Service Utilities floppy disk as described in the package's Readme file. 2. Plug in an AC adapter. 3. Insert the Service Utilities floppy disk in the floppy drive. 4. Turn on the notebook. When the HP logo appears (on either the built-in display or the external monitor), press Esc to display the boot menu, then choose Removable Device and boot from the floppy disk. 5. Select the Serial Number option from the boot menu. 6. When prompted, type A for the automatic update option. This stores the current system data from the old motherboard on the floppy disk. 1. Unplug the AC adapter, if present, and remove the battery. 2. Remove these additional assemblies: • Hard disk drive (page 2-9). • Keyboard cover (page 2-12). • Keyboard (page 2-16). • CD/DVD drive (page 2-20). • Display assembly (page 2-23). • Top case (page 2-26). • Floppy drive (page 2-32). • Heat sink (page 2-40). 2-50 Removal and Replacement Service Manual
-
 1
1 -
2
-
3
-
4
-
5
-
6
-
7
-
8
-
9
-
10
-
11
-
12
-
13
-
14
-
15
-
16
-
17
-
18
-
19
-
20
-
21
-
22
-
23
-
24
-
25
-
26
-
27
-
28
-
29
-
30
-
31
-
32
-
33
-
34
-
35
-
36
-
37
-
38
-
39
-
40
-
41
-
42
-
43
-
44
-
45
-
46
-
47
-
48
-
49
-
50
-
51
-
52
-
53
-
54
-
55
-
56
-
57
-
58
-
59
-
60
-
61
-
62
-
63
-
64
-
65
-
66
-
67
-
68
-
69
-
70
-
71
-
72
-
73
-
74
-
75
-
76
-
77
-
78
-
79
-
80
-
81
-
82
-
83
-
84
-
85
-
86
-
87
-
88
-
89
-
90
-
91
-
92
-
93
-
94
-
95
-
96
-
97
-
98
-
99
-
100
-
101
-
102
-
103
-
104
-
105
-
106
-
107
-
108
-
109
-
110
-
111
-
112
-
113
-
114
-
115
-
 116
116 -
 117
117 -
 118
118 -
 119
119 -
 120
120 -
 121
121 -
 122
122 -
 123
123 -
 124
124 -
 125
125 -
 126
126 -
127
-
128
-
129
-
130
-
131
-
132
-
133
-
134
-
135
-
136
-
137
-
138
-
139
-
140
-
141
-
142
-
143
-
144
-
145
-
146
-
147
-
148
-
149
-
150
-
151
-
152
-
153
-
154
-
155
-
156
-
157
-
158
-
159
-
160
-
161
-
162
-
163
-
164
-
165
-
166
-
167
-
168
-
169
-
170
-
171
-
172
-
173
-
174
-
175
-
176
-
177
-
178
-
179
-
180
-
181
-
182
-
183
-
184
-
185
-
186
-
187
-
188
 |
 |
