Computer Associates ETRAVE7025BPME User Guide - Page 13
Selective Scanning
 |
UPC - 757943264531
View all Computer Associates ETRAVE7025BPME manuals
Add to My Manuals
Save this manual to your list of manuals |
Page 13 highlights
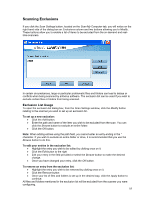
Selective Scanning The on-demand scan can be ran easily, on all files and folders by using the Scan My Computer feature described above. If however, you wish to select certain files and folders to be scanned individually, you can use the Selective Scanning feature. Scan Files or Folders To access selective scanning, click the Selective Scanning button located on the Virus Scanning tab. This will display the Scan Files and Folders dialog box. This window displays all items located on the various drives and folders stored on your computer. The following scanning tasks can be achieved from this dialog box: Scan an individual file: Use the + symbol or double-click the drive or folder that the file is located in (on the right-hand side of the window). Click the file you wish to scan (located on the left-hand side of the window). Click the Scan button. Scan a group of files in the same folder: Use the + symbol or double-click the drive or folder that the files are located in. Hold the Ctrl button down while selecting the files to be scanned. Once selected, release the Ctrl button. Click the Scan button. Scan a group of files and/or folders: Use the + symbol or double-click the drive or folder that the files and/or folders are located in. Hold the Ctrl button down while selecting the files and/or folders to be scanned. Once selected, release the Ctrl button. Click the Scan button. Scan a whole drive: Highlight the drive you wish to scan (located on the right-hand side of the window). Click the Scan button. Scan the entire computer: Highlight the My Computer item (located on the right-hand side of the window). Click the Scan button. 13
-
 1
1 -
2
-
3
-
4
-
5
-
6
-
7
-
 8
8 -
 9
9 -
 10
10 -
 11
11 -
 12
12 -
 13
13 -
 14
14 -
 15
15 -
 16
16 -
 17
17 -
 18
18 -
19
-
20
-
21
-
22
-
23
-
24
-
25
-
26
 |
 |
