Craftsman 11218 Operation Manual - Page 6
Assembly, Description Cont. - parts
 |
View all Craftsman 11218 manuals
Add to My Manuals
Save this manual to your list of manuals |
Page 6 highlights
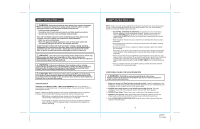
DESCRIPTION cont. This Random Orbit Sander has the following features cont.: 6. On/Off rocker switch is conveniently located for easy control. Sealed to keep out dust for long life. 7. Hook and Loop Backing Pad for easy attachment of hook and loop type sanding discs with pre-punched holes. 8. High impact-resistant housing helps protect tool from damage and reduces weight. 9. Built-in Dust Collection System Dust bag assembly with dual dust ports collects dust from work surface through holes in backing pad and sanding disc. Use either the dust bag, or attach a 11/4 or 21/2-inch vac hose and wet / dry vac (sold separately) for dust collection. Helps keep work surface area clean and extends life of sanding disc. 10. Permanently lubricated 100% ball bearings for smooth operation and long life. Fig 2 Comfort Grip Handle Variable Speed Dial On/Off Rocker Switch Vac Adapter with Dual Dust Ports Dust Bag Assembly 5-in. Hook and Loop Backing Pad PRODUCT SPECIFICATIONS No-load Speed Rating Input Orbit Diameter Sanding Disc Size Paper Type 5000-12000 OPM (orbits per minute) variable speed 120 Volts, 60 Hz AC 3.0 Amps 1/16-in. 5-in. Diameter Hook and Loop Discs with Pre-Punched Holes 12 ASSEMBLY ! WARNING: Your sander should NEVER be connected to the power source when you are assembling parts, making adjustments, installing or removing sandpaper, cleaning or when it is not in use. Disconnecting the sander will prevent accidental starting, that could cause serious personal injury. INSTALLING THE SANDPAPER (See Figs. 3) ALWAYS inspect the sandpaper before installing. DO NOT use if broken or defective. 1. Unplug the sander. ! WARNING: Failure to unplug the sander could result in accidental starting causing possible serious personal injury. NOTE: Remove dust bag assembly when installing sandpaper. ALWAYS remember to reattach the dust bag assembly before beginning sanding operation (see page 15, Fig. 6). 2. Align the holes in the sanding disc with the holes in the hook and loop backing pad. NOTE: Holes in sanding disc must line up with holes in the backing pad in order for the dust collection feature of the sander to function properly. 3. Press the sanding disc against the backing pad as firmly as possible. NOTE: For best adhesion, we recommend that you clean the backing pad and the sanding disc backing occasionally by brushing them lightly with a small brush. Fig 3 Sander Backing Pad 5-in. Hook and Loop Sanding Disc with Pre-Punched Holes 13 27675 2/11/08
-
 1
1 -
 2
2 -
 3
3 -
 4
4 -
 5
5 -
 6
6 -
 7
7 -
 8
8 -
 9
9 -
 10
10 -
 11
11 -
 12
12 -
13
 |
 |
