Craftsman 11585 Operation Manual - Page 16
USING, LASER, GUIDES, injury.
 |
View all Craftsman 11585 manuals
Add to My Manuals
Save this manual to your list of manuals |
Page 16 highlights
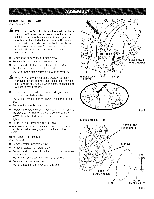
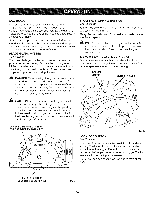
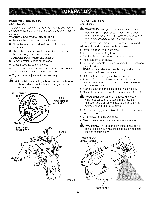
USING THE LASER GUIDES See Figures 12- 13. '_ WARNING: Do not stare into the laser beams or turn the lasers on when the tool is not in use. Failure to heed this warning could result in possible serious personal injury. The laser guides will generate a red colored laser beam on the work surface in front of and behind the saw when turned on. The front laser aids in following the line of cut when cutting the workpiece. The rear laser aids in aligning pocket cuts and following the kerf when exiting the workpiece. NOTE: The laser units come from the factory already installed and aligned. If the lasers become misaligned after time, refer to the "Adjustments" section later in this manual. NOTE: Make a trial cut on a piece of scrap material to ensure laser is aligned; adjusting the laser may be necessary. [] Mark the line to be cut on the workpiece. \ [] Adjust the depth and angle of the cut as needed. [] Insert battery pack into saw and press the laser guide button to activate the laser. [] Start the motor. NOTE: Do not touch the blade to the workpiece until the saw has reached maximum speed. [] Slowly push the saw forward into the workpiece. NOTE: Keep the laser beam on the marked line on the workpiece for precision cutting. [] Once the cut is complete, allow the saw to come to a complete stop before turning off the laser. [] Remove battery pack from saw. LASERGUIDE SWITCH Fig. 12 Fig. 13 16
-
 1
1 -
2
-
3
-
4
-
5
-
6
-
7
-
8
-
9
-
10
-
 11
11 -
 12
12 -
 13
13 -
 14
14 -
 15
15 -
 16
16 -
 17
17 -
 18
18 -
 19
19 -
 20
20 -
 21
21 -
22
-
23
-
24
 |
 |
