Craftsman 77236100N Operation Manual - Page 16
How To Operate, Edger
 |
View all Craftsman 77236100N manuals
Add to My Manuals
Save this manual to your list of manuals |
Page 16 highlights
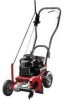
How To Operate The Edger The edger is designed to cut a small trench along sidewalks and driveways or to trim close to trees, flower beds, lampposts, etc. The main reason for edging is to enhance the overall appeal of the yard. A cleanly-edged yard gives a nice, overall finished look. Always dress properly to protect against flying debris. Wear substantial shoes, long pants and close-fitting clothes that are not likely to get caught in the machinery. Also, make sure to wear safety glasses or goggles. WARNING • Always wear safety glasses or eye shields while you assemble, operate or do maintenance to the unit. To reduce the risk of flying debris, inspect the area and remove any stones, sticks or other objects that could be thrown by the edger. If the lawn has not been edged in a while, it may take several passes to obtain a nice, clean edge. Because the front wheel and the right rear wheel are adjustable, the edger can be used on uneven surfaces, such as the curb shown in Figure 14. NOTE: References to the right or left side of the edger are from the viewpoint of the operator's position behind the unit. 1 Before you start the engine, move the depth control lever (D) forward until the blade (A) will not contact the ground. When edging along a concrete driveway or sidewalk, set the wheels on the concrete and position the blade along the left side of the driveway. To position the edger on a curb, see the "Curb-hop feature" section. To keep the blade from hitting the driveway, make sure to keep the blade guide (B) aligned with the side of the driveway (see Figure 13). 3 Start the engine. See "How To Start The Engine". 4 Move the depth control lever back to lower the blade. Do not try to edge too deep. It may take several passes to obtain a nice clean edge. 5 Stand behind the edger and firmly hold the handle (D). See Figure 13. As the blade begins to cut, slowly move forward. 6 Proceed at a moderate pace until you are comfortable with the handling of the edger. NOTE: To operate on a curb, see the "Curb-hop feature" section. Figure 13: Operation Of Edger 16
-
 1
1 -
2
-
3
-
4
-
5
-
6
-
7
-
8
-
9
-
10
-
 11
11 -
 12
12 -
 13
13 -
 14
14 -
 15
15 -
 16
16 -
 17
17 -
 18
18 -
 19
19 -
 20
20 -
 21
21 -
22
-
23
-
24
-
25
-
26
-
27
-
28
-
29
-
30
-
31
-
32
-
33
-
34
-
35
-
36
-
37
-
38
-
39
-
40
-
41
-
42
-
43
-
44
-
45
-
46
-
47
-
48
-
49
-
50
-
51
-
52
-
53
-
54
-
55
-
56
-
57
-
58
-
59
-
60
-
61
-
62
-
63
-
64
-
65
-
66
-
67
-
68
-
69
-
70
-
71
-
72
 |
 |
