Creative 73VF015000007 User Guide - Page 4
Installing Your Webcam
 |
UPC - 054651115996
View all Creative 73VF015000007 manuals
Add to My Manuals
Save this manual to your list of manuals |
Page 4 highlights
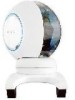
CLI_WCam Live! Motion_QS.book Page 2 Tuesday, June 28, 2005 11:43 AM 1 Installing Your Webcam You need to install device drivers and applications before using your webcam. Do not connect your webcam to your computer before installing the drivers. If you accidentally begin installation with your webcam connected and the Add New Hardware Wizard or Found New Hardware Wizard dialog box appears, click the Cancel button. 1. Insert the Installation CD into your CD-ROM drive. Your CD should start automatically. If it does not, follow the steps below: i. Start Windows Explorer. ii. On the left pane, click the My Computer icon. iii. Right-click the CD-ROM/DVD-ROM drive icon, and then click Autoplay. 2. Select the region you are in and then click the Next button. 3. Select a language and then click the Next button. 4. Click the options for installing drivers and applications, and then click the Install button. 5. Place your webcam on top of your computer monitor or other flat surface. For LCD flat panel monitors or notebook computers, use the integrated hinged lever to balance the camera (see Figure 1). Figure 1 6. Connect the headset to your computer's microphone and headphone connectors. Refer to your computer or audio card documentation for the microphone and headphone connectors. 2
-
 1
1 -
 2
2 -
 3
3 -
 4
4 -
 5
5 -
 6
6 -
 7
7 -
 8
8 -
 9
9 -
 10
10 -
11
-
12
-
13
-
14
-
15
-
16
-
17
-
18
-
19
-
20
-
21
-
22
-
23
-
24
-
25
-
26
-
27
-
28
-
29
-
30
-
31
-
32
 |
 |
