Crucial CT64SSDN125P05 Installation Guide - Page 2
Installation Instructions Desktops and Laptops - inc
 |
UPC - 649528745156
View all Crucial CT64SSDN125P05 manuals
Add to My Manuals
Save this manual to your list of manuals |
Page 2 highlights
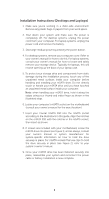
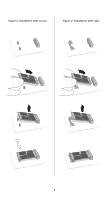
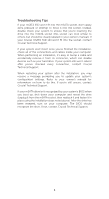
Installation Instructions (Desktops and Laptops) 1. Make sure you're working in a static-safe environment. Remove any plastic bags or papers from your work space. 2. Shut down your system and make sure the power is completely off. For desktop systems, unplug the power cord from your computer. For laptop systems, unplug the power cord and remove the battery. 3. Discharge residual power by pressing the power button. 4. For desktop systems, remove your computer cover. Refer to your owner's manual for how to do this. For laptop systems, consult your owner's manual for how to locate and safely remove your storage device. Typically for laptops, this will involve opening up the back of your laptop case. 5. To protect your storage drive and components from static damage during the installation process, touch any of the unpainted metal surfaces inside your computer before handling and installing your mSATA drive. Do not directly touch or handle your mSATA drive until you have touched an unpainted metal surface inside your computer. Note: when handling your mSATA drive, hold it along the edges using your thumb and index finger as shown in the illustrated steps. 6. Locate your computer's mSATA socket on the motherboard (consult your owner's manual for the exact location). 7. Insert your Crucial mSATA SSD into the mSATA socket according to the illustrations in this guide. Align the notches on the mSATA SSD with the notches in the mSATA socket, then insert as shown. 8. If screws are included with your motherboard, screw the mSATA drive into place (see Figure 1), and as always, consult your owner's manual or system manufacturer for system-specific information on how to hold the drive securely in place. For mSATA sockets that use clips to hold the drive securely in place (see Figure 2), refer to your system's owner's manual. 9. Once your mSATA drive has been fastened securely into place, reassemble your system and reconnect the power cable or battery. Installation is now complete. 2
-
 1
1 -
 2
2 -
 3
3 -
 4
4 -
 5
5
 |
 |
