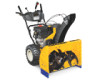
Cub Cadet 528 SWE Two-Stage Snow Thrower 524 WE Operator's Manual - Page 15
Starting and Stopping the Engine, To Engage Drive, To Engage Augers, To Steer, Engage Heated Grips,
 |
View all Cub Cadet 528 SWE Two-Stage Snow Thrower manuals
Add to My Manuals
Save this manual to your list of manuals |
Page 15 highlights
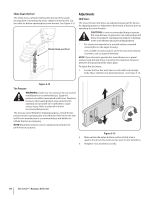
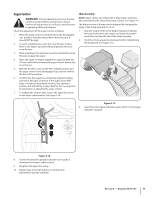
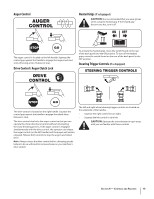
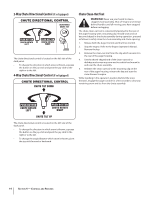
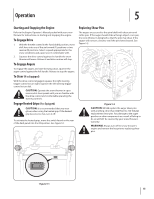
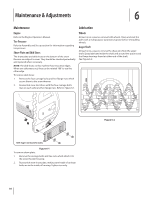
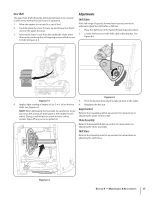
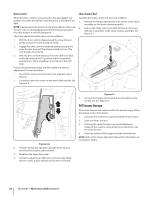
Operation 5 Starting and Stopping the Engine Refer to the Engine Operator's Manual packed with your snow thrower for instructions on starting and stopping the engine. To Engage Drive 1. With the throttle control in the Fast (rabbit) position, move shift lever into one of the six forward (F) positions or two reverse (R) positions. Select a speed appropriate for the snow conditions and a pace you're comfortable with. 2. Squeeze the drive control against the handle the snow thrower will move. Release it and drive motion will stop. To Engage Augers To engage the augers and start throwing snow, squeeze the auger control against the left handle. Release to stop the augers. To Steer (If so Equipped) With the drive control engaged, squeeze the right steering trigger control to turn right. Squeeze the left steering trigger control to turn left. CAUTION: Operate the snow thrower in open areas and at slow speeds until you are familiar with the drive control and comfortable operating the steering controls. Engage Heated Grips (If so Equipped) CAUTION: It is recommended that you wear gloves when using the heated grip. If the heated grip become too hot, turn it off. To activate the heated grips, move the switch found on the rear of the dash panel into the ON position. See Figure 5-1. Replacing Shear Pins The augers are secured to the spiral shaft with shear pins and cotter pins. If the auger should strike a foreign object or ice jam, the snow thrower is designed so that the pins may shear. If the augers will not turn, check to see if the pins have sheared. See Figure 5-2. Figure 5-2 CAUTION: NEVER replace the auger shear pins with anything other than OEM Part No.738-04124A replacement shear pins. Any damage to the auger gearbox or other components as a result of failing to do so will NOT be covered by your snow thrower's warranty. WARNING! Always turn off the snow thrower's engine and remove the key prior to replacing shear pins. Figure 5-1 15
-
 1
1 -
2
-
3
-
4
-
5
-
6
-
7
-
8
-
9
-
 10
10 -
 11
11 -
 12
12 -
 13
13 -
 14
14 -
 15
15 -
 16
16 -
 17
17 -
 18
18 -
 19
19 -
 20
20 -
21
-
22
-
23
-
24
-
25
-
26
-
27
-
28
 |
 |
