Cub Cadet LS 25 CC H Operation Manual - Page 8
Operating Tips
 |
View all Cub Cadet LS 25 CC H manuals
Add to My Manuals
Save this manual to your list of manuals |
Page 8 highlights
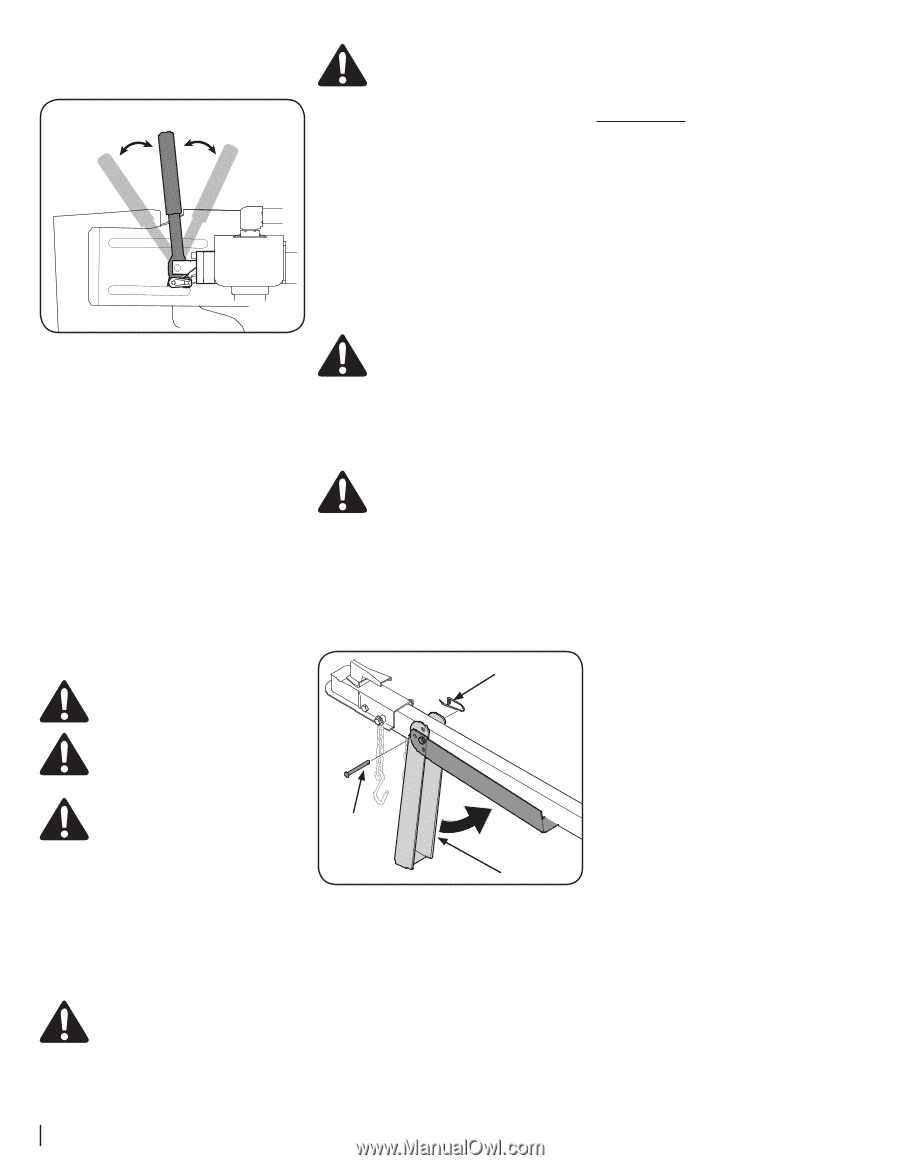
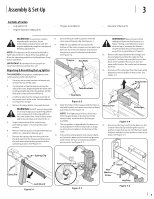
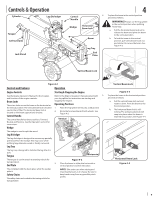
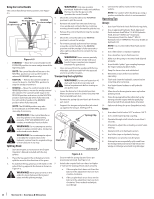
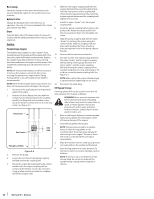
Using the Control Handle The control handle has three positions. See Figure 4-5. FORWARD (To split wood) NEUTRAL (To stop wedge) REVERSE (To return wedge) Figure 4-5 • FORWARD - Move the control handle to the FORWARD position to move wedge toward the log being split. NOTE: The control handle will return to the NEUTRAL position as soon as the handle is released (FORWARD position only). • NEUTRAL - Release the control handle or move the lever to the NEUTRAL position to stop the wedge movement. • REVERSE - Move the control handle to the REVERSE position to return the wedge toward the cylinder. The control handle stays in the REVERSE position and returns to the NEUTRAL position automatically when fully retracted. Do not hold the handle in the REVERSE position when fully retracted. NOTE: The REVERSE position may also be moved back to the NEUTRAL position manually, if necessary. WARNING! If the control handle on your log splitter is not functioning properly, STOP USE IMMEDIATELY and contact an authorized service dealer. WARNING! Do not attempt to service, repair or replace control valve. Contact an authorized service dealer. WARNING! Do not attempt to adjust or modify the control valve or the hydraulic system from its original settings or manufacture in any way. Splitting Wood 1. Start the engine as instructed in the Engine Operator's Manual included with the log splitter. 2. Place the log against the end plate and only split the wood in the direction of the grain. 3. To stabilize the log, place your left hand on the side of the log opposite the beam as shown in Figure 4-2. WARNING! Never place a hand on the ends of a log or between the log/end plate and the splitting wedge. WARNING! Only one operator permitted. Adult who loads and stabilizes the log, must be the person who operates the control handle. 4. Move the control handle to the FORWARD position to split the wood. 5. Remove left hand from the side of the log once wedge just contacts the log. Continue moving control handle forward to split the log. 6. Release the control handle to stop the wedge movement. 7. Move the control handle to the REVERSE position to return the wedge. 8. To remove partially split wood from wedge, move the control handle to the REVERSE position until the wedge is fully retracted to allow split wood portion to contact the log dislodger. WARNING! Never remove partially split wood from the wedge with your hands. Fingers may become trapped between the split wood. 9. Once removed from the wedge with the log dislodger, split the wood from the opposite end or in another location. Transporting the Log Splitter WARNING! Do not tow faster than 45 mph and check the local, state and federal requirements before towing on any public road. 1. Lower the beam to its horizontal position. Make certain the beam is locked securely with the horizontal beam lock. 2. Remove the spring clip and clevis pin from the jack stand. 3. Support the tongue and pivot the jack stand up against the tongue. See Figure 4-6. Spring Clip Clevis Pin Jack Stand Figure 4-6 4. Secure with the spring clip and clevis pin previously removed. See Figure 4-6. 5. Attach the coupler hitch to a class I or higher 2" ball on the towing vehicle; latch securely. a. If the coupler hitch does not fit on the ball, turn the adjustment nut one turn counter-clockwise. b. If the coupler hitch is too loose on the ball, turn the adjustment nut one turn clockwise. Then recheck and adjust accordingly. 6. Connect the safety chains to the towing vehicle. NOTE: Use caution when backing up, using a spotter outside the vehicle is recommended. Operating Tips Always: 1. Use clean fluid and check fluid levels regularly. 2. Use an approved hydraulic fluid. Approved fluids include Shell Tellus® S2 M 32 Hydraulic Fluid, Dexron® III/Mercon® Automatic Transmission Fluid, Pro-Select™ AW-32 Hydraulic Oil or 10WAW-ISO Viscosity Grade 32 Hydraulic Oil. NOTE: It is recommended that fluids not be mixed. 3. Use a filter (clean or replace regularly). 4. Use a breather cap on fluid reservoir. 5. Make sure the pump is mounted and aligned properly. 6. Use a flexible "spider" type coupling between the engine and pump drive shafts. 7. Keep the hoses clear and unblocked. 8. Bleed the air out of the hoses before operating. 9. Flush and clean the hydraulic system before restarting after servicing. 10. Use liquid thread sealant on all hydraulic fittings. 11. Allow time for the engine to warm-up before splitting wood. 12. Prime the pump before the initial start-up by turning over the engine with the spark plug disconnected (if not already done at factory). 13. Split wood along the grain (lengthwise) only. Never: 1. Use when fluid is below 20° F or above 150° F. 2. Use a solid engine/pump coupling. 3. Operate through relief valve for more than 5 seconds. 4. Attempt to adjust the unloading or relief valve settings. 5. Operate with air in hydraulic system. 6. Use Teflon tape on hydraulic fittings. 7. Attempt to cut wood across the grain. 8. Attempt to remove partially split wood from the wedge with your hands. Fully retract the wedge to dislodge wood with log dislodger. 8 Section 4- Controls & Operation
-
 1
1 -
2
-
 3
3 -
 4
4 -
 5
5 -
 6
6 -
 7
7 -
 8
8 -
 9
9 -
 10
10 -
 11
11 -
 12
12 -
 13
13 -
14
-
15
-
16
-
17
-
18
-
19
-
20
-
21
-
22
-
23
-
24
-
25
-
26
-
27
-
28
 |
 |