Cub Cadet LTX 1050 KH LTX 1046 KW Operator's Manual - Page 28
Caution
 |
View all Cub Cadet LTX 1050 KH manuals
Add to My Manuals
Save this manual to your list of manuals |
Page 28 highlights
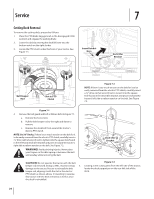
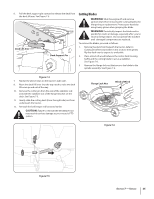
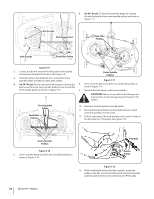
7. On 46" Decks: To place the new belt begin by routing the belt around the two outer spindle pulleys as shown in Figure 7-11. Hex Screws Belt Keeper Rod Deck Idler Pulleys Belt Guards Deck Idler Pulley Figure 7-9 3. Loosen, but do not remove the belt guard on the pulley located near the back of the deck. See Figure 7-8. Outer Spindle Pulleys 4. Carefully remove the deck belt from around the three spindle pulleys and the two deck idler pulleys. Figure 7-11 5. On 50" Decks: To place the new belt, begin by routing the 8. Then route the belt around the two deck idler pulleys as belt around the two outer spindle pulleys, then around the show in Figure 7-11. front spindle pulley as shown in Figure 7-10. 9. Reinstall the belt keeper rod loosened earlier. CAUTION: Failure to reinstall the belt keeper rod may result in serious damage to your tractor's PTO system. Front Spindle Pulley Deck Idler Pulleys 10. Remount the belt guards removed earlier. 11. Re-install the deck making sure the belt remains routed around the pulleys as instructed. 12. Pull the right side of the belt and place the narrow V side of the belt into the PTO pulley. See Figure 7-12. Outer Spindle Pulleys Figure 7-10 6. Then route the belt around the two deck idler pulleys as shown in Figure 7-10. PTO Belt Rotate Pulley Figure 7-12 13. While holding the belt and pulley together, rotate the pulley to the left. Continue holding and rotating the pulley and belt until the belt is fully rolled into the PTO pulley. 28 Section 7- Service
-
 1
1 -
2
-
3
-
4
-
5
-
6
-
7
-
8
-
9
-
10
-
11
-
12
-
13
-
14
-
15
-
16
-
17
-
18
-
19
-
20
-
21
-
22
-
 23
23 -
 24
24 -
 25
25 -
 26
26 -
 27
27 -
 28
28 -
 29
29 -
 30
30 -
 31
31 -
 32
32 -
 33
33 -
34
-
35
-
36
-
37
-
38
-
39
-
40
-
41
-
42
-
43
-
44
-
45
-
46
-
47
-
48
-
49
-
50
-
51
-
52
-
53
-
54
-
55
-
56
-
57
-
58
-
59
-
60
-
61
-
62
-
63
-
64
-
65
-
66
-
67
-
68
-
69
-
70
-
71
-
72
 |
 |
