Cub Cadet RZT S 46 RZT S 42 Operator's Manual - Page 24
Setting the Deck Wheels, Adjusting the Rollers 50 & 54 Decks, Parking Brake Adjustment
 |
View all Cub Cadet RZT S 46 manuals
Add to My Manuals
Save this manual to your list of manuals |
Page 24 highlights
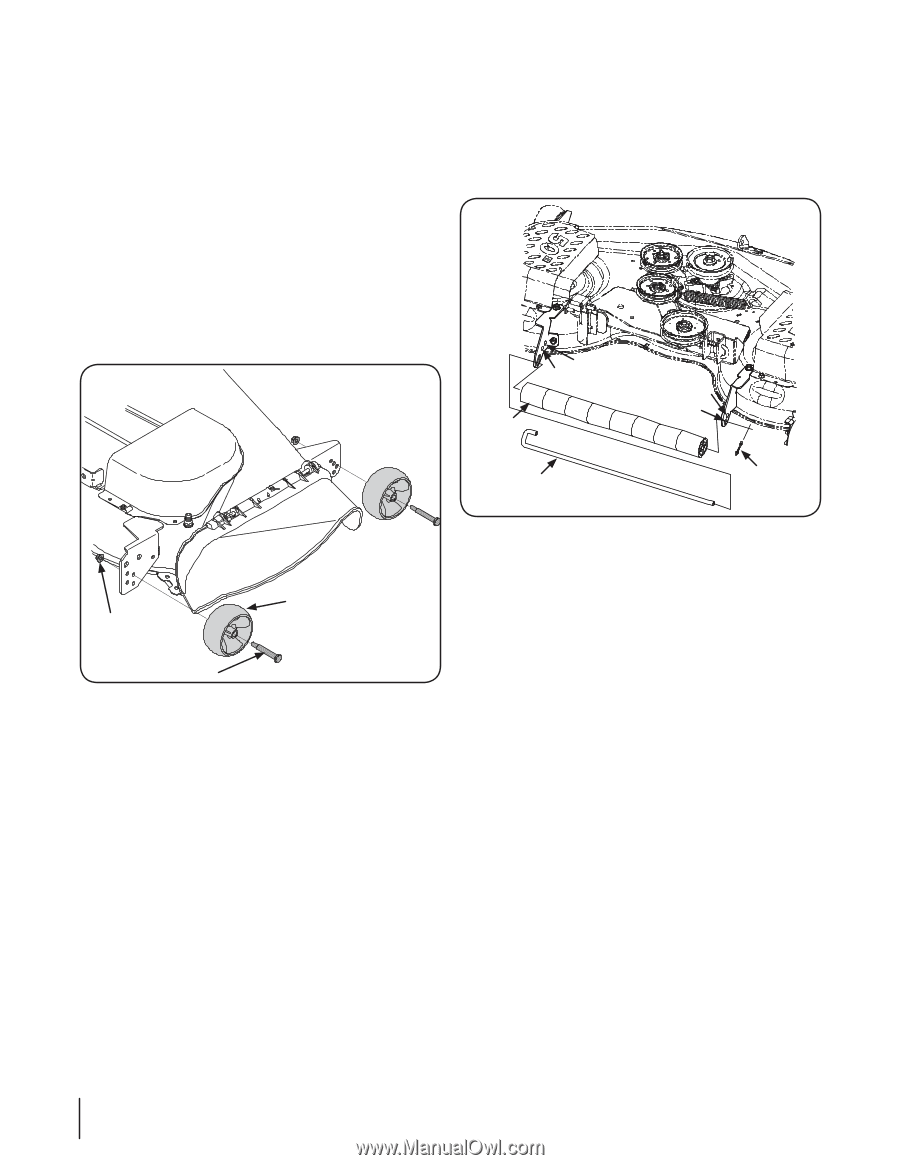
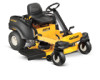
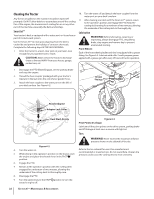
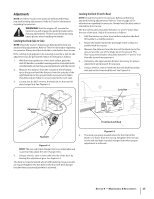
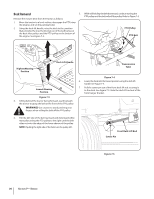
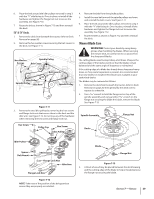
Setting the Deck Wheels Move the tractor on a firm and level surface, preferably pavement, and proceed as follows 1. Select the height position of the cutting deck by placing the deck lift handle in the normally desired mowing height setting. 2. Check the deck wheels for contact or excessive clearance with the surface below. The deck wheels should have between ¼-½" clearance above the ground. 3. If the deck wheels have excessive clearance or contact with the surface, adjust as follows: a. Raise the deck lift handle to its highest setting. b. Remove the deck wheels by removing the lock nuts and shoulder bolts which secure them to the deck. See Figure 6-6. Adjusting the Rollers (50" & 54" Decks) To adjust the rollers proceed as follows: 1. To change the height of the rollers, remove the bow-tie cotter pin and slide the J-hook out until the end is out of current height setting hole on the right side of the roller bracket. See Figure 6-7. Rollers High Position Low Position High Position Low Position J-hook Bow-Tie Cotter Pin Lock Nut Deck Wheel Shoulder Bolt Figure 6-6 NOTE: The 42" deck has two deck wheels (front), the 46" deck has four deck wheels (front and rear), the 50" and 54" decks have two deck wheels (front) and rollers (rear). c. Place the deck lift handle in the desired mowing height setting. d. Reinsert the shoulder bolts (with each gauge wheel) into the index hole that leaves approximately ½-inch between the bottom of the wheel and the pavement. Figure 6-7 2. Then slide the J-hook back through the right side of the bracket in the new position. 3. Secure the position by placing the hooked end of the J-hook into the corresponding hole on the left side of the roller bracket. Parking Brake Adjustment If the tractor does not come to a complete stop when the brake lever is completely engaged, or if the tractor's rear wheels can roll with the parking brake applied (and the hydrostatic relief valve open), the brake is in need of adjustment. See your Cub Cadet dealer to have the brake properly adjusted. 24 Section 6- Maintenance & Adjustments
-
 1
1 -
2
-
3
-
4
-
5
-
6
-
7
-
8
-
9
-
10
-
11
-
12
-
13
-
14
-
15
-
16
-
17
-
18
-
 19
19 -
 20
20 -
 21
21 -
 22
22 -
 23
23 -
 24
24 -
 25
25 -
 26
26 -
 27
27 -
 28
28 -
 29
29 -
30
-
31
-
32
-
33
-
34
-
35
-
36
-
37
-
38
-
39
-
40
-
41
-
42
-
43
-
44
-
45
-
46
-
47
-
48
-
49
-
50
-
51
-
52
-
53
-
54
-
55
-
56
-
57
-
58
-
59
-
60
-
61
-
62
-
63
-
64
-
65
-
66
-
67
-
68
-
69
-
70
-
71
-
72
-
73
-
74
-
75
-
76
 |
 |