Cuisinart CMW-100 CMW-100 Manual - Page 6
Preset Auto Menu Cooking Chart - white
 |
UPC - 086279014191
View all Cuisinart CMW-100 manuals
Add to My Manuals
Save this manual to your list of manuals |
Page 6 highlights
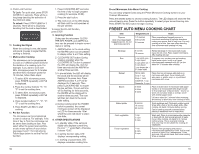
9. Child-Lock Function To Lock: For quick start, press STOP/ CLEAR for 3 seconds. There will be a long beep denoting the activation of the child-lock state. To unlock: Press STOP/CLEAR for 3 seconds. There will be a long beep denoting that the lock is deactivated. 10. Cooking End Signal When the cooking is over, the buzzer will sound 5 beeps to signal that the cooking is finished. 11. Multi-section Cooking The microwave can be programmed to cook on 2 different power levels for the duration of a cooking cycle. For example, if you want to cook with 80% microwave power for 5 minutes and then 60% microwave power for 10 minutes, follow these steps: 1. To select 80% microwave power, press POWER repeatedly until PL8 is displayed. 2. Press the number buttons "5", "0", "0" to set the cooking time. 3. To select 60% microwave power, press POWER repeatedly until PL6 is displayed. 4. Press number buttons "1", "0", "0", "0" to set the cooking time. 5. Press START/+30 SEC to start cooking. 12. Pre-Set Function The microwave can be programmed to start in advance. For example, if the time of day is 7pm the microwave can be set to start cooking at 9pm. First select either the power level and time or auto menu options of your choice (see page 9 and 11 for instructions). Follow steps below to set the Pre-Set function: 1. Press CLOCK/PRE-SET and enter the time of day to begin program cooking (for example, 09.00). 2. Press the start button. 3. The clock icon on the LED display will flash until the unit operates at the pre-set time. To cancel the Pre-Set function, press STOP. 13. Inquiring Function During use the microwave CLOCK/ PRE-SET, POWER, and AM/PM buttons can be pressed to inquire current status or setting. 1. AM/PM button: In the clock setting the AM/PM button can be pressed to display either A or P time setting. 2. CLOCK/PRE-SET button: During cooking operation when the CLOCK/PRE-SET button is pressed the LED will display the clock for three seconds and the AM/PM for another three seconds. 3. In pre-set state, the LED will display the clock and the seconds will be flashing at the same time. Press AM/PM and either A or P will be displayed for 3 seconds. Then press CLOCK/PRE-SET to inquire the pre-set time. The pre-set time will be flashing for three seconds, the AM/PM will be displayed for another three seconds. The oven will then turn back to the clock state setting. 4. During cooking when the POWER button is pressed, the current microwave power will be displayed on LED for three seconds. After which the oven will return to previous state. 14. OTHER SPECIFICATIONS a. In standby state, if the set clock digital tube displays current time, the icon " : " would flash; otherwise, it shows "0:00". b. In setting function state, LED displays corresponding setting. c. In working or pause state, LED displays remainder cooking time. 10 Preset Microwave Auto Menu Cooking You can easily prepare foods using the Preset Microwave Cooking buttons on your Cuisinart Microwave. Press the desired button to choose cooking function. The LED display will show the first amount/serving size. Press the button repeatedly to select proper amount/serving size. Press START/+30 SEC button to begin cooking. PRESET AUTO MENU COOKING CHART Item Popcorn (Use only prepackaged bagged popcorn. Do not pop loose popcorn) Weight/Amount 1.75 ounces 3.00 ounces 3.5 ounces Notes Place prepackaged bagged popcorn in microwave according to package directions, making sure proper side of bag is up. Pop only one bag at a time. Use care when removing from microwave and opening hot bag. Beverage Rice Reheat Bacon Baked potato Fresh vegetables Frozen vegetables 8 ounces 16 ounces Reheat beverage in microwave-safe mugs/ cups. Do not cover. Place cups in microwave. After heating stir well. 1 cup white rice + 2 cups liquid 2 cups white rice + 4 cups liquid 1 cup brown rice + 2½ cups liquid To prepare rice, combine rice and cooking liquid (water, stock, broth) in a 3-quart microwave-safe casserole with lid. Let rice stand for 10 minutes after cooking. Dinner plate Soup, 1 cup Soup, 2 cups Casserole, 1 cup Casserole, 2 cups 2 slices 4 slices 6 slices Place food on microwave-safe plate or in microwave-safe bowl. Cover loosely with wax paper or plastic wrap, or a purchased microwave dish cover. Place a double layer of microwave-safe paper towels on a microwavable dish large enough to fit a single layer of bacon slices - two to six slices. Do not allow strips to overlap. Cover with another paper towel. Let bacon stand for 2 minutes before removing and serving, to allow carry-over cooking to finish. 8 ounces 16 ounces 24 ounces Scrub potatoes well. Prick each potato several times with a fork or tip of a sharp knife. After cooking, let stand 3 minutes before serving. Can be used to precook potatoes before placing in traditional oven to crisp skins. 1 cup 2 cups 3 cups Wash well. Place in a microwave-safe casserole or bowl with lid. Add a small amount of water. Cover. After cooking, let stand for 2 minutes before serving. This is a general cooking time, and may not be suitable for cooking all vegetables. 1 cup 2 cups 3 cups Remove from packaging and place in microwave-safe casserole or bowl. Add a small amount of liquid (2 to 4 tablespoons). Cover and cook. Stir and let stand. Add more cooking times as needed. 11
-
 1
1 -
 2
2 -
 3
3 -
 4
4 -
 5
5 -
 6
6 -
 7
7
 |
 |
