Cuisinart SG-3P1 User Manual - Page 4
Assembly
 |
View all Cuisinart SG-3P1 manuals
Add to My Manuals
Save this manual to your list of manuals |
Page 4 highlights
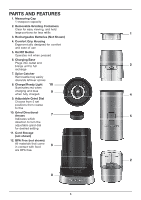
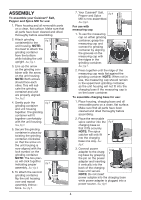
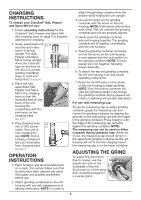
ASSEMBLY To assemble your Cuisinart® Salt, Pepper and Spice Mill for use: 1. Place housing and all removable parts on a clean, flat surface. Make sure that all parts have been cleaned and dried thoroughly before assembling. 2. Attach grinding fig.1 container(s) to the unit housing. NOTE: It is best to attach the grinding container from the bottom while holding the unit upright. See fig.1. 3. Line up the arrow on the grinding con- fig.2 tainer with the arrow on the unit housing. NOTE: Both arrows should face each other. This will indicate the grinding container and unit are properly aligned. See fig.2. 4. Gently push the fig.3 grinding container and unit housing together. The grinding container will fit together comfortably with the unit housing. See fig.3. 5. Secure the grinding container in place by fig.4 twisting the grinding container clockwise so that the arrow on the unit housing is now aligned with the lock symbol on the grinding container. NOTE: The two piec- es will click together indicating proper fig.5 assembly. See fig.4. 6. To attach the second grinding container, flip the unit housing over and repeat assembly instructions. See fig.5. 7. Your Cuisinart® Salt, fig.6 Pepper and Spice Mill is now assembled. See fig.6. For use with measuring cap: 1. To use the measuring cap on either grinding container, grasp the fig.7 measuring cap and connect to grinding container by aligning the grooves on the measuring cap with the ridges in the grinding container. See fig.7. 2. Press together until the ridge of the measuring cap rests flat against the grinding container. NOTE: When not in use, the measuring cap should remain in the uppermost grinding container, as the unit housing will not fit into the charging base if the measuring cap is on the lower container. To assemble charging base for use: 1. Place housing, charging base and all removable parts on a clean, flat surface. Make sure that all parts have been cleaned and dried thoroughly before assembling. 2. Place the removable spice catcher into the fig.8 charging base so that it fits securely. NOTE: The spice catcher will only fit into the charging base one way. See fig.8. 3. Connect power fig. adapter to the charg- 9 ing base by grasping the pin on the power adapter and inserting it vertically into the back of the charging base until secure. NOTE: Do not insert power adapter into the charging base while power adapter is plugged into a power source. See fig.9. 4
-
 1
1 -
 2
2 -
 3
3 -
 4
4 -
 5
5 -
 6
6 -
 7
7 -
 8
8 -
 9
9 -
 10
10 -
11
-
12
-
13
-
14
-
15
-
16
-
17
 |
 |
