Cuisinart SS-GB1 User Manual
Cuisinart SS-GB1 Manual
 |
View all Cuisinart SS-GB1 manuals
Add to My Manuals
Save this manual to your list of manuals |
Cuisinart SS-GB1 manual content summary:
- Cuisinart SS-GB1 | User Manual - Page 1
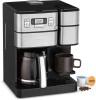
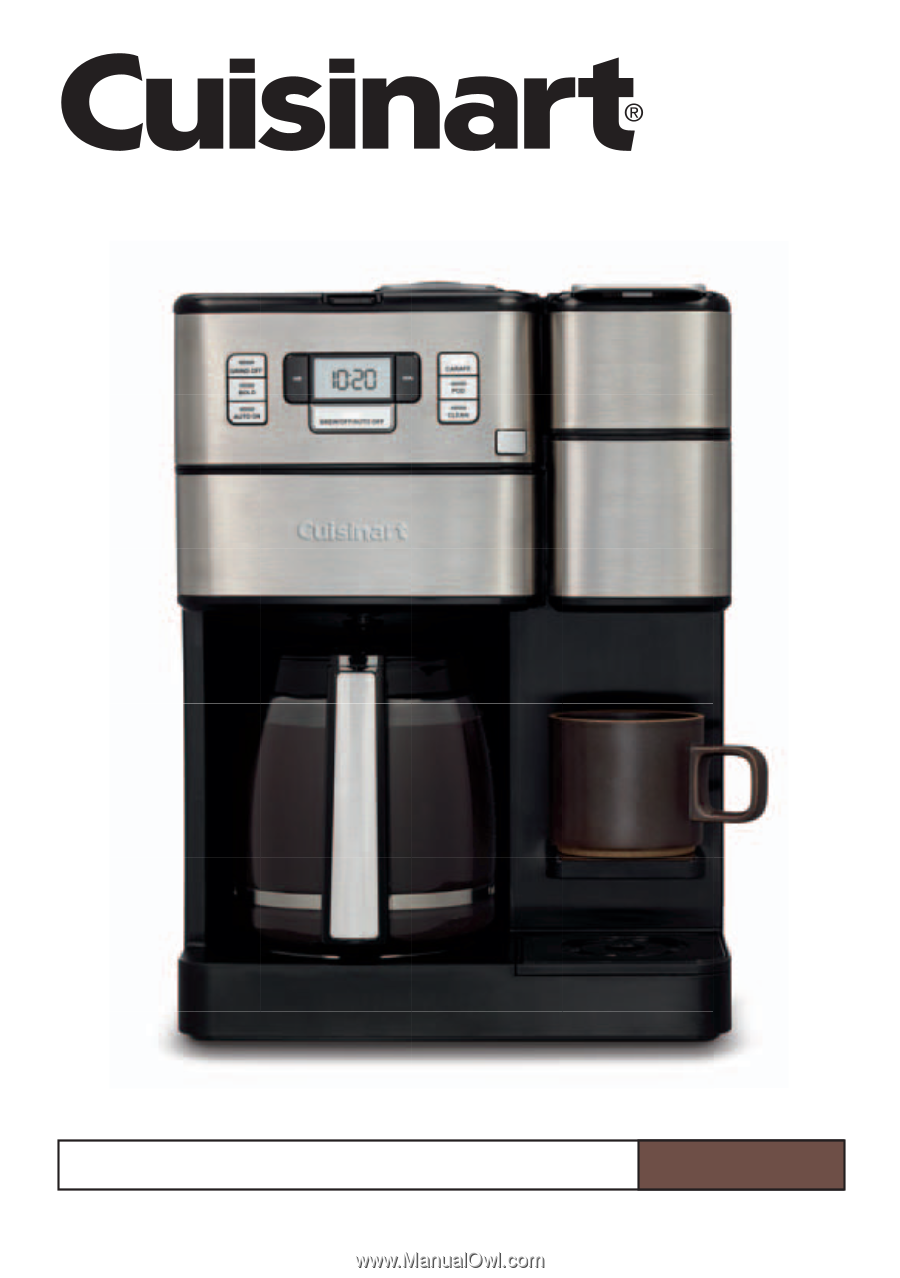
INSTRUCTION BOOKLET Coffee Center® GRIND & BREW PLUS SS-GB1 Series For your safety and continued enjoyment of this product, always read the instruction book carefully before using. - Cuisinart SS-GB1 | User Manual - Page 2
in the cleaning instructions in this guide. 20. Do not clean carafe, heating plate or single-serve drip tray with harsh cleansers, steel wool pads, or other abrasive materials. 21. WARNING: TO REDUCE THE RISK OF FIRE OR ELECTRIC SHOCK, DO NOT REMOVE THE BASE PANEL. NO USER-SERVICEABLE PARTS ARE - Cuisinart SS-GB1 | User Manual - Page 3
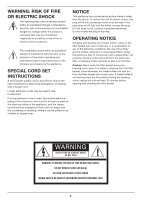
triangle is intended to alert the user to the presence of important operating and maintenance (servicing) instructions in the literature accompanying the appliance. SPECIAL CORD SET INSTRUCTIONS A short power-supply cord is provided to reduce the risks resulting from becoming entangled in - Cuisinart SS-GB1 | User Manual - Page 4
process. ELEMENT 4: PROPORTION Coffee that is too strong or too weak is always a disappointment. Follow the recommended portions of ground coffee in the instructions under Brewing Coffee, and later adjust the amount to suit your taste. NOTE: DO NOT OVERFILL OR THE GRINDER COULD MALFUNCTION AND/OR - Cuisinart SS-GB1 | User Manual - Page 5
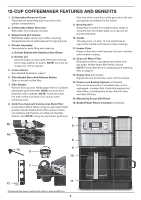
12-CUP COFFEEMAKER FEATURES AND BENEFITS 1. Coffeemaker Reservoir Cover Flips back for easy filling and to access to the grinder compartment. 2. Coffeemaker Water Reservoir With water level indicator window. 3. Showerhead (not shown) Distributes water evenly over coffee, reducing temperature loss - Cuisinart SS-GB1 | User Manual - Page 6
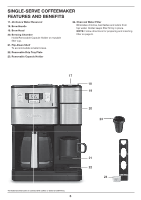
SINGLE-SERVE COFFEEMAKER FEATURES AND BENEFITS 17. 40-Ounce Water Reservoir 18. Brew Handle 19. Brew Head 20. Brewing Chamber Holds Removable Capsule Holder or reusable filter cup. 21. Flip-Down Shelf To accommodate smaller brews. 22. Removable Drip Tray Plate 23. Removable Capsule Holder 24. - Cuisinart SS-GB1 | User Manual - Page 7
Button Indicator light appears when it is time to decalcify your coffeemaker. See page 11 for detailed descaling instructions. 1 3 2 4 5 6 7 89 SINGLE-SERVE COFFEEMAKER CONTROLS Detailed use instructions are on pages 11-12. 9. Pod Button Press once to activate single-serve side. Use to select - Cuisinart SS-GB1 | User Manual - Page 8
initial cleaning before making your first beverage. Follow these instructions, without adding coffee. 1. Insert charcoal water filter. have hard water. Replacement filters can be purchased in stores, by calling Cuisinart Consumer Service, or at www.cuisinart.com 3. Make sure carafe is in place. 4. - Cuisinart SS-GB1 | User Manual - Page 9
as above to program your coffeemaker to shut off from 0 to 4 hours after brew cycle is finished. MAKING COFFEE WITH WHOLE BEANS Follow instructions in Setting Up Your 12-Cup Coffeemaker on page 8. 1. Insert charcoal water filter Follow directions for the preparation and insertion of the filter - Cuisinart SS-GB1 | User Manual - Page 10
or cleansers to clean the heater plate. Do not dry the inside of the water reservoir with a cloth, as lint may remain. Maintenance: Any other servicing should be performed by an authorized - Cuisinart SS-GB1 | User Manual - Page 11
COFFEEMAKER INITIAL CLEANING Perform an initial cleaning before making your first beverage. Follow these instructions, without inserting a capsule. 1. Insert charcoal water filter if you haven't already. Instructions on page 8. 2. Fill the water reservoir dedicated to the single-serve side of the - Cuisinart SS-GB1 | User Manual - Page 12
USING THE SINGLESERVE COFFEEMAKER Follow instructions in Setting Up Your Single-Serve Coffeemaker above. BREWING 1. Add water into the 40-ounce water reservoir. 2. Plug the power cord into an independent outlet. - Cuisinart SS-GB1 | User Manual - Page 13
pulling toward you. 2a. Drop the reusable coffee capsule into the brewing chamber. There is no need to snap it into place. 2b. Follow brewing instructions on page 12. Caution: There are two sharp needles in the brewing chamber that puncture the capsule, one above and one below. To avoid risk - Cuisinart SS-GB1 | User Manual - Page 14
Step 1 three times, using fresh water in place of vinegar. 2. This will clean the coffeemaker plumbing and remove any residual vinegar taste. MAINTENANCE Any other servicing should be performed by an authorized - Cuisinart SS-GB1 | User Manual - Page 15
If the nonconforming product is to be serviced by someone other than Cuisinart's Authorized Service Center, please remind the servicer to call our Consumer Service Center at 1-800-726-0190 to ensure that the problem is properly diagnosed, the product is serviced with the correct parts, and to ensure - Cuisinart SS-GB1 | User Manual - Page 16
©2020 Cuisinart East Windsor, NJ 08520 Printed in China 20CE074398 F IB-16914-ESP - Cuisinart SS-GB1 | User Manual - Page 17
MANUAL DE INSTRUCCIONES Cafetera 2 en 1 con molinillo incorporado Coffee Center® GRIND & BREW PLUS Serie SS-GB1 Para su seguridad y para disfrutar plenamente de este producto, siempre lea cuidadosamente las instrucciones antes del uso. - Cuisinart SS-GB1 | User Manual - Page 18
aparato! No ponga ningún otro líquido u alimento en el depósito, a excepción de cuando sea para limpiarlo, según las instrucciones indicadas en este manual. 20. No limpie la jarra, la placa calentadora ni la bandeja de goteo de la cafetera monodosis con limpiadores abrasivos, lana de acero u otros - Cuisinart SS-GB1 | User Manual - Page 19
ADVERTENCIA: RIESGO DE INCENDIO O DESCARGA ELÉCTRICA El símbolo de relámpago con punta de flecha dentro de un triángulo equilátero tiene como fin alertar al usuario de la presencia de voltajes peligrosos no aislados en el interior del aparato, los cuales pueden ser de suficiente magnitud para - Cuisinart SS-GB1 | User Manual - Page 20
de la cafetera monodosis 13-14 Garantía 15 INSTRUCCIONES DE DESEMBALAJE 1. Ponga la caja sobre una superficie espaciosa, plana y segura. 2. Retire el manual de instrucciones y otros folletos de la caja. 3. Voltee la caja para que repose en su lado y retire la cafetera. 4. Aleje la caja - Cuisinart SS-GB1 | User Manual - Page 21
PIEZAS Y CARACTERÍSTICAS DE LA CAFETERA DE 12 TAZAS (1.75 L) 1. Tapa del depósito de agua de la cafetera Articulada, para facilitar el llenado del depósito y proveer acceso al molinillo. 2. Depósito de agua de la cafetera Con indicador de nivel de agua. 3. Rociador de agua (no ilustrado) Distribuye - Cuisinart SS-GB1 | User Manual - Page 22
PIEZAS Y CARACTERÍSTICAS DE LA CAFETERA MONODOSIS 17. Depósito de agua de 40 onzas (1.2 L) 18. Asa 19. Tapa de la cámara de preparación 20. Cámara de preparación Para cápsulas monodosis desechable o reutilizable. 21. Estante abatible Para colocar tazas más pequeñas. 24. Filtro de agua de carbón - Cuisinart SS-GB1 | User Manual - Page 23
PANEL DE CONTROL CONTROLES DE LA CAFETERA DE 12 TAZAS (1.75 L) Véase las instrucciones detalladas de programación en las páginas 8 a 10. 1. Reloj/Pantalla LCD Indica la hora del día, la hora de encendido automático , y el tiempo de apagado automático. 2. Botones HR (horas) y MIN (minutos) Permiten - Cuisinart SS-GB1 | User Manual - Page 24
FILTRO DE AGUA DE CARBÓN INSTALACIÓN DEL FILTRO DE AGUA 1. Retire el filtro de la bolsa de plástico y remójelo en agua fría por 15 minutos. 2. Levante el soporte del filtro que se encuentra en el depósito de agua de la cafetera de 12 tazas (1.75 L). 3. Abra el soporte, jalando la base. 4. Instale el - Cuisinart SS-GB1 | User Manual - Page 25
CÓMO FIJAR LA HORA DE ENCENDIDO AUTOMÁTICO Al ingresar el modo de programación de la hora de encendido automático, "12:00" (la hora de encendido automático por defecto) o la hora de encendido automático previamente fijada aparecerá en la pantalla, parpadeando. 1. Mantenga presionado el botón AUTO ON - Cuisinart SS-GB1 | User Manual - Page 26
6. Antes de preparar café Compruebe que la jarra está debidamente posicionada y que tiene puesta la tapa. Enchufe el cable en una toma de corriente. NOTA: Su cafetera cuenta con un sistema de seguridad que impide que la unidad se ponga en marcha a menos que la tapa del depósito y la tapa del - Cuisinart SS-GB1 | User Manual - Page 27
No ponga agua en la unidad después de sacar el molinillo. Limpie el área bajo el molinillo con un paño húmedo, teniendo cuidado de no dejar penetrar agua en el motor, ya que esto puede dañarlo. Vuelva a instalar todas las piezas una vez que estén limpias y secas. Saque la jarra de la placa - Cuisinart SS-GB1 | User Manual - Page 28
5. Coloque una taza en la bandeja de goteo 6. Presione el botón POD para ingresar al modo "monodosis"; el indicador luminoso del botón POD se encenderá y la pantalla mostrará el tamaño de taza por defecto: 10 onzas (295 ml). 7. Presione el botón BREW/OFF/AUTO OFF una vez; el indicador luminoso - Cuisinart SS-GB1 | User Manual - Page 29
CÓMO PREPARAR CAFÉ CON LA CÁPSULA REUTILIZABLE HOMEBARISTA™. La cafetera monodosis también le deja preparar café con una cápsula reutilizable (no incluida), un método que le permite usar su propio café molido. Pruebe la cápsula reutilizable HomeBarista™ de Cuisinart para preparar café o té con su - Cuisinart SS-GB1 | User Manual - Page 30
4. Limpieza de la aguja perforadora - La aguja perforadora, ubicada dentro de la cámara de preparación, deberá limpiarse en caso de atascamiento, usando un sujetapapeles u otro objeto similar. Introduzca la punta del sujetapapeles en el pico para desatascarlo. Paso 2: Enjuague con agua fresca 1. - Cuisinart SS-GB1 | User Manual - Page 31
GARANTÍA Garantía limitada de tres años Esta garantía es para los consumidores que residen en los EE. UU. solamente. Usted es un consumidor si posee una cafetera 2 en 1 con molinillo incorporado Coffee Center® Grind & Brew Plus de Cuisinart® que fue comprada en una tienda para uso personal, familiar - Cuisinart SS-GB1 | User Manual - Page 32
©2020 Cuisinart East Windsor, NJ 08520 Impreso en China 20CE074398 F IB-16914-ESP
-
 1
1 -
 2
2 -
 3
3 -
 4
4 -
 5
5 -
 6
6 -
 7
7 -
8
-
9
-
10
-
11
-
12
-
13
-
14
-
15
-
16
-
17
-
18
-
19
-
20
-
21
-
22
-
23
-
24
-
25
-
26
-
27
-
28
-
29
-
30
-
31
-
32
 |
 |
For your safety and continued enjoyment of this product, always read the instruction book carefully before using.
Coffee Center
®
GRIND & BREW PLUS
SS-GB1 Series
INSTRUCTION BOOKLET