Cuisinart SS-GB1 User Manual - Page 9
Making Coffee With, Whole Beans
 |
View all Cuisinart SS-GB1 manuals
Add to My Manuals
Save this manual to your list of manuals |
Page 9 highlights
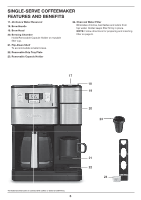
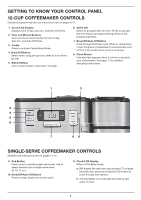
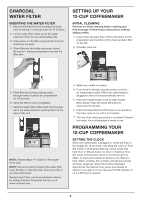
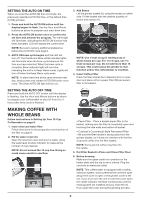
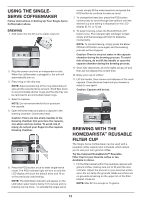
SETTING THE AUTO ON TIME When you enter the AUTO ON time set mode, the previously selected AUTO ON time, or the default time (12:00) will flash. 1. Press and hold the AUTO ON button until the display begins to flash. Use the Hour and Minute buttons as above to program your start-brew time. 2. Press the AUTO ON button once to confirm the set time and activate the program. The white light will illuminate, indicating the AUTO ON function has been activated. LCD will display the current time. NOTE: Be sure to set any additional preference before the AUTO ON cycle begins. 3. AUTO ON brew cycle begins and the LED will turn off. The Carafe and Brew white indicator lights will illuminate when the brew cycle begins at the time you have selected. When the brew cycle is complete, Brew indicator light will turn blue, indicating the unit is in Keep Warm mode. Lights will turn off when the Keep Warm cycle ends. NOTE: To start brew time at the same time the next day, simply press and release AUTO ON button once more. The white AUTO ON light will turn on. 3. Add Beans Lift the grinder basket lid, using the recess on either side. Fill the basket with the desired quantity of beans and replace lid. NOTE: Use 1 level scoop (1 tablespoon) of whole beans per cup. For 1 to 4 cups, use 1½ level scoops per cup. Do not add more than 14 scoops. This could cause the grinder to malfunction and/or the coffeemaker to overflow. 4. Insert Coffee Filter Press the filter basket door release button to open door and place either a paper filter OR permanent filter in the basket. SETTING THE AUTO OFF TIME Press and hold the AUTO OFF button until the display is flashing. Use the Hour and Minute buttons as above to program your coffeemaker to shut off from 0 to 4 hours after brew cycle is finished. MAKING COFFEE WITH WHOLE BEANS Follow instructions in Setting Up Your 12-Cup Coffeemaker on page 8. 1. Insert charcoal water filter Follow directions for the preparation and insertion of the filter on page 8. 2. Fill the water reservoir Open the reservoir cover and pour in water, using the water level window indicator to measure the number of cups desired. NOTE: Do not exceed the 12-cup line. Doing so could cause carafe to overflow. • Paper Filter - Place a basket paper filter in the basket, making sure the filter is completely open and touching the side walls and bottom of basket. • Cuisinart's Commercial-Style Permanent Filter - Be sure the filter handle is facing away from the grinder basket, so it does not interfere with the flow of ground coffee into the filter basket. NOTE: Some ground coffee may flow into the carafe. 5. Put Filter Basket in Place and Close Filter Door 6. Before brewing Make sure the glass carafe is in position on the heater plate and the top cover is closed. Plug the cord into an electrical outlet. NOTE: This coffeemaker is equipped with a safety interlock system, which prevents the unit from operating if the cover is open or the grinder cover is left out. If you try to turn the unit on with the cover open, the carafe indicator will flash continuously until the missing parts are installed and you close the lid. If you open the cover during the grinding process, 9
-
 1
1 -
2
-
3
-
 4
4 -
 5
5 -
 6
6 -
 7
7 -
 8
8 -
 9
9 -
 10
10 -
 11
11 -
 12
12 -
 13
13 -
 14
14 -
15
-
16
-
17
-
18
-
19
-
20
-
21
-
22
-
23
-
24
-
25
-
26
-
27
-
28
-
29
-
30
-
31
-
32
 |
 |
