D-Link DAP-1325 User Manual - Page 10
Hardware Overview, Top - reset
 |
View all D-Link DAP-1325 manuals
Add to My Manuals
Save this manual to your list of manuals |
Page 10 highlights
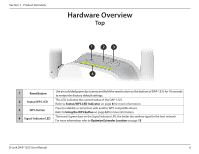
Section 1 - Product Overview Hardware Overview Top 1 23 4 1 Reset Button 2 Status/WPS LED 3 WPS Button 4 Signal Indicator LED Use an unfolded paperclip to press and hold the reset button on the bottom of DAP-1325 for 10 seconds to restore the factory default settings. This LED indicates the current status of the DAP-1325. Refer to Status/WPS LED Indicator on page 8 for more information. Press to establish a connection with another WPS compatible device. Refer to Using the WPS Button on page 42 for more information. The more lit green bars on the Signal Indicator LED, the better the wireless signal to the host network. For more information refer to Optimize Extender Location on page 15. D-Link DAP-1325 User Manual 6
-
 1
1 -
2
-
3
-
4
-
 5
5 -
 6
6 -
 7
7 -
 8
8 -
 9
9 -
 10
10 -
 11
11 -
 12
12 -
 13
13 -
 14
14 -
 15
15 -
16
-
17
-
18
-
19
-
20
-
21
-
22
-
23
-
24
-
25
-
26
-
27
-
28
-
29
-
30
-
31
-
32
-
33
-
34
-
35
-
36
-
37
-
38
-
39
-
40
-
41
-
42
-
43
-
44
-
45
-
46
-
47
-
48
-
49
-
50
-
51
-
52
-
53
-
54
-
55
-
56
-
57
-
58
-
59
-
60
-
61
-
62
-
63
-
64
-
65
-
66
-
67
-
68
-
69
-
70
 |
 |

6
D-Link DAP-1325 User Manual
Section 1 - Product Overview
Hardware Overview
Top
1
2
3
4
1
Reset Button
Use an unfolded paperclip to press and hold the reset button on the bottom of DAP-1325 for 10 seconds
to restore the factory default settings.
2
Status/WPS LED
This LED indicates the current status of the DAP-1325.
Refer to
Status/WPS LED Indicator
on page
8
for more information.
3
WPS Button
Press to establish a connection with another WPS compatible device.
Refer to
Using the WPS Button
on page
42
for more information.
4
Signal Indicator LED
The more lit green bars on the Signal Indicator LED, the better the wireless signal to the host network.
For more information refer to
Optimize Extender Location
on page
15
.