D-Link DCS-8600LH Quick Install Guide - Page 1
D-Link DCS-8600LH Manual
 |
View all D-Link DCS-8600LH manuals
Add to My Manuals
Save this manual to your list of manuals |
Page 1 highlights
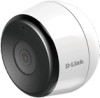
Full HD Outdoor Wi-Fi Camera Power Adapter Mounting Kit Quick Installation Card Quick Installation Guide 1 Download the App 2 Log In mydlink Search for mydlink and download the app. Note: This product is incompatible with other mydlink apps such as 'mydlink Home,' 'mydlink Lite,' etc. Sign In or Sign Up for a mydlink account. mydlink Lite users may sign in with the same account. 3 Add the Device S/N:QXXXXYMXXXXXX mydlink No.:XXXXXXXX PIN Code:XXXXXX 1 Tap the menu button 2 Tap Add a Device 3 Scan the Setup Code on the power cable or on the Quick Install Card, then follow the app instructions Mounting 6 Mounting 9 1 / Place the baseplate at the desired l2o0ccamtiofnro, menstuhreincg6eitlhinagt.itMisakaet least sure 6 4/ Align the large top screw with the largest hole on the snap mount. Slide the mount down to lock into place. the screw is facing up and the holes are level. Use a pencil to mark the holes. 2 / 72 Using a 6mm drill bit, drill two 5 / 25mm deep hole72s over the pencil 10 Attach the back of the camera to the mount. Adjust the angle as desired. marks. For a plaster, drywall, or concrete wall, insert the plastic anchors to support the screws first. 72 3 / 8 Place the baseplate over the holes. Use the supplied8screws to attach the baseplate to the wall. 9 8 9
-
 1
1 -
 2
2
 |
 |