D-Link DCS-8635LH Product Manual 1 - Page 15
Wall/ Ceiling Mounting
 |
View all D-Link DCS-8635LH manuals
Add to My Manuals
Save this manual to your list of manuals |
Page 15 highlights
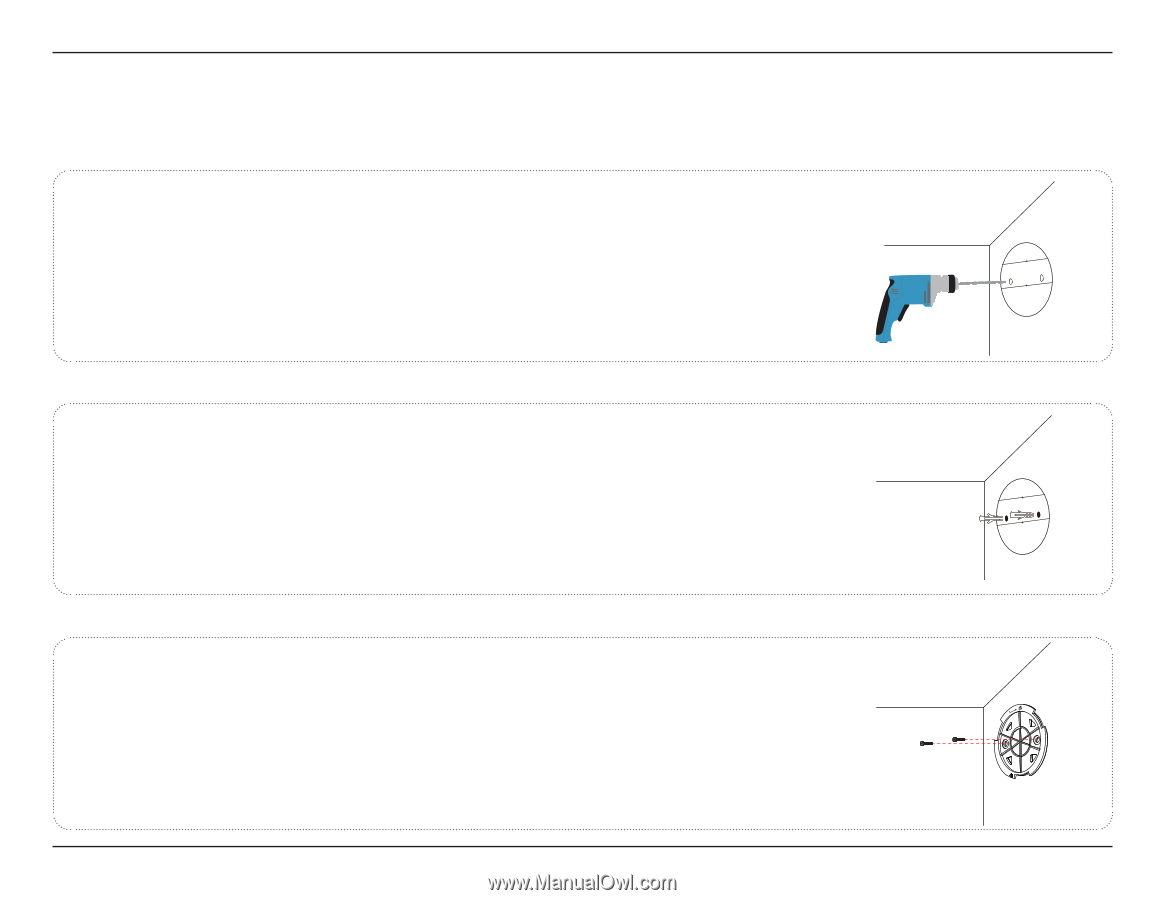
Section 2 - Installation Wall/ Ceiling Mounting The device can be mounted on a wall or on the ceiling. 1/ Stick the alignment sticker on the location where you want to mount the camera, and ensure the holes are level. Then use a 6 mm drill bit to drill two 26 mm deep holes. 2/ Hammer in the plastic wall anchors to support the screws. 3/ Align the base plate over the holes and secure it tightly with screws. D-Link DCS-8635LH User Manual 12
-
 1
1 -
2
-
3
-
4
-
5
-
6
-
7
-
8
-
9
-
 10
10 -
 11
11 -
 12
12 -
 13
13 -
 14
14 -
 15
15 -
 16
16 -
 17
17 -
 18
18 -
 19
19 -
 20
20 -
21
-
22
-
23
-
24
-
25
-
26
-
27
-
28
-
29
-
30
-
31
-
32
-
33
-
34
-
35
-
36
-
37
-
38
-
39
-
40
-
41
-
42
 |
 |
12
D-Link DCS-8635LH User Manual
Section 2 - Installation
Stick the alignment sticker on the location where you want to mount the
camera, and
ensure the holes are level
. Then use a 6 mm drill bit to drill two
26 mm deep holes.
Hammer in the plastic wall anchors to support the screws.
1
/
2
/
Align the base plate over the holes and secure it tightly with screws.
3
/
Wall/ Ceiling Mounting
°±²³³´µ¶³·
°±²³³´µ¶³·
°±²³´µ¶´·¸¹·²º»¶¼
°±²³³´µ¶³·
°±²³³´µ¶³·
°±²³´µ¶´·¸¹·²º»¶¼
The device can be mounted on a wall or on the ceiling.