D-Link DCS-8635LH Quick Install Guide - Page 2
Wall/ Ceiling Mounting, Pole Mounting
 |
View all D-Link DCS-8635LH manuals
Add to My Manuals
Save this manual to your list of manuals |
Page 2 highlights
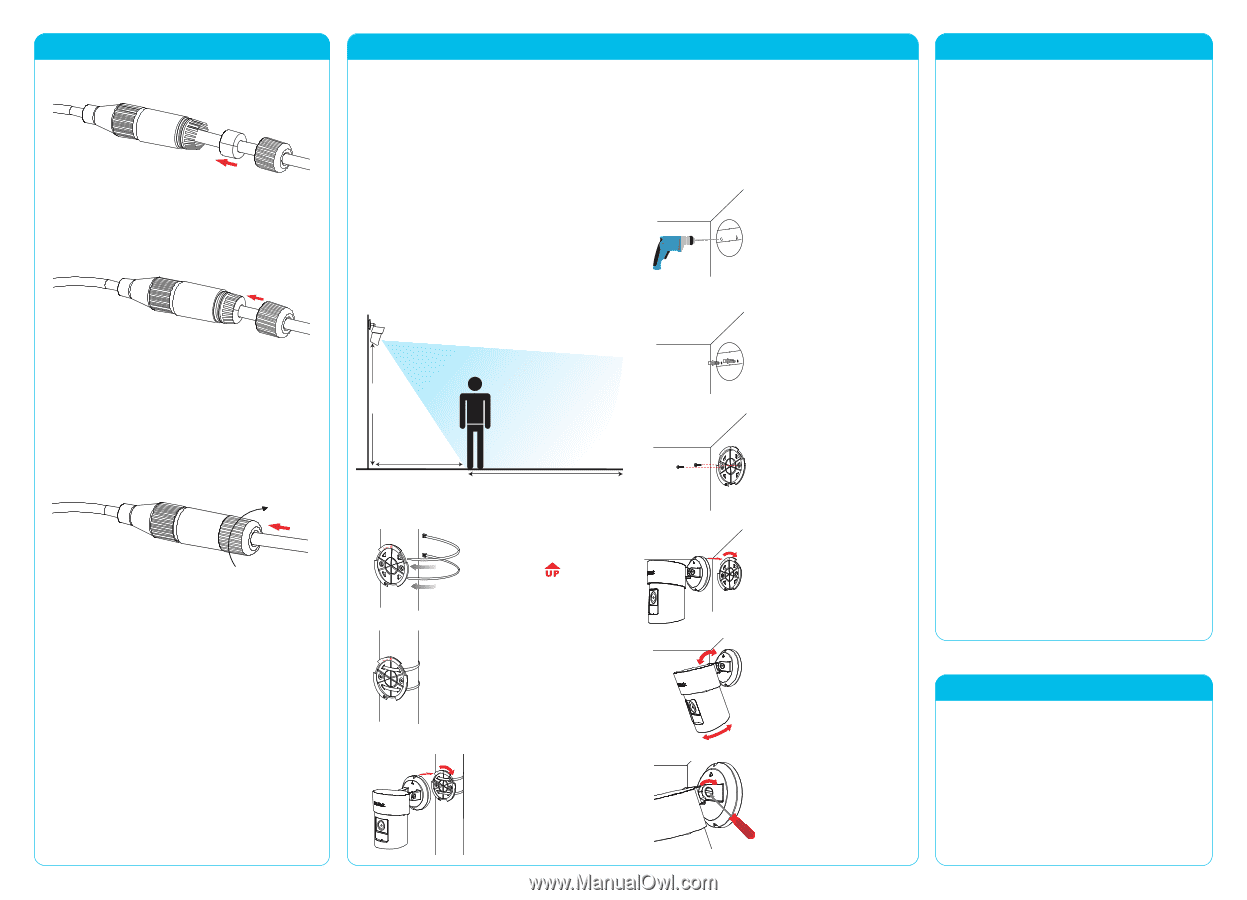
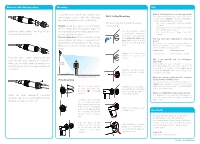
Ethernet Cable Waterproofing Install the white rubber bushing on the Ethernet cable as shown. Push the white rubber bushing all the way into the large waterproof connector. Make sure the white rubber bushing is not protruding outside of the large waterproof connector. Screw the small waterproof connector clockwise until it is securely tightened onto the large waterproof connector. Mounting To get the most out of your camera's view and features, please take the following placement guidelines into consideration. Height: Install the camera 2 to 2.5 meters (6.5 to 8 feet) from the ground. Higher or lower installation points will greatly decrease person detection accuracy. Person Detection: Person detection works properly when the subject is between 2 to 7 meters (6.5 to 23 feet) away from the camera. Detection accuracy decreases outside of this range. 2 - 2.5m (6.5 - 8ft.) 2m (6.5ft.) Pole Mounting Ideal Viewing Distance: 2 - 7 m (6.5 - 23ft.) Place the base plate against the pole and make sure the arrow is pointing upwards. Thread the cable ties through the slots on the base plate. Make sure the textured side of the cable ties is facing the pole to avoid slippage. Then fasten the plastic ties around the pole to secure the base plate. Align the arrow on the camera base with the dot on the base plate and turn clockwise to secure them together. Wall/ Ceiling Mounting The device can be mounted on a wall or on the ceiling. Stick the alignment sticker on the location where you want to mount the camera, and ensure the holes are level. Then use a 6 mm drill bit to drill two 26 mm deep holes. Hammer in the plastic wall anchors to support the screws. Align the base plate over the holes and secure it tightly with screws. Align the arrow on the camera base with the dot on the base plate and turn clockwise to secure them together. Adjust the camera to your desired position. After adjusting the camera angle, use a screwdriver or a coin and turn clockwise to tighten the screw. FAQ What do I do if my device is not working properly? Reset and reinstall your device. Use a paper clip to press the recessed Reset button and the LED will turn solid red. During installation, ensure that: • Your router is connected to the Internet and Wi-Fi is enabled • Your mobile device is connected to your router's Wi-Fi and Bluetooth is enabled • Your mydlink device is in range of your Wi-Fi network How can I use voice commands to control my device? The device will work with both Amazon Alexa and the Google Assistant. For setup instructions on these services, visit the following websites: Amazon Alexa The Google Assistant: dlink.com/en/alexa dlink.com/en/google-assistant Why is my microSD card not working/not supported? The microSD card must be formatted into the correct file system (FAT32) before it can be used with this product. This can be done in the mydlink app by selecting the Format function in the storage menu under the device settings. What is my username and password for setting up my device with an ONVIF system? To connect your device to an ONVIF system, key in "admin" as the username and use the PIN code of your mydlink device as the password. You can find the PIN code on your device's label. What is Color Night Vision and how does it work? Color Night Vision is enabled by default and allows you to see color images while viewing the live feed in low light scenarios. Need Help? Having trouble installing your new product? D-Link's website contains the latest user documentation and software updates for D-Link products. Customers can contact D-Link Technical Support through our website by choosing the relevant region. Contact Us www.dlink.com/en/contact-us 2021/07/09 Ver 1.02(WW)_90x130
-
 1
1 -
 2
2
 |
 |