D-Link DFE-550TX Product Manual - Page 19
Connecting the Network Cable - fast ethernet adapter
 |
UPC - 790069219528
View all D-Link DFE-550TX manuals
Add to My Manuals
Save this manual to your list of manuals |
Page 19 highlights
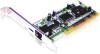
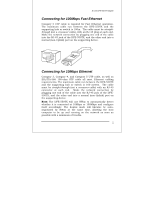
D-Link DFE-550TX Adapter the WOL cable. 1. Connect either end connector of the WOL Cable to the NIC WOL Connector. Both ends of the WOL Cable are identical, so either end may be used. 2. Examine the PC motherboard and/or refer to the manual for the motherboard to locate the corresponding WOL Connector on the motherboard. The actual location is system dependent, but the motherboard may have a label beside the WOL Connector. After you have located the WOL connector on the motherboard, connect the cable. 3. Power-ON the PC and press or when prompted to enter the PCI/ISA BIOS CMOS Setup. Enable the WOL function or the power-ON function of the PC. The name of this function is system dependent, but may be located in a category heading titled something like Power Management. Refer to your computer's manual for more information regarding the CMOS Setup Utility and BIOS settings. NOTE: If your system's motherboard WOL Connector does not fit the WOL Cable or does not have 3 pins, do not attempt to force a connection or alter the components to fit. Doing so could permanently damage your computer. Connecting the Network Cable Category 5 UTP cable qualifies for both 100BASE-TX Fast Ethernet and 10BASE-T Ethernet cabling rules. The maximum length of any single cable segment is 100 meters. Please keep in mind, however, that the maximum cable run between any two stations in a collision domain is 205m. 8
-
 1
1 -
2
-
3
-
4
-
5
-
6
-
7
-
8
-
9
-
10
-
11
-
12
-
13
-
 14
14 -
 15
15 -
 16
16 -
 17
17 -
 18
18 -
 19
19 -
 20
20 -
 21
21 -
 22
22 -
 23
23 -
 24
24 -
25
-
26
-
27
-
28
-
29
-
30
-
31
-
32
-
33
-
34
 |
 |
