D-Link DHP-306AV Product Manual - Page 8
Hardware Installation - problem
 |
View all D-Link DHP-306AV manuals
Add to My Manuals
Save this manual to your list of manuals |
Page 8 highlights
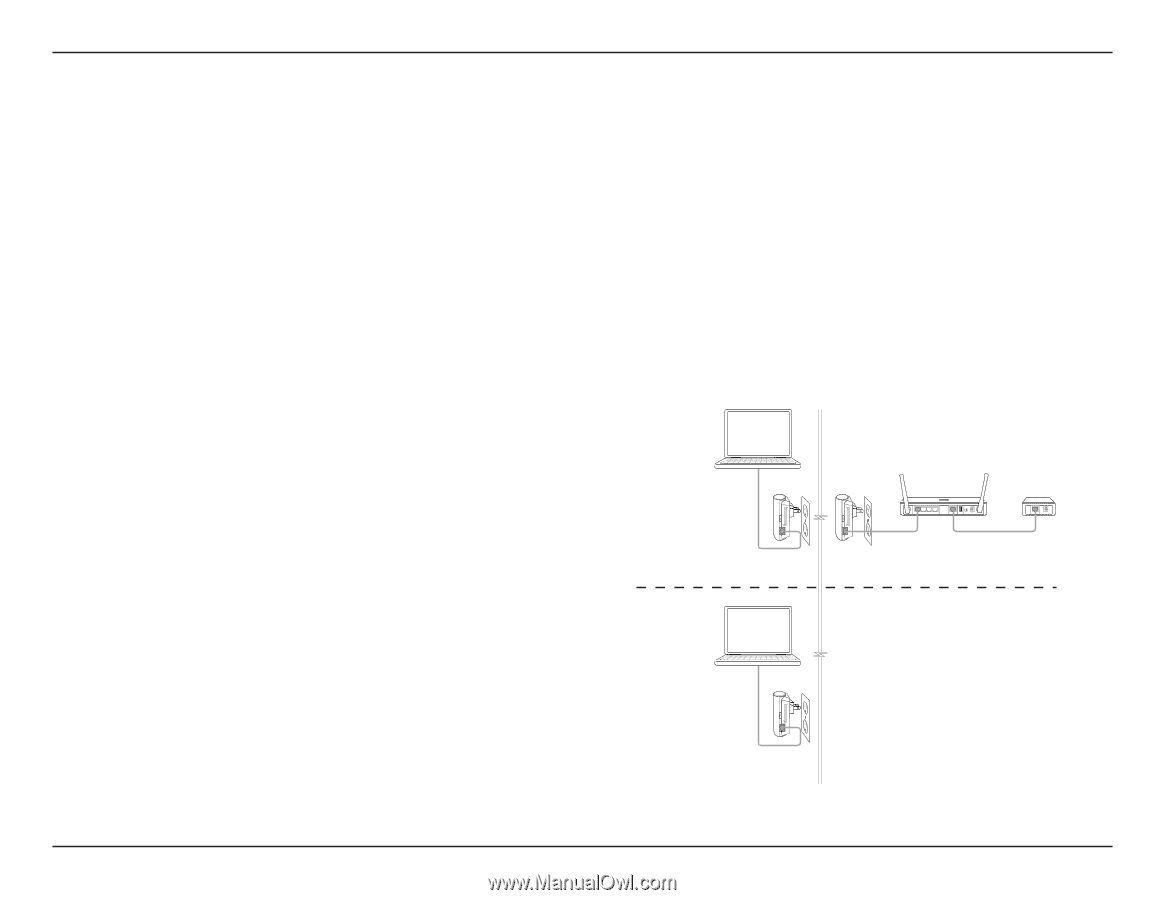
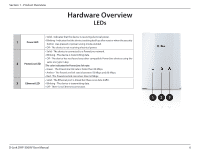
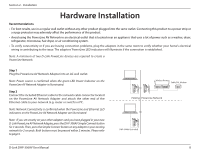
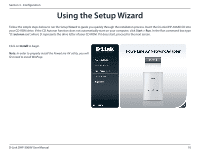
Section 2 - Installation Hardware Installation Recommendations • For best results, use in a regular wall outlet without any other product plugged into the same outlet. Connecting this product to a power strip or a surge protector may adversely affect the performance of this product. • Avoid using the PowerLine AV Network in an electrical outlet that is located near an appliance that uses a lot of power such as a washer, dryer, refrigerator, microwave, hair dryer, or air conditioning system. • To verify connectivity or if you are having connection problems, plug the adapters in the same room to verify whether your home's electrical wiring is contributing to the issue. The adapters' PowerLine LED indicators will illuminate if the connection is established. Note: A minimum of two D-Link PowerLine devices are required to create a PowerLine Network. Step 1 Plug the PowerLine AV Network Adapter into an AC wall outlet. Note: Power source is confirmed when the green LED Power Indicator on the PowerLine AV Network Adapter is illuminated. Step 2 Connect the included Ethernet cable to the network cable connector located on the PowerLine AV Network Adapter and attach the other end of the Ethernet cable to your network (e.g. router or switch) or PC. Note: Network Connectivity is confirmed when the PowerLine and Ethernet LED indicators on the PowerLine AV Network Adapter are illuminated. Note: If you set security on your other adapters and you have plugged in your new D-Link PowerLine AV Network Adapter, press the DHP-306AV Simple Connect button for 2 seconds. Then, press the Simple Connect button on any adapter in your existing network for 2 seconds. Both buttons must be pressed within 2 minutes. Please refer to page 9. Wireless Router Cable/DSL Modem 1 2 LAN 3 4 RESET INTERNET USB 5V - - - 3A INTERNET Existing PowerLine Network DHP-306AV (Included) D-Link DHP-306AV User Manual 8
-
 1
1 -
2
-
 3
3 -
 4
4 -
 5
5 -
 6
6 -
 7
7 -
 8
8 -
 9
9 -
 10
10 -
 11
11 -
 12
12 -
 13
13 -
14
-
15
-
16
-
17
-
18
-
19
-
20
-
21
-
22
-
23
 |
 |