D-Link DI-714P Product Manual - Page 10
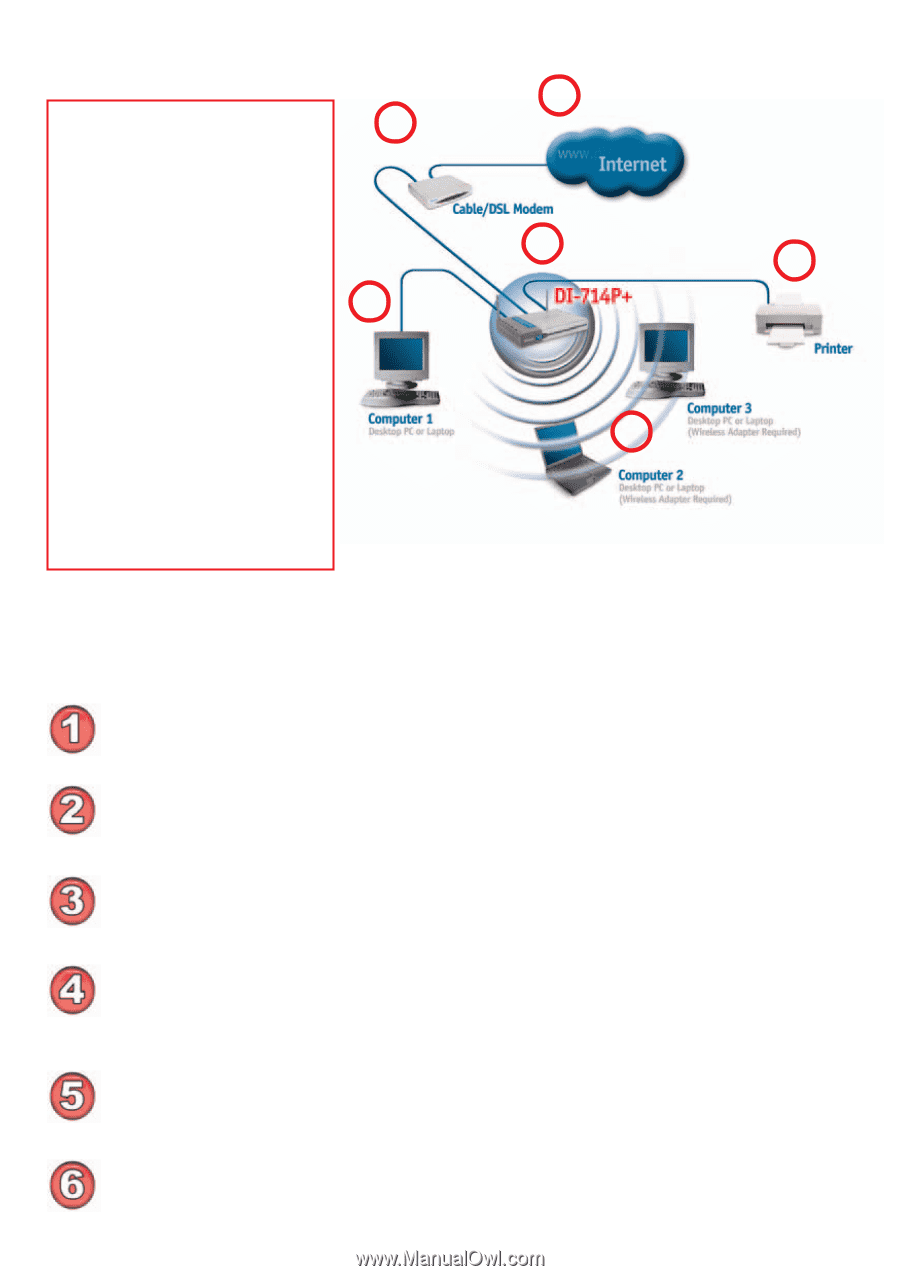
For a typical wireless setup at home as shown above, please do the, following, e.g., D-Link - driver
 |
UPC - 790069247057
View all D-Link DI-714P manuals
Add to My Manuals
Save this manual to your list of manuals |
Page 10 highlights
Getting Started Please refer to the following sections of this manual for 2 1 additional information about setting up a network: Networking Basics - learn how to check and assign 3 your IP Address; share 6 printers and files. 4 Using the Configuration Menu - learn the settings for the DI-714P+, using the web- based interface. 5 Troubleshooting - learn how to check for common installation issues and other tips for troubleshooting. Please remember that D-Link AirPlus wireless devices are pre-configured to connect together, right out of the box, with their default settings. For a typical wireless setup at home (as shown above), please do the following: You will need broadband Internet access (a Cable or DSL subscription line into your home or office) Consult with your Cable or DSL provider for proper installation of the modem Connect the Cable or DSL modem to the DI-714P+ wireless broadband router (see the Quick Installation Guide included with the DI-714P+.) If you are connecting a desktop computer to your network, you can install the D-Link AirPlus DWL-520+ wireless PCI adapter into an available PCI slot. (See the Quick Installation Guide included with the DWL-520+.) If you are connecting a laptop computer to your network, install the drivers for the wireless cardbus adapter (e.g., D-Link AirPlus DWL-650+) into a laptop computer.(See the Quick Installation Guide included with the DWL-650+.) Connect your printer to the printer port on the DI-714P+. Please refer to the quick installation guide for loading the print server software. 10
-
 1
1 -
2
-
3
-
4
-
 5
5 -
 6
6 -
 7
7 -
 8
8 -
 9
9 -
 10
10 -
 11
11 -
 12
12 -
 13
13 -
 14
14 -
 15
15 -
16
-
17
-
18
-
19
-
20
-
21
-
22
-
23
-
24
-
25
-
26
-
27
-
28
-
29
-
30
-
31
-
32
-
33
-
34
-
35
-
36
-
37
-
38
-
39
-
40
-
41
-
42
-
43
-
44
-
45
-
46
-
47
-
48
-
49
-
50
-
51
-
52
-
53
-
54
-
55
-
56
-
57
-
58
-
59
-
60
-
61
-
62
-
63
-
64
-
65
-
66
-
67
-
68
-
69
-
70
-
71
-
72
-
73
-
74
-
75
-
76
-
77
-
78
-
79
-
80
-
81
-
82
-
83
-
84
-
85
 |
 |