D-Link DI-724GU Product Manual
D-Link DI-724GU - Wireless 108G QoS Gigabit Office Router Manual
 |
UPC - 790069290114
View all D-Link DI-724GU manuals
Add to My Manuals
Save this manual to your list of manuals |
D-Link DI-724GU manual content summary:
- D-Link DI-724GU | Product Manual - Page 1
- D-Link DI-724GU | Product Manual - Page 2
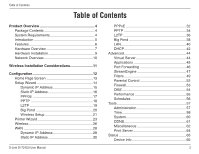
12 Home Page Screen 13 Setup Wizard 14 Dynamic IP Address 15 Static IP Address 16 PPPoE 17 PPTP 18 L2TP 19 Big Pond 20 Wireless Setup 21 Printer Wizard 23 Wireless 26 WAN 28 Dynamic IP Address 28 Static IP Address 30 D-Link DI-724GU User Manual PPPoE 32 PPTP 34 L2TP 36 Big Pond 38 - D-Link DI-724GU | Product Manual - Page 3
68 Wireless Status 69 Active Sessions 70 Print Server 71 Help 72 Troubleshooting 73 Wireless Basics 75 Networking Basics 80 Check your IP Address 80 Statically Assign an IP Address 81 Technical Specifications 82 Contacting Technical Support 83 Warranty 84 Registration 89 D-Link DI-724GU - D-Link DI-724GU | Product Manual - Page 4
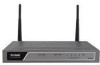
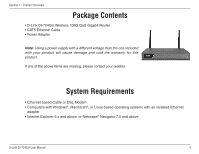
1 - Product Overview PParocdkuacgteOCvoenrtveinetws • D-Link DI-724GU Wireless 108G QoS Gigabit Router • CAT5 Ethernet Cable • Power Linux-based operating systems with an installed Ethernet adapter • Internet Explorer 6.x and above, or Netscape® Navigator 7.0 and above D-Link DI-724GU User Manual - D-Link DI-724GU | Product Manual - Page 5
Section 1 - Product Overview Introduction The D-Link DI-724GU Wireless 108G QoS Router is an 802.11g high-performance, wireless router that supports high-speed wireless networking at home, at work or in public places. Unlike most routers, the DI-724GU provides data transfers at up to 108Mbps ( - D-Link DI-724GU | Product Manual - Page 6
rate. D-Link 108G performance results are based on testing with other D-Link 108G enabled devices utilizing Packet Bursting, FastFrames, Turbo Mode and Compression techniques. Data already compressed may not benefit from the D-Link 108G compression techniques.. D-Link DI-724GU User Manual 6 - D-Link DI-724GU | Product Manual - Page 7
WLAN LED A solid light indicates that the wireless segment is ready. This LED blinks during wireless data transmission. USB LED A solid light indicates on the WAN port. This LED blinks during data transmission. D-Link DI-724GU User Manual Local Network LEDs A solid light on each port indicates a - D-Link DI-724GU | Product Manual - Page 8
Section 1 - Product Overview Antennas Used to connect to 802.11g or 802.11b wireless adapters. USB Port Connection for a USB to Ethernet-enabled computers. Power Receptor D-Link DI-724GU User Manual Reset Button Pressing this button restores the Router to its original factory default settings. 8 - D-Link DI-724GU | Product Manual - Page 9
.11g wireless adapters will be able to connect to the DI-724GU. The DWL-G650 AirPlus Xtreme G Wireless Cardbus Adapter and the DWL-G520 AirPlus Xtreme G Wireless PCI Adapter will be able to connect out of the box with the router using their default wireless settings. D-Link DI-724GU User Manual 9 - D-Link DI-724GU | Product Manual - Page 10
Section 1 - Product Overview Network Overview Please remember that D-Link Wireless 108G devices are pre-configured to connect together, right out of the box, with their default settings. D-Link DI-724GU User Manual 10 - D-Link DI-724GU | Product Manual - Page 11
Section 2 - Installation Wireless Installation Considerations The D-Link Wireless 108G QoS Gigabit Router lets you access your network using a wireless connection from virtually anywhere within the operating range of your wireless network. Keep in mind, however, that the number, thickness and - D-Link DI-724GU | Product Manual - Page 12
D-Link Wireless 108G QoS Gigabit Router using the D-Link Setup Wizard. Open your Web browser and type "http://192.168.0.1" into the URL address box. Then press the Enter or Return key. Select "Admin" from the User Name drop down menu and leave the password field blank. Click Login D-Link DI-724GU - D-Link DI-724GU | Product Manual - Page 13
browser can always download some version of the program from the router itself. If the browser displays a pop-up window requesting permission to download the Printer Wizard program, answer Yes or OK. Continue to page 23 for instructions on running the Printer Wizard. D-Link DI-724GU User Manual 13 - D-Link DI-724GU | Product Manual - Page 14
Section 3 - Configuration Setup Wizard Click Next You have the option to establish a password for the User Name "Admin". Click Next Choose your time zone from the drop down list. Click Next D-Link DI-724GU User Manual 14 - D-Link DI-724GU | Product Manual - Page 15
Dynamic IP Address, this screen will appear: (Used mainly for Cable Internet service). Click the "Clone MAC Address" button to automatically copy the MAC address of the network adapter in your computer. You can also manually type in the MAC address. Click Next D-Link DI-724GU User Manual 15 - D-Link DI-724GU | Product Manual - Page 16
3 - Configuration Static IP Address If your ISP requires a Static IP Address, select the corresponding radio button. Click Next Enter the IP address that was originally provided to you by your ISP. You will need to complete all of the required fields. Click Next D-Link DI-724GU User Manual 16 - D-Link DI-724GU | Product Manual - Page 17
IP connection, enter the Server IP, PPPoE Account, and Password provided to you by your ISP. If you have a Static IP connection, enter the IP Address, Subnet Mask, Gateway IP Address, Server IP, PPTP Account, and Password provided to you by your ISP. Click Next D-Link DI-724GU User Manual 17 - D-Link DI-724GU | Product Manual - Page 18
IP connection, enter the Server IP, PPTP Account, and Password provided to you by your ISP. If you have a Static IP connection, enter the IP Address, Subnet Mask, Gateway IP Address, Server IP, PPTP Account, and Password provided to you by your ISP. Click Next D-Link DI-724GU User Manual 18 - D-Link DI-724GU | Product Manual - Page 19
, enter the L2TP Server IP Address, User Name, and Password provided to you by your ISP. If you have a Static IP connection, enter the L2TP IP Address, Subnet Mask, Gateway IP Address, L2TP Server IP, User Name, and Password provided to you by your ISP. Click Next D-Link DI-724GU User Manual 19 - D-Link DI-724GU | Product Manual - Page 20
Section 3 - Configuration Big Pond Select this option if you connect to the internet through Telstra BigPond Cable Broadband in Australia. Click Next Enter the User Name, and Password provided to you by your ISP. Click Next D-Link DI-724GU User Manual 20 - D-Link DI-724GU | Product Manual - Page 21
. You can change the encryption settings for more secure wireless communication. Click Next There are two levels of WEP encryption: 64-bit and 128-bit (using only Hexadecimal). You can change the encryption settings for more secure wireless communication. Click Next D-Link DI-724GU User Manual 21 - D-Link DI-724GU | Product Manual - Page 22
Section 3 - Configuration Enter a PassPhrase that is between 8 to 63 characters and is alphanumeric. Click Next Click Restart D-Link DI-724GU User Manual 22 - D-Link DI-724GU | Product Manual - Page 23
Section 3 - Configuration Printer Wizard Before selecting to run the Print Wizard, make sure your printer is connected to the USB port on the router. Click Next The wizard will identify the make and model of your printer, as well as its status. Click Next D-Link DI-724GU User Manual 23 - D-Link DI-724GU | Product Manual - Page 24
Section 3 - Configuration Click Next to run the Printer Setup application. Click Next This application can only run when accessed from the router. Do not click Save. Click Next Click Next D-Link DI-724GU User Manual 24 - D-Link DI-724GU | Product Manual - Page 25
for your printer if they are not built into Windows®. Click OK Click Browse to locate the driver and then click OK. Once the wizard has completed installing your printer, you will be prompted to print a test page to verify its functionality. Click OK Click Finish D-Link DI-724GU User Manual 25 - D-Link DI-724GU | Product Manual - Page 26
Default is set to Auto. 802.11g Only If all of the wireless devices you want to connect with this router can connect in 802.11g mode, you can improve performance Mode: slightly by enabling this mode. If you want to connect 802.11b devices to this router, leave this option disabled. D-Link DI-724GU - D-Link DI-724GU | Product Manual - Page 27
including: WEP, WPA-Personal, and WPA-Enterprise. WEP is the original wireless encryption standard. WPA provides a higher level of security. WPA-Personal does not require an authentication server. The WPA-Enterprise option does require a RADIUS authentication server. D-Link DI-724GU User Manual 27 - D-Link DI-724GU | Product Manual - Page 28
server may be one that works better with unicast responses. In this case, turn the unicasting option on, and observe whether the router can obtain an IP address. In this mode, the router accepts unicast responses from the DHCP server instead of broadcast responses. D-Link DI-724GU User Manual 28 - D-Link DI-724GU | Product Manual - Page 29
the router's MTU is set too high, packets will be fragmented downstream. If the router's MTU is set too low, the router will fragment packets unnecessarily and in extreme cases may be unable to establish some connections. In either case, network performance can suffer. D-Link DI-724GU User Manual - D-Link DI-724GU | Product Manual - Page 30
from a computer or router with this particular MAC address.Your new router has a different MAC address than the computer or router that initially connected to the ISP. The default MAC address of the router is set to the MAC address of the WAN interface in the device. D-Link DI-724GU User Manual 30 - D-Link DI-724GU | Product Manual - Page 31
the router's MTU is set too high, packets will be fragmented downstream. If the router's MTU is set too low, the router will fragment packets unnecessarily and in extreme cases may be unable to establish some connections. In either case, network performance can suffer. D-Link DI-724GU User Manual - D-Link DI-724GU | Product Manual - Page 32
and the ISP. Password: This value is provided by agreement between you and the ISP. Verify Password: Re-enter the password. Service Name: Service Name is optional, but may be required by some ISPs. If your ISP provides a Service Name, enter the provided value here. D-Link DI-724GU User Manual 32 - D-Link DI-724GU | Product Manual - Page 33
establish some connections. In either case, network performance can suffer. Connect mode Typically, connections such as PPPoE, PPTP, and L2TP are not always on. The router allows you to set the connection select: mode. Choose Always on, Connect on demand, or Manual. D-Link DI-724GU User Manual 33 - D-Link DI-724GU | Product Manual - Page 34
Mask: When required, this value is provided by the ISP. Default Gateway: When required, this value is provided by the ISP. Server IP Address: When required, this value is provided by the ISP. Username: This value is provided by agreement between you and the ISP. D-Link DI-724GU User Manual 34 - D-Link DI-724GU | Product Manual - Page 35
establish some connections. In either case, network performance can suffer. Connect mode Typically, connections such as PPPoE, PPTP, and L2TP are not always on. The router allows you to set the connection select: mode. Choose Always on, Connect on demand, or Manual. D-Link DI-724GU User Manual 35 - D-Link DI-724GU | Product Manual - Page 36
Mask: When required, this value is provided by the ISP. Default Gateway: When required, this value is provided by the ISP. Server IP Address: When required, this value is provided by the ISP. Username: This value is provided by agreement between you and the ISP. D-Link DI-724GU User Manual 36 - D-Link DI-724GU | Product Manual - Page 37
establish some connections. In either case, network performance can suffer. Connect mode Typically, connections such as PPPoE, PPTP, and L2TP are not always on. The router allows you to set the connection select: mode. Choose Always on, Connect on demand, or Manual. D-Link DI-724GU User Manual 37 - D-Link DI-724GU | Product Manual - Page 38
in the computer or router used to initially connect to their service. The ISP will then only grant Internet access to requests from a computer or router with this particular MAC address.Your new router has a different MAC address than the computer or router that D-Link DI-724GU User Manual 38 - D-Link DI-724GU | Product Manual - Page 39
immediate disconnection when the cable is pulled or when a glitch occurs. Having to increase Link Drop Delay because you are experiencing WAN disconnections for long periods would suggest a fault with the cable or with the modem (if any) to which it is connected. D-Link DI-724GU User Manual 39 - D-Link DI-724GU | Product Manual - Page 40
RIP specification. V1. Use if none of the routers supports Version 2. V2 Broadcast. Use if some routers are capable of Version 2, but some are only capable of Version 1. V2 Multicast. Use if this is the only rounter on the LAN or if all the routers support Version 2. D-Link DI-724GU User Manual 40 - D-Link DI-724GU | Product Manual - Page 41
. Act as default router: Make this router the preferred destination for packets that are not otherwise destined. Allow RIP updates For security, disable this option unless required by the ISP. from WAN: RIP Password: RIP Version 2 supports the use of a password to limit access to routers through the - D-Link DI-724GU | Product Manual - Page 42
- Configuration DHCP DHCP Server: Once the router is properly configured and this DHCP Server option is enabled, the DHCP Server will manage the IP addresses and other network configuration information for no longer needed than another tenant may use the address. D-Link DI-724GU User Manual 42 - D-Link DI-724GU | Product Manual - Page 43
router to always broadcast its responses to all clients, thereby working around the problem, at the cost of increased broadcast traffic on the LAN. DHCP Reservations: In this section you can add reserved IP see what LAN devices are currently leasing IP addresses. List: D-Link DI-724GU User Manual 43 - D-Link DI-724GU | Product Manual - Page 44
, go to the Advanced -> Firewall page and create a new firewall rule. Schedule: Select a schedule for when the service will be enabled. If you do not see the schedule you need in the list of schedules, go to the Advanced -> Schedules screen and create a new schedule. D-Link DI-724GU User Manual 44 - D-Link DI-724GU | Product Manual - Page 45
that you want to open up to Internet traffic. [6000-6200] Public Type: Select the protocol used by the Internet traffic coming back into the router through the opened port range. [Both] D-Link DI-724GU User Manual 45 - D-Link DI-724GU | Product Manual - Page 46
IP address of the system hosting the game server, for example 192.168.0.50. TCP Ports to Enter the TCP ports to open. [6159-6180, Open: 99] UDP Ports to Enter the UDP ports to open. [6159-6180, Open: 99] Firewall Rule: Select a firewall rule that controls access . D-Link DI-724GU User Manual 46 - D-Link DI-724GU | Product Manual - Page 47
default the router service such as http://www.dslreports.com/. Note however that sites such as DSL Reports, because they do not consider as many network protocol overheads, will generally note speeds slightly lower than the Measured Uplink Speed or the ISP rated speed. D-Link DI-724GU User Manual - D-Link DI-724GU | Product Manual - Page 48
Section 3 - Configuration Connection Type: By default, the router automatically determines whether the underlying connection is an xDSL/Frame-relay network or some Auto-detect, the automatically detected connection type is displayed here. Other Frame Relay Network : D-Link DI-724GU User Manual 48 - D-Link DI-724GU | Product Manual - Page 49
. IP Filter List: This section shows the current IP Filter rules. Rules can be changed by clicking the Edit icon, or deleted by clicking the Delete icon. When you click the Edit icon, the item is highlighted, and the "IP Filters" section is activated for editing. D-Link DI-724GU User Manual 49 - D-Link DI-724GU | Product Manual - Page 50
, you can regain access by activating the factory defaults button on the router itself. Only deny Select this option if you want all computers to computers with have network access except those computers MAC address in the list. listed below to access the network: D-Link DI-724GU User Manual 50 - D-Link DI-724GU | Product Manual - Page 51
: All currently connected LAN devices under DHCP will be listed here by their current IP address. Select the computer whose access you want to control from the "DHCP Client" list. Then click the Clone button to capture its MAC address in the MAC Address box above. D-Link DI-724GU User Manual 51 - D-Link DI-724GU | Product Manual - Page 52
, to access my.yahoo.com, you need to enable access to yahoo.com, yimg.com, and doubleclick.net. Save: Clicking the Save button saves the new or edited entry in the following list. Clear: Clicking this button erases edits you have made to the "Add Web Site" text. D-Link DI-724GU User Manual 52 - D-Link DI-724GU | Product Manual - Page 53
the add/edit area of the screen. Action: The rule can either Allow or Deny messages. Source IP Range: Define the range of Internet addresses this rule applies to. Firewall Rules The section lists the , and the "Firewall Rules" section is activated for editing. D-Link DI-724GU User Manual 53 - D-Link DI-724GU | Product Manual - Page 54
. If this computer obtains its address Automatically using DHCP, then you may want to make a DHCP reservation on the Home -> DHCP page, so that the IP address of the DMZ machine does not change. D-Link DI-724GU User Manual 54 - D-Link DI-724GU | Product Manual - Page 55
broadcast or multicast messages for associated clients, it sends the next DTIM with a DTIM Interval value. Wireless clients detect the beacons and awaken to receive the broadcast and multicast messages. The default value is 1. Valid settings are between 1 and 255. D-Link DI-724GU User Manual 55 - D-Link DI-724GU | Product Manual - Page 56
box and the minutes in the second box. The end time is used for most other rules, but is not normally used for email events. D-Link DI-724GU User Manual 56 - D-Link DI-724GU | Product Manual - Page 57
:// my.domain.com:1080/. Remote Admin Select a firewall rule that controls access as needed for this admin port. If you do not see the firewall rule you need in Firewall Rule: the list of firewall rules, go to the Advanced -> Firewall page and create a new firewall rule. D-Link DI-724GU User Manual 57 - D-Link DI-724GU | Product Manual - Page 58
the configured Network Time Server. Here you can select how often you want the router to update its time from the Network Time Server. To avoid overloading Network Time Servers, do the correct time after you restart the router, or you must enable the NTP Server option. D-Link DI-724GU User Manual 58 - D-Link DI-724GU | Product Manual - Page 59
Daylight Saving: Enable this option if daylight saving time is observed in your location. The router will automatically update the hour on the start and end dates specified below. Start/End: Select the starting "Daylight saving starts on the third Sunday of October." D-Link DI-724GU User Manual 59 - D-Link DI-724GU | Product Manual - Page 60
settings that were in effect at the time the router was shipped from the factory. Any settings that have not been saved will be lost, including any rules that you have created. If you want to save the current router configuration settings, use the Save button above. D-Link DI-724GU User Manual 60 - D-Link DI-724GU | Product Manual - Page 61
80 on your LAN. If, however, you do this from a LAN-side computer and there is no virtual server defined for port 80, the router will return the router's configuration home page. Refer to the Advanced -> Virtual Server configuration page to set up a virtual server. D-Link DI-724GU User Manual 61 - D-Link DI-724GU | Product Manual - Page 62
ficulties when playing online games or even certain applications that use voice data, you may need to enable Gaming Mode for these applications to work correctly. When not playing games or using these voice applications, it is recommended that Gaming Mode be disabled. D-Link DI-724GU User Manual 62 - D-Link DI-724GU | Product Manual - Page 63
L2TP VPN connections typically use IPSec to secure the connection. To achieve multiple VPN pass-through in this case, the IPSec ALG must be enabled. WAN Speed Normally, this is set to "auto". If you have trouble connecting to the WAN, try the other settings. Select: D-Link DI-724GU User Manual 63 - D-Link DI-724GU | Product Manual - Page 64
router to support the LPD/LPR protocol. Printers are identified by a symbolic queue name. This option is disabled by default; enable it if required by the devices on the LAN. This method of printing is generally preferred for Unix or Macintosh (starting with Mac OS 8.1). D-Link DI-724GU User Manual - D-Link DI-724GU | Product Manual - Page 65
WAN, LAN, Wireless, and DHCP options router. The detection "range" is limited to the address range as configured in DHCP Server. Computers that have an address outside of this range will not show. If the DHCP Client (i.e. a computer configured to "Automatically obtain an D-Link DI-724GU User Manual - D-Link DI-724GU | Product Manual - Page 66
for your router. A value of 0.0.0.0 for gateway means there is no next hop, and the IP address is directly connected to the router on the interface specified: LAN or WAN. A value of 0.0.0.0 in both the destination IP and netmask means that this is the default route. D-Link DI-724GU User Manual 66 - D-Link DI-724GU | Product Manual - Page 67
you accessed the log. Clear: Clicking this button empties the log by erasing all log entries. Send Mail Now: If you provided email information with the Tools -> Miscellaneous screen, clicking the Send Mail Now button sends the router log to the configured email address. D-Link DI-724GU User Manual - D-Link DI-724GU | Product Manual - Page 68
Refresh button updates the display by retrieving the latest packet tallies from the router. Clicking the Reset button restarts the packet tallies from zero. Receive: The number of packets received by the router. Transmit: The number of packets sent from the router. D-Link DI-724GU User Manual 68 - D-Link DI-724GU | Product Manual - Page 69
wireless clients that are connected to your wireless router. MAC Address: The Ethernet ID (MAC address) of the wireless client. IP Address: The LAN-side IP address of the client. Mode wireless networks), and by obstacles between the router and the wireless device. D-Link DI-724GU User Manual 69 - D-Link DI-724GU | Product Manual - Page 70
-side application. Protocol: The communications protocol used for the conversation. External: The IP address and port number of the WAN-side application. NAT: The port number of Out: The number of seconds of idle time until the router considers the session terminated. D-Link DI-724GU User Manual 70 - D-Link DI-724GU | Product Manual - Page 71
the router; therefore, such a printer always shows a status of "Offline". Raw TCP Port Shows the "IP Address" mode. LPD/LPR Printing: Shows the "IP Address" and "Queue Name" values that you need to enter when you configure your computer to use the printer in LPR/LPD mode. D-Link DI-724GU User Manual - D-Link DI-724GU | Product Manual - Page 72
Section 3 - Configuration Help D-Link DI-724GU User Manual 72 - D-Link DI-724GU | Product Manual - Page 73
in the Wireless Basics section of this manual for further information about the most advantageous placement of your D-Link wireless products. 2. Why does my wireless connection keep dropping? Antenna Orientation- Try different antenna orientations for the DI-724GU. Try to keep the antenna at least - D-Link DI-724GU | Product Manual - Page 74
other methods for troubleshooting your network, you may choose to Reset the DI-724GU to the factory default settings. Remember that D-Link Wireless 108G products network together, out of the box, at the factory default settings. • To hard-reset the DI-724GU to Factory Default Settings, please do - D-Link DI-724GU | Product Manual - Page 75
. Under many circumstances, it may be desirable for mobile network devices to link to a conventional Ethernet LAN in order to use servers, printers or an Internet connection supplied through the wired LAN. A Wireless Router is a device used to provide this link. D-Link DI-724GU User Manual 75 - D-Link DI-724GU | Product Manual - Page 76
, the signal can travel up to 300 feet. With an outdoor access point the signal can reach out up to 30 miles to serve places like manufacturing plants, industrial locations, college and high school campuses, airports, golf courses, and many other outdoor venues. D-Link DI-724GU User Manual 76 - D-Link DI-724GU | Product Manual - Page 77
just at home or office. People like the freedom of mobility and it's becoming so popular that more and more public facilities now provide wireless access to attract people. The wireless connection in public places is usually called "hotspots". D-Link DI-724GU User Manual 77 - D-Link DI-724GU | Product Manual - Page 78
on same frequency. Security Don't let you next-door neighbors or intruders connect to your wireless network. Secure your wireless network by turning on the WPA or WEP security feature on the router. Refer to product manual for detail information on how to set it up. D-Link DI-724GU User Manual 78 - D-Link DI-724GU | Product Manual - Page 79
an Access Point or wireless router. All the wireless devices, or clients, will connect to the wireless router or access point. An Ad-Hoc network contains only clients, such as laptops with wireless cardbus adapters. All the adapters must be in Ad-Hoc mode to communicate. D-Link DI-724GU User Manual - D-Link DI-724GU | Product Manual - Page 80
your router. Some firewall software programs may block a DHCP request on newly installed adapters. If you are connecting to a wireless network at a hotspot (e.g. hotel, coffee shop, airport), please contact an employee or administrator to verify their wireless network settings. D-Link DI-724GU User - D-Link DI-724GU | Product Manual - Page 81
Set Default Gateway the same as the LAN IP address of your router (192.168.0.1). Set Primary DNS the same as the LAN IP address of your router (192.168.0.1).The Secondary DNS is not needed or you may enter a DNS server from your ISP. Step 5 Click OK twice to save your settings. D-Link DI-724GU User - D-Link DI-724GU | Product Manual - Page 82
Explorer v6 LEDs Two-Color LED Advanced Firewall Features Power • NAT with VPN Passthrough (Network Address Translation) • External Power Supply • MAC Filtering • 5V actual data throughput rate. Environmental factors will adversely affect wireless signal range. D-Link DI-724GU User Manual 82 - D-Link DI-724GU | Product Manual - Page 83
: http://support.dlink.com/contact/ Tech Support for customers within Canada: D-Link Technical Support over the Telephone: (800) 361-5265 Monday to Friday 7:30am to 9:00pm EST D-Link Technical Support over the Internet: http://support.dlink.ca email:[email protected] D-Link DI-724GU User Manual 83 - D-Link DI-724GU | Product Manual - Page 84
the defective Hardware will be refunded by D-Link upon return to D-Link of the defective Hardware. All Hardware or part thereof that is replaced by D-Link, or for which the purchase price is refunded, shall become the property of D-Link upon replacement or refund. D-Link DI-724GU User Manual 84 - D-Link DI-724GU | Product Manual - Page 85
Link's option, to replace the non-conforming Software (or defective media) with software that substantially conforms to D-Link's functional specifications for the Software or to refund the portion of the actual purchase price original purchase point based on dlink.com/. D-Link DI-724GU User Manual 85 - D-Link DI-724GU | Product Manual - Page 86
any manuals or accessories in the shipping package. DLink will only software, firmware or other products or services provided by anyone other than D-Link; and Products that have been purchased from inventory clearance or liquidation sales or other sales in which D-Link Link DI-724GU User Manual 86 - D-Link DI-724GU | Product Manual - Page 87
from D-Link Corporation/D-Link Systems, Inc., as stipulated by the United States Copyright Act of 1976 and any amendments thereto. Contents are subject to change without prior notice. Copyright 2006 by D-Link Corporation/D-Link Systems, Inc. All rights reserved. D-Link DI-724GU User Manual 87 - D-Link DI-724GU | Product Manual - Page 88
not installed and used in accordance with the instructions, may cause harmful interference to radio communication. more of the following measures: • Reorient or relocate the receiving antenna. • Increase the separation between the equipment and receiver. • Link office. D-Link DI-724GU User Manual 88 - D-Link DI-724GU | Product Manual - Page 89
Registration Product registration is entirely voluntary and failure to complete or return this form will not diminish your warranty rights. Version 1.0 03/15/2006 D-Link DI-724GU User Manual 89
-
 1
1 -
 2
2 -
 3
3 -
 4
4 -
 5
5 -
 6
6 -
 7
7 -
8
-
9
-
10
-
11
-
12
-
13
-
14
-
15
-
16
-
17
-
18
-
19
-
20
-
21
-
22
-
23
-
24
-
25
-
26
-
27
-
28
-
29
-
30
-
31
-
32
-
33
-
34
-
35
-
36
-
37
-
38
-
39
-
40
-
41
-
42
-
43
-
44
-
45
-
46
-
47
-
48
-
49
-
50
-
51
-
52
-
53
-
54
-
55
-
56
-
57
-
58
-
59
-
60
-
61
-
62
-
63
-
64
-
65
-
66
-
67
-
68
-
69
-
70
-
71
-
72
-
73
-
74
-
75
-
76
-
77
-
78
-
79
-
80
-
81
-
82
-
83
-
84
-
85
-
86
-
87
-
88
-
89
 |
 |
