D-Link DSM-310 Quick Installation Guide - Page 1
D-Link DSM-310 Manual
 |
View all D-Link DSM-310 manuals
Add to My Manuals
Save this manual to your list of manuals |
Page 1 highlights
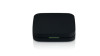
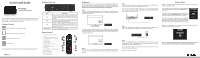
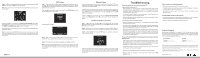
Quick Install Guide Hardware Overview MovieNite Streaming Media Player Thank you for purchasing the DSM-310 MovieNite Streaming Media Player. Follow the easy steps in this guide to properly set up your media player. Please verify that all the package contents listed below are available. Package Contents DSM-310 MovieNite Streaming Media Player Remote Control (includes 2 AAA batteries) Composite Audio/Video Cable Power Adapter If any of the above items are missing, please contact your reseller. Note that this product does not include an Ethernet or HDMI cable. For the best quality video and audio, it is recommended to purchase an HDMI cable. DSM-310 AV HDMI LAN DC 12V Port AV HDMI LAN Power Receptor Description Firmly connect the supplied composite A/V cable here and the other end into your TV or home theater receiver. If you are using an HDMI connection, you do not have to connect this cable. Connect an HDMI cable (not included) here and the other end into your TV or home theater receiver. Connect an Ethernet cable (not included) here and the other end to your network (router/gateway or switch). If you would like to connect using a wireless connection, do not connect an Ethernet cable. Connect the supplied power adapter here and the other end into an outlet or surge protector. Remote Control 1 Press to turn the DSM-310 on and off 2 Stop 3 Previous Button (function depends on app) 4 Forward Button (function depends on app) 5 Rewind Button 6 Play/Pause Button 7 Fast Forward Button 8 Directional Pad to navigate menus 9 OK/Enter Button 10 Press to go to the home page 11 Back Button 12 Options Button (function depends on app) 13 Press to launch Vudu 14 Press to launch Netflix 15 Press to launch Pandora 16 Press to launch YouTube 2 3 5 6 9 10 11 13 15 1 4 7 8 12 14 16 Installation Follow the steps below to connect and install your MovieNite Media Player. Once you connect, you may be prompted to update the firmware. Press OK on the remote. Once the firmware is finished updating, the unit will reboot automatically. Warning: Do not turn off the DSM-310 during the update process. Step 1 Connect an HDMI cable (not included) to the HDMI port on the DSM-310 and the other end into the HDMI input port on your TV or receiver. Note that HDMI is required for HD resolution. HDMI AV HDMI LAN DC 12V If you do not have an HDMI cable or a TV with an HDMI port, connect the supplied A/V cable into the AV port on the DSM-310 and the other end into the correct matching input ports on your TV or home theater receiver (yellow is for video, red and white are for audio). Step 3 Connect an Ethernet cable (not included) to the LAN port on the DSM-310 and other end into your network (via router, gateway, or switch). If you want to use the built-in wireless adapter, do not connect the Ethernet cable. The on-screen setup wizard will allow you configure your wireless settings (refer to Step 6 for wireless setup information). 1 2 LAN 3 4 RESET INTERNET USB 5V - - - 3A AV HDMI LAN DC 12V Step 4 Connect the supplied power adapter to the power receptor on the DSM-310 and plug it into a power outlet or surge protector. The device will power on. AV HDMI LAN DC 12V Wireless Setup Step 6 - If you did not connect an Ethernet cable, the DSM-310 will attempt to connect to a wireless network. A list of wireless networks in your area will appear. Select the network you want to connect to and press the OK button on your remote. If you do not see your network displayed in the list, you can scroll down and select Manually Connect to manually enter your wireless network name (SSID) and security settings. Note that your wireless network will not be displayed if your router is out of range or the SSID broadcast is disabled. Remember that the SSID and security password must match your wireless router or access point exactly (case-sensitive). Step 7 - If the network you want to connect to is secure (encrypted), you will be prompted to enter the security password. HDMI AV HDMI LAN DC 12V Step 2 Power on your TV (and your receiver if you have connected the media player to it). Select the correct video input (or source) on your TV (and correct input on your receiver). Step 5 You will see the MovieNite screen appear. Follow the on-screen setup (if any) to configure your DSM-310 media player. You may manually change your settings by clicking the gear icon from the Home page. If you connected an Ethernet cable and you cannot connect, please refer to Ethernet Setup on the back page. Wireless users continue to Step 6. Note: You can also use WPS (useful if you do not remember your wireless password). Skip to the WPS Setup section on the back of this install guide.
-
 1
1 -
 2
2
 |
 |