D-Link DSN-500 Software User's Guide for DSN-1100-10 - Page 106
Viewing or Changing Advanced Settings Advanced Settings Tab
 |
UPC - 790069324031
View all D-Link DSN-500 manuals
Add to My Manuals
Save this manual to your list of manuals |
Page 106 highlights
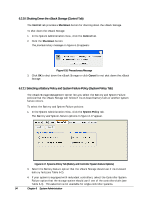
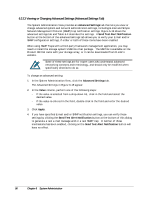
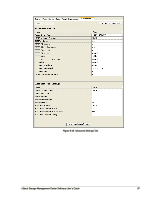
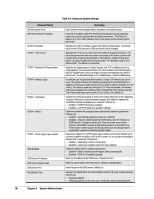
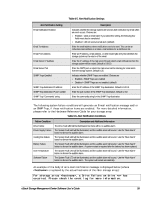
6.2.13 Viewing or Changing Advanced Settings (Advanced Settings Tab) The System Administration View provides an Advanced Settings tab that lets you view or change advanced system and network administration settings, including E-mail and Simple Network Management Protocol (SNMP) trap notification settings. Figure 6-18 shows the advanced settings tab and Table 6-4 describes the settings. A Send Test Alert Notification button at the bottom of the advanced settings tab allows you to verify your E-mail and/or SNMP configuration settings, if either or both of those items have been enabled. When using SNMP Traps with a third-party framework management application, you may need to install the storage system's MIB into that package. The MIB file is available on the Product CD that came with your storage array, or it can be downloaded from D-Link's website. Some of these settings are for expert users who understand advanced networking concepts and terminology, and should only be modified when specifically directed to do so. To change an advanced setting: 1. In the System Administration View, click the Advanced Settings tab. The Advanced Settings in Figure 6-18 appear. 2. In the Value column, perform one of the following steps: - If the value is selected from a drop-down list, click in the field and select the desired value. - If the value is entered in the field, double-click in the field and enter the desired value. 3. Click Apply. 4. If you have specified E-mail and/or SNMP notification settings, you can verify those settings by clicking the Send Test Alert Notification button at the bottom of this dialog to generate a test e-mail message and/or a test SNMP trap. In neither of those mechanisms has been enabled, clicking on the Send Test Alert Notification button will have no effect. 96 Chapter 6 System Administration
-
 1
1 -
2
-
3
-
4
-
5
-
6
-
7
-
8
-
9
-
10
-
11
-
12
-
13
-
14
-
15
-
16
-
17
-
18
-
19
-
20
-
21
-
22
-
23
-
24
-
25
-
26
-
27
-
28
-
29
-
30
-
31
-
32
-
33
-
34
-
35
-
36
-
37
-
38
-
39
-
40
-
41
-
42
-
43
-
44
-
45
-
46
-
47
-
48
-
49
-
50
-
51
-
52
-
53
-
54
-
55
-
56
-
57
-
58
-
59
-
60
-
61
-
62
-
63
-
64
-
65
-
66
-
67
-
68
-
69
-
70
-
71
-
72
-
73
-
74
-
75
-
76
-
77
-
78
-
79
-
80
-
81
-
82
-
83
-
84
-
85
-
86
-
87
-
88
-
89
-
90
-
91
-
92
-
93
-
94
-
95
-
96
-
97
-
98
-
99
-
100
-
 101
101 -
 102
102 -
 103
103 -
 104
104 -
 105
105 -
 106
106 -
 107
107 -
 108
108 -
 109
109 -
 110
110 -
 111
111 -
112
-
113
-
114
-
115
-
116
-
117
-
118
-
119
-
120
-
121
-
122
-
123
-
124
-
125
-
126
-
127
-
128
-
129
-
130
-
131
-
132
-
133
-
134
-
135
-
136
-
137
-
138
-
139
-
140
-
141
-
142
-
143
-
144
-
145
-
146
-
147
-
148
-
149
-
150
-
151
-
152
-
153
-
154
-
155
-
156
-
157
-
158
 |
 |