D-Link DSN-6510 User Manual - Page 103
Upgrade Firmware, Enclosure Management -> S.M.A.R.T.
 |
View all D-Link DSN-6510 manuals
Add to My Manuals
Save this manual to your list of manuals |
Page 103 highlights
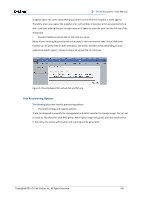
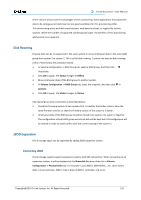
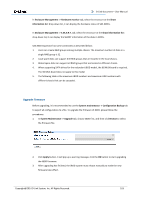
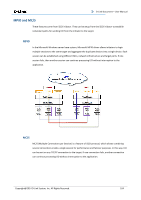
D-Link Document - User Manual In Enclosure Management -> Hardware monitor tab, select the enclosure at the Show information for: drop-down list, it can display the hardware status of SAS JBODs. In Enclosure Management -> S.M.A.R.T. tab, select the enclosure at the Show information for: drop-down list, it can display the SMART information of the disks in JBODs. SAS JBOD expansion has some constraints as described below: 1. Users can create RAID groups among multiple chassis. The maximum number of disks in a single RAID group is 32. 2. Local spare disks can support the RAID groups that are located in the local chassis. 3. Global spare disks can support all RAID groups that are located in different chassis. 4. When supporting SATA drives for the redundant JBOD model, the 6G MUX board is required. The 3G MUX board does not apply to this model. 5. The following table is the maximum JBOD numbers and maximum HDD numbers with different chassis that can be cascaded. Upgrade Firmware Before upgrading, it is recommended to use the System maintenance -> Configuration Backup tab to export all configurations to a file. To upgrade the firmware of JBOD, please follow the procedures. 1. In System Maintenance -> Upgrade tab, choose JBOD first, and then click Browse to select the firmware file. 2. Click Apply button, it will pop up a warning message, click the OK button to start upgrading the JBOD firmware. 3. After upgrading has finished, the JBOD system must reboot manually to make the new firmware take effect. Copyright@2014 D-Link System, Inc. All Rights Reserved. 103
-
 1
1 -
2
-
3
-
4
-
5
-
6
-
7
-
8
-
9
-
10
-
11
-
12
-
13
-
14
-
15
-
16
-
17
-
18
-
19
-
20
-
21
-
22
-
23
-
24
-
25
-
26
-
27
-
28
-
29
-
30
-
31
-
32
-
33
-
34
-
35
-
36
-
37
-
38
-
39
-
40
-
41
-
42
-
43
-
44
-
45
-
46
-
47
-
48
-
49
-
50
-
51
-
52
-
53
-
54
-
55
-
56
-
57
-
58
-
59
-
60
-
61
-
62
-
63
-
64
-
65
-
66
-
67
-
68
-
69
-
70
-
71
-
72
-
73
-
74
-
75
-
76
-
77
-
78
-
79
-
80
-
81
-
82
-
83
-
84
-
85
-
86
-
87
-
88
-
89
-
90
-
91
-
92
-
93
-
94
-
95
-
96
-
97
-
 98
98 -
 99
99 -
 100
100 -
 101
101 -
 102
102 -
 103
103 -
 104
104 -
 105
105 -
 106
106 -
 107
107 -
 108
108 -
109
-
110
-
111
-
112
-
113
-
114
-
115
-
116
-
117
-
118
-
119
-
120
-
121
-
122
-
123
-
124
-
125
-
126
-
127
-
128
-
129
-
130
-
131
-
132
-
133
-
134
-
135
-
136
-
137
-
138
-
139
-
140
-
141
-
142
-
143
-
144
-
145
-
146
-
147
-
148
-
149
-
150
-
151
-
152
-
153
-
154
-
155
 |
 |