D-Link DSR-250v2 Quick installation guide - Page 2
Federal Communication Commission, Interference Statement
 |
View all D-Link DSR-250v2 manuals
Add to My Manuals
Save this manual to your list of manuals |
Page 2 highlights
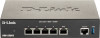
2. Connect an RJ-45 cable from the port labeled LAN (1-4) to a switch in the LAN network segment. 3. Connect an RJ45-to-DB9 cable from the console port for CLI (Command Line Interface) management access. Internet WAN 2. Ensure your workstation is DHCP Client enabled or configured with a static IP address in the 192.168.10.0/24 subnet. 3. Log on the Services Router Web Interface 192.168.10.1, the default log on information is: Username: admin Password: Admin$123 Switch LAN Console User Figure 3. Basic Cabling Example Initially Configure the Device The services router software is preinstalled on the DSR-250V2 device. When the device is powered on, it is ready to be configured. While the device has a default factory configuration that allow you to initially connect to the device, you must perform further configuration for your specific network requirements. Using the WebUI To use the WebUI, the workstation from which you are managing the device must initially be on the same subnetwork as the device. To access the device with the WebUI: 1. Connect your workstation on the port labeled LAN (1-4), which is pre-allo- cated to the LAN. Figure 4. WebUI login Using a Console Connection (RJ45-to-DB9 DCE) The Services Router provides an serial port that enables a connection to a computer or terminal for monitoring and configuring the device. This port is a RJ-45 connector, implemented as a data communication terminal equipment (DCE) connection. To use the console port connection, you need the following equipment: 1. A terminal or a computer with both a serial port and the ability to emu- late a terminal. 2. A RJ45-to-DB9 RS-232 with female connector. (Already included in packing list) 3. If your Laptop or PC doesn't have RS-232 connector, a converter is required. Note: DSR-250V2 does not come with RS-232 converter and these must be purchased separately. To establish a console connection: 1. Plug the RJ-45 connector of the supplied RJ45-to-DB9 cable directly to the console port on the Services Router. 2. Connect the other end of the cable to a terminal or to the serial connector of a computer running terminal emulation software. Set the terminal emulation software as following: Baud rate: 115200 Data bits: 8 Parity: None Stop bits: 1 Flow control: None 3. When you have correctly set up the terminal, having previously followed the instructions in section "Connecting Power and Turn the Device On/ Off" then switch on your device. The boot sequence appears in the terminal. 4. Once the boot sequence completes, the command prompt is displayed, the device is ready to be configured. Instruction and Cautionary Statement The AC adapter plug of this product is detachable. If an abnormal force is applied to the AC adapter such as by cable tripping, it may generate a gap between AC plug and AC adapter, or the plug may be separated from the adapter. In addition, if the AC plug is broken and you keep using it, there may be a risk of a spark, ignition or smoke. If the AC plug is not attached property or broken as stated above, stop using the product immediately. Align the pin assembly with the adapter body. Slide the pin assembly into the adapter body until it snaps into place. Technical Support and Warranty Policy http://www.dlink.com/support http://www.dlink.com/warranty Federal Communication Commission Interference Statement This device complies with Part 15 of the FCC Rules. Operation is subject to the following two conditions: (1) This device may not cause harmful interference, and (2) this device must accept any interference received, including interference that may cause undesired operation. This equipment has been tested and found to comply with the limits for a Class B digital device, pursuant to Part 15 of the FCC Rules. These limits are designed to provide reasonable protection against harmful interference in a residential installation. This equipment generates, uses and can radiate radio frequency energy and, if not installed and used in accordance with the instructions, may cause harmful interference to radio communications. However, there is no guarantee that interference will not occur in a particular installation. If this equipment does cause harmful interference to radio or television reception, which can be determined by turning the equipment off and on, the user is encouraged to try to correct the interference by one of the following measures: - Reorient or relocate the receiving antenna. - Increase the separation between the equipment and receiver. - Connect the equipment into an outlet on a circuit different from that to which the receiver is connected. - Consult the dealer or an experienced radio/TV technician for help. FCC Caution: Any changes or modifications not expressly approved by the party responsible for compliance could void the user's authority to operate this equipment. Industry Canada statement This device complies with ISED's licence-exempt RSSs. Operation is subject to the following two conditions: (1) This device may not cause harmful interference, and (2) this device must accept any interference received, including interference that may cause undesired operation. Le présent appareil est conforme aux CNR d' ISED applicables aux appareils radio exempts de licence. L'exploitation est autorisée aux deux conditions suivantes : (1) le dispositif ne doit pas produire de brouillage préjudiciable, et (2) ce dispositif doit accepter tout brouillage reçu, y compris un brouillage susceptible de provoquer un fonctionnement indésirable.
-
 1
1 -
 2
2
 |
 |
