Dacor EORS127 Installation Instructions - Page 16
Verifying Proper Operation, Reinstalling the Oven Door Cont - ranges
 |
View all Dacor EORS127 manuals
Add to My Manuals
Save this manual to your list of manuals |
Page 16 highlights
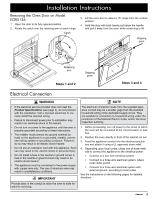
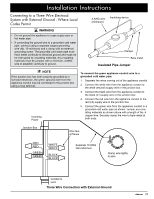
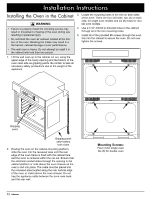
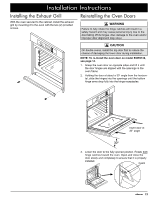
Installation Instructions Reinstalling the Oven Door (Cont) Verifying Proper Operation To re-install the oven door on model EORS136: warning To avoid personal injury or damage to the door from it falling off its hinges: • Make sure that the notch on the bottom of each hinge rests on top of the lower lip of each hinge receptacle before attempting to open the oven door. • Rotate the hinge locks toward the front of the range immediately after installation of the door. 1. Grasp the oven door on opposite sides and hold it at a 15° angle from the front of the oven. Slide the hinges into the hinge openings, resting the bottom of the hinge arms on the hinge receptacles. Continue to hold the door at a 15° angle with one hand while pushing in on each of the bottom corners of the door. Push until the notch on the bottom of each hinge slips over the lower lip of each hinge receptacle. 2. Lower the door to the fully opened position. 3. Rotate the two hinge locks toward the oven. 4. Slowly and carefully open and close the door completely to ensure that it is properly installed. 1. For stainless steel ovens, peel off the protective layer of plastic that covers the stainless steel surfaces. 2. Remove any packaging from inside the oven(s). 3. Slide the oven racks onto the supports inside the oven chamber(s) according to the use and care manual. 4. Turn on power to the oven at the circuit breaker or fuse box. 5. Set the clock according to the use and care manual. note For double ovens, test oven operation for both the upper and lower ovens. 6. Press the BAKE key on the control panel. The default bake temperature should appear on the display. 7. Press START. After approximately three (3) minutes, the lower heating element should glow red through the glass. 8. Press CANCEL/SECURE. 9. Press the BROIL key on the control panel. The default broil temperature should appear on the display. 10. Press START. After approximately three (3) minutes, the upper heating element should glow red. On some ovens the element is behind the glass panel on the ceiling of the oven. 11. If the oven does not operate properly, follow these troubleshooting steps: • Verify that power is being supplied to the oven. • If power is being properly supplied, turn off power at the circuit breaker or fuse box and check the electrical connections. • Turn on power and repeat the above heating test. • If the appliance still does not work, contact Dacor Distinctive Service at (877) 337-3226. Do not attempt to repair the appliance yourself. If you need service, be sure to have the model and serial numbers available when you call. See page 3 for location. Notch on bottom of hinge 14 Lower lip of hinge receptacle
-
 1
1 -
2
-
3
-
4
-
5
-
6
-
7
-
8
-
9
-
10
-
 11
11 -
 12
12 -
 13
13 -
 14
14 -
 15
15 -
 16
16 -
 17
17 -
 18
18 -
 19
19 -
 20
20
 |
 |
