Dacor MORS227 Installation Instructions - Page 14
Installing the Oven in the Cabinet
 |
View all Dacor MORS227 manuals
Add to My Manuals
Save this manual to your list of manuals |
Page 14 highlights
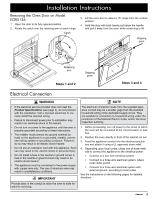
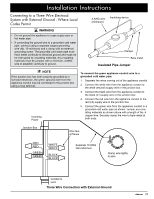
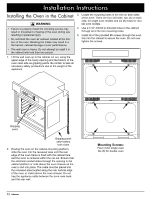
Installation Instructions Installing the Oven in the Cabinet warning • Failure to properly install the mounting screws may result in movement or tipping of the oven during use resulting in personal injury. • Do not block the oven air exhaust located at the bottom of the oven. Blocking the intake may result in a fire hazard, cabinet damage or poor performance. • The wall oven is heavy. Do not attempt to install it in the cabinet with less than two people. 1. Lift the wall oven up to the cabinet cut out, using the upper edge of the cavity opening and the bottom of the oven case side as gripping points. Be certain to take all necessary safety precautions due to the weight of the appliance. 3. Locate the mounting holes in the trim on both sides of the oven. There are four (4) holes, two (2) on each side, for single oven models and six (6) holes for double oven models. 4. Use a 1/16" drill bit to drill pilot holes in the cabinet through all of the trim mounting holes. 5. Install all of the provided #6 screws through the oven trim into the cabinet to secure the oven. Do not overtighten the screws. Gripping point Gripping point: case bottom both sides 2. Resting the oven on the cabinet-mounting platform, slide the oven into the recessed area until the rear edge of the oven frame is flush with the cabinet face and the oven is centered within the cut out. Ensure that the electrical conduit slides through the opening in the cabinet platform or coils above the oven chassis as the oven is slid into place. The cable must be placed into the recessed area located along the rear vertical edge of the oven or coiled above the oven chassis. Do not trap the appliance cable between the oven case back and the rear wall. 12 Mounting Screws: Four (4) for single oven Six (6) for double oven
-
 1
1 -
2
-
3
-
4
-
5
-
6
-
7
-
8
-
 9
9 -
 10
10 -
 11
11 -
 12
12 -
 13
13 -
 14
14 -
 15
15 -
 16
16 -
 17
17 -
 18
18 -
 19
19 -
20
 |
 |
